Registration Hosted Page
Overview
The cidaas registration hosted page enables new users to create accounts and configure their login methods. Before implementing your registration page, consider these key design questions to ensure a smooth onboarding experience.
What identifiers can users register with?
- Determine whether users can register using email address, mobile number, username (User ID), or a combination of these options.
What user information is required?
- Define which fields are mandatory during registration and what additional information should be collected.
Can users register with existing identities?
- Decide whether to enable social login or enterprise SSO, allowing users to register using known identity providers.
Configuration
-
Apply Registration Scope: Configuring
cidaas:registerscope to your app. -
Setup Registration Fields: Configure list of fields to show on the registration page.
-
Select Identifiers: Configure multiple ways by which the user can be identified during login or registration.
-
Password Policy Settings: To encourage users to employ strong passwords and use them properly.
-
Groups and Roles Restriction: To enable restricted access to various features of your app for different groups of users.
Apply Registration Scope
To configure registration page for your app, you must add cidaas:register scope to your app settings.
Configure Registration Scope
- Log in to your Admin Dashboard.
- Navigate to Apps > App Settings.
- Click on Edit button of the app you want to configure.
- Open App Setting and select
cidaas:registerscope from the drop down menu.
Developer Prespective
You can also register scope via API call.
| API | Description | Link |
|---|---|---|
| Register scope | This API call enables the creation and updating of a scope and its subsequent addition to the resource protection, where necessary. | View API |
Setup Registration Fields
Prerequisite
Before proceeding with the registration hosted page, verify that the user doesn't already exist in cidaas using the check user exists API.
If the user already exists in cidaas, then you could redirect to the login page.
Configure Registration Fields
Customize your registration page by defining the fields to display and specifying which ones are mandatory for user completion.
-
Log in to your Admin Dashboard.
-
Navigate to Apps > App Settings.
-
Click on Edit button of the app you want to configure.
-
Click on Advanced Settings > Registration Fields.
-
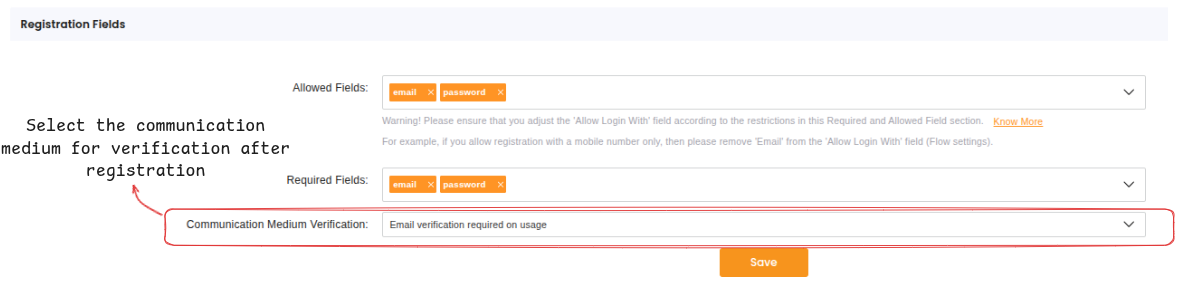
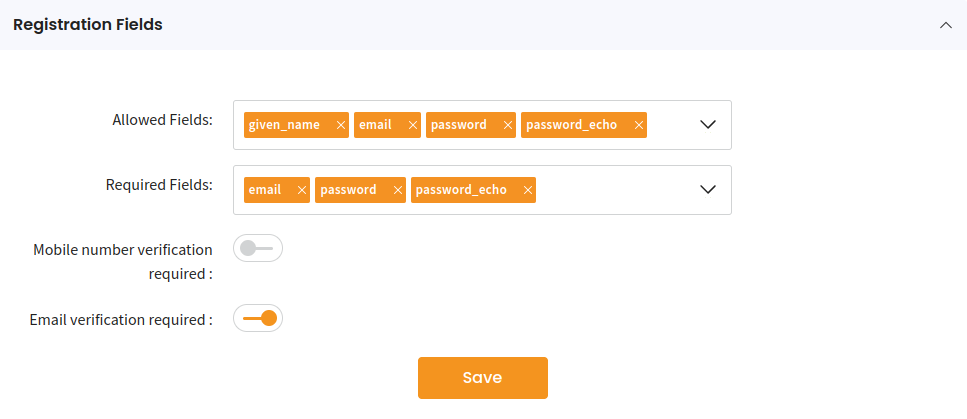
Add the Allowed fields and Required fields for your Registartion page.
-
Setup the communication medium after Registration.
- Mobile and email verification required
- Mobile verification required
- Email verification required
- Verification required on usage
- Email verification required on usage
- Mobile verification required on usage
-
Click Save.
You can also create new fields/field groups by following the steps below:
Register a new field
-
Log in to your Admin Dashboard.
-
Navigate to Settings -> Registration Page Fields
-
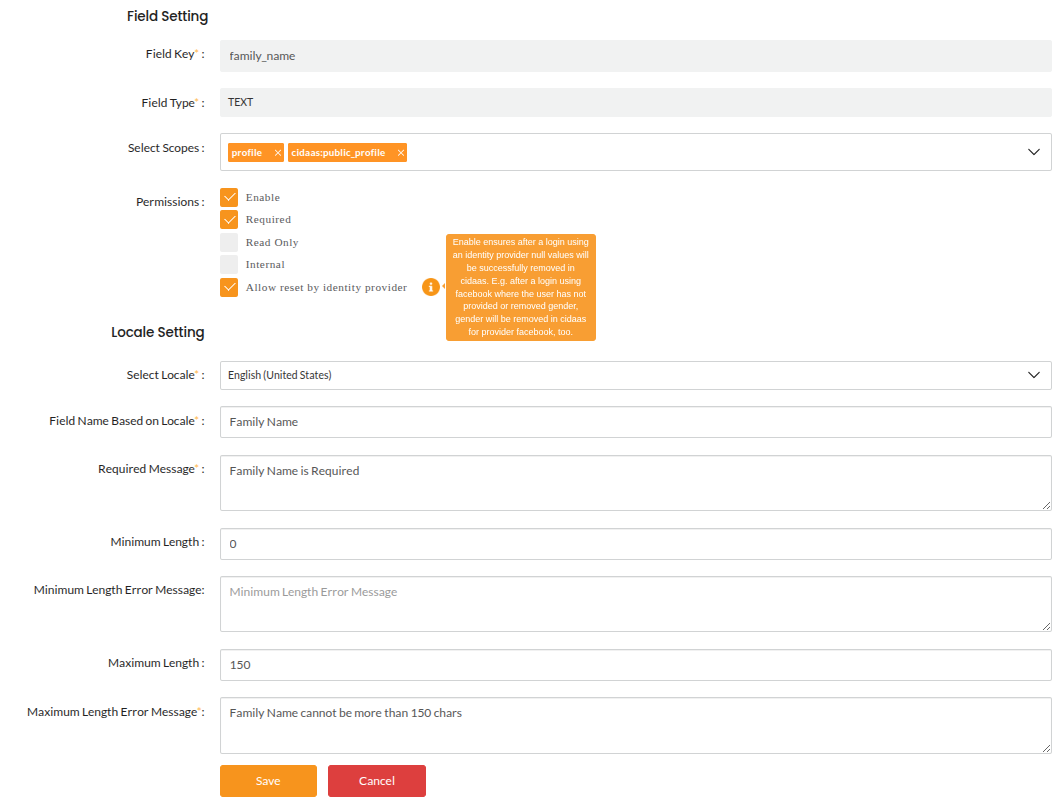
Click on "+" icon to Create field.
-
Add your field key and choose its type, scope, and permissions.
-
Add the Locale settings and click Save.
Developer Prespective
| API | Description | Link |
|---|---|---|
| Get registration fields | Use this API to get all the registration fields configured for your app | View API |
- If you wish to add new fields/remove some fields from the registration page, then you need to update the fields configured for your app. For that you can use the following APIs:
| API | Description | Link |
|---|---|---|
| Get app details | Use this API to get all the allowed and required fields configured for your app | View API |
| Get all registration fields | This API will return all the registration fields available for your instance. You can choose the fields you want to configure for your app from the response of this API | View API |
| Save app details | Use this API to save all your changes | View API |
Setup Identifiers
Registration identifiers uniquely identify users in cidaas. Users can choose to register and log in using email address, mobile number, or username. Each identifier must be unique across all users, ensuring no duplicate accounts exist in the system
Configure Identifiers
-
Log in to the Admin Dashboard
-
Go to Apps -> App Settings
-
Click on the Edit button of the app you want to configure.
-
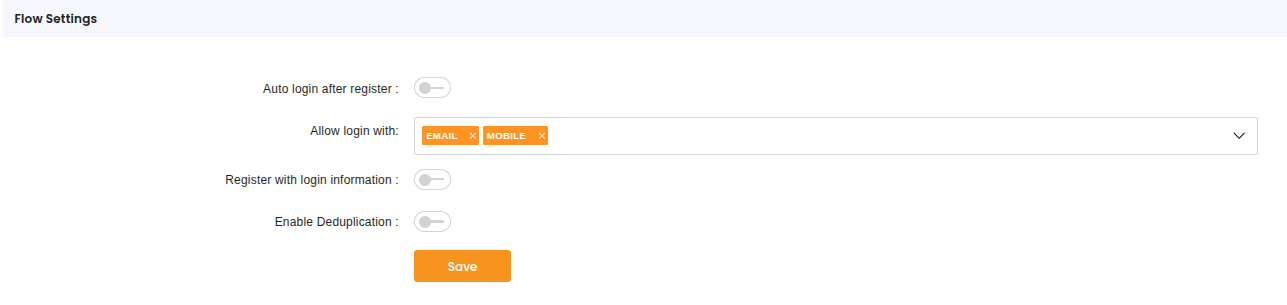
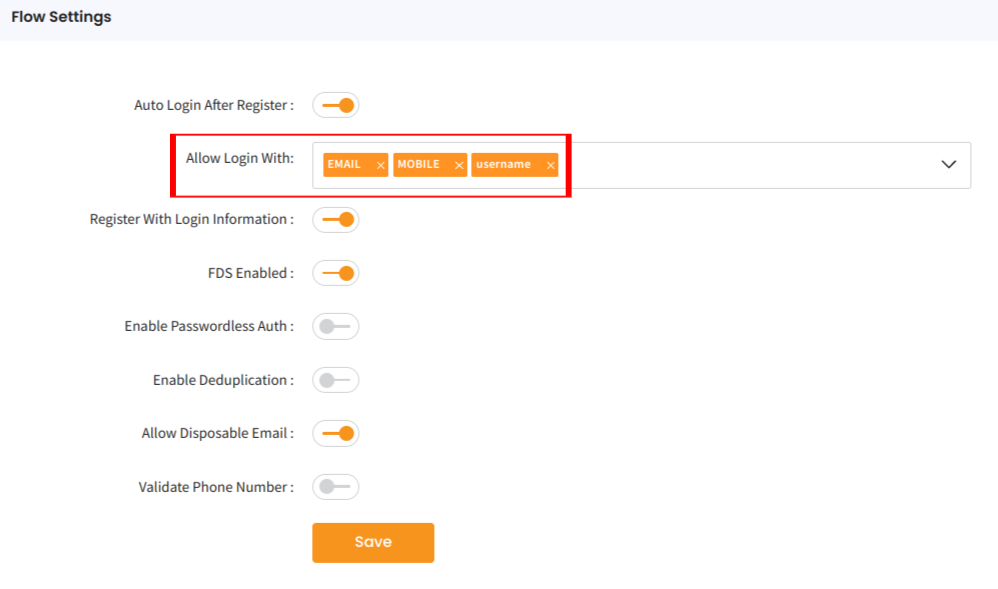
Click on Advanced Settings > Flow Settings and select the desired identifiers from the Allow Login with drop down menu.
-
Select the other desired flows to have more control over registration information and Save.
Developer Prespective
| API | Description | Link |
|---|---|---|
| Add identifiers | Add or update identifiers app.allow_login_with using API | View API |
Setup Password Policy Settings
Password policies enhance security by enforcing rules for strong password creation. Apply password policy settings to your registration page to ensure users set passwords that meet your security standards.
To create a new password policy, you can refer this document.
Configure Password-Policy
-
Log in to the Admin Dashboard
-
Go to Apps -> App Settings
-
Click on the Edit button of the app you want to configure.
-
Click on Advanced Settings > Password Policy and select the desired policy from the drop down menu.

Developer Prespective
| API | Description | Link |
|---|---|---|
| Get list of password policy | Get the list of the password policy that you utilize | View API |
| Configure password policy | Configure the desired password policy using this API | View API |
| Upsert password policy | Update or Insert the desired password policy using this API | View API |
Setup Groups and Roles Restriction
Group and role restrictions control who can register for your application. Configure these settings to allow only users from specific groups with designated roles (e.g., admin, manager) to complete registration and access your app.
Configure Groups and Roles Restriction
-
Log in to the Admin Dashboard
-
Go to Apps -> App Settings
-
Click on the Edit button of the app you want to configure.
-
Click on Advanced Settings > Groups & Role restriction.
-
Under Login restriction and groups, select the Roles from the list for cidaas group, cidaas Admin group.
-
Click Save to apply your selections.
To know more about the configuration of Groups and Roles Restriction you can refer to this page
Developer Prespective
| API | Description | Link to API |
|---|---|---|
| Check user group restrictions | This API call validates user group restrictions | View API |
| Get all group verification requests | This API call reads all the Group Verification Requests. | View API |
| Create new group verification request | This API creates group verification requests that represent user access filters. | View API |
| Get group verification request by id | This API endpoint gets group Verification requests by ID. | View API |
| Update group verification request by id | This API endpoint updates group Verification requests by ID. | View API |
| Delete group verification request by id | This API endpoint deletes group Verification requests by ID. | View API |
| Verify user group restrictions | This API call verifies user group access by verification request ID and user sub. | View API |
Explore Related Topics
| API | Description | Link |
|---|---|---|
| Get app details | Use this API to get all the allowed and required fields configured for your app | Link |
| Get all registration fields | This API will return all the registration fields available for your instance. You can choose the fields you want to configure for your app from the response of this API | Link |
| Save app details | Use this API to save all your changes | Link |
Configuring Registration Fields from Administrative Perspective
The setup can also be done via admin portal as shown below:
If you want to add new registration fields for your registration page, you can create new fields/field groups by following the steps below:
-
Navigate to Settings -> Registration Page Fields -> Create field
-
Add your field key and choose its type, scope, and locale.

-
You can also set length validation for those fields.

Select Identifiers
On a registration page, identifiers are used to provide user identification. The user can use multiple options to register, e.g., they may select email, mobile number, or username for registering or logging in. These identifiers are unique and cannot be shared between users. (cidaas does not allow duplicate users.)
Configuring Identifiers via APIs
| API | Description | Link |
|---|---|---|
| Add identifiers | Add or update identifiers using API | Link |
Configuring Identifiers from Administrative Perspective
- Go to Apps -> App Settings
- Click on the edit button of the app you want to configure.
- Open Advanced Settings -> Flow Settings and select the desired identifiers rom the Allow Login with option as shown below:
Enable Verification Methods
Verification is an essential step in securing your identity, and therefore cidaas needs to know which verification methods you are going to apply:
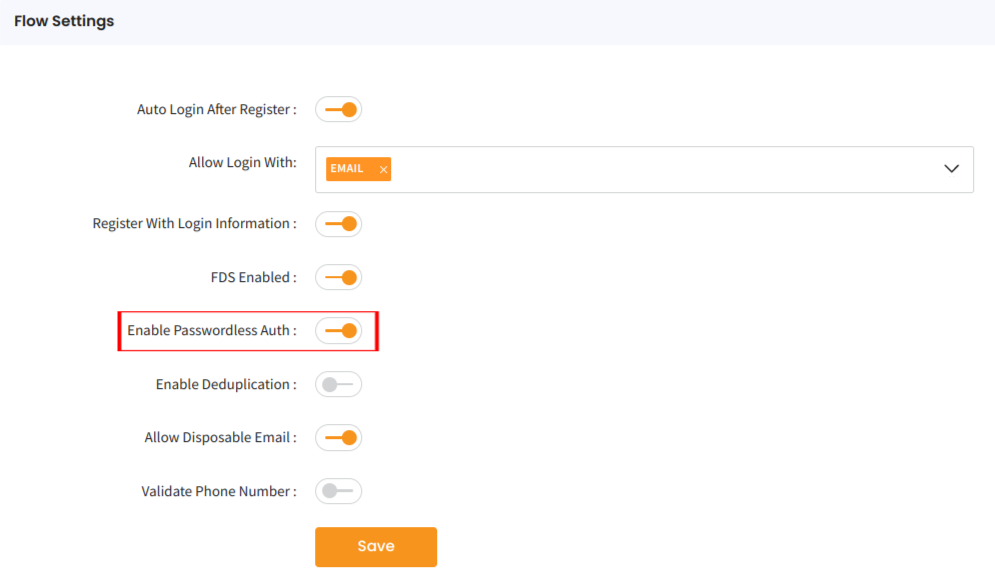
- Verification requires the setting of a password during registration, but you may not want your users to remember passwords every time, so you can enable passwordless verifications, like one-time passwords using
SMS or email, where a mobile number or emailis required.
Configuring verification methods via APIs
To access this feature, first you need to initiate the process of verification and then authenticate with the unique code or number received.
| API | Description | Link |
|---|---|---|
| Initiate API | This API is used to initiate the verification of the user depending on the type of verification configured. | Link |
| Authenticate API | This API is used to initiate authentication depending on the type of verification configured. | Link |
Configuring Verification methods from Administrative Perspective
To choose the verification methods, you can:
- Navigate to Apps -> App Settings
- Click on edit button of the app you want to configure.
- Open Advanced Settings -> Flow Settings and enable the
passwordless authenticationoption as shown below:
Password Policy Settings
The Password Policy is a set of rules designed to enhance cidaas portal by encouraging users to employ strong passwords and use them properly. cidaas password policy is designed in such a way that users choose better passwords.
By configuring the password policy for the registration page, you can ensure that users can set strong passwords for their applications.
Configuring Password-Policy via API
| API | Description | Link |
|---|---|---|
| Get list of password policy | Get the list of the password policy that you utilize | Link |
| Configure password policy | Configure the desired password policy using this API | Link |
Configuring Password-Policy from an administrative perspective
Go to Apps -> Edit App -> App Settings -> Advance Settings -> Password Policy Settings, and select the password-policy you want to set from the list of configured options as shown below:

Configuring and Mapping Password-Policy via API
To create a new password policy from administrative perspective, you can refer this page .
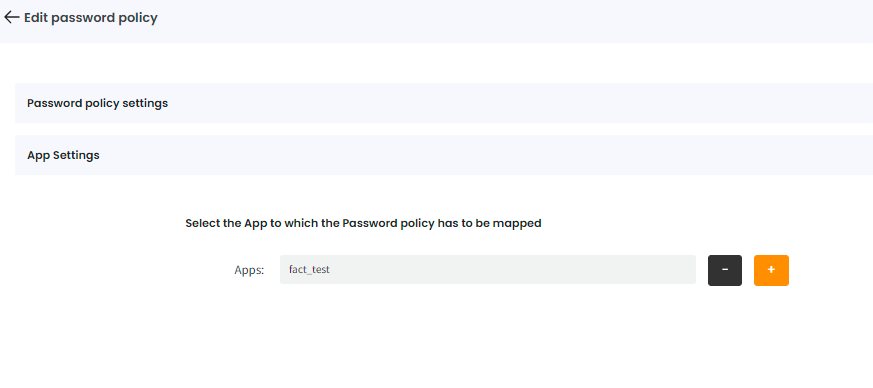
Configuring and Mapping Password-Policy from an administrative perspective
Go to Settings -> Password Policy -> Edit password policy > App Settings, and select the App to which the password-policy has to be mapped as shown below:
Groups and Roles Restriction
You can add or configure the Groups and Role restrictions in the registration page to allow only specific users belonging to a specific group (within cidaas or in your organization) mapped to allowed roles like admin, manager, etc., to access your app.
Integrating Groups and Roles Restriction via APIs
To configure Groups and Roles Restriction settings for your application, you can use Groups and Roles Restriction API.
Configuring Groups and Roles Restriction from Administrative Perspective
-
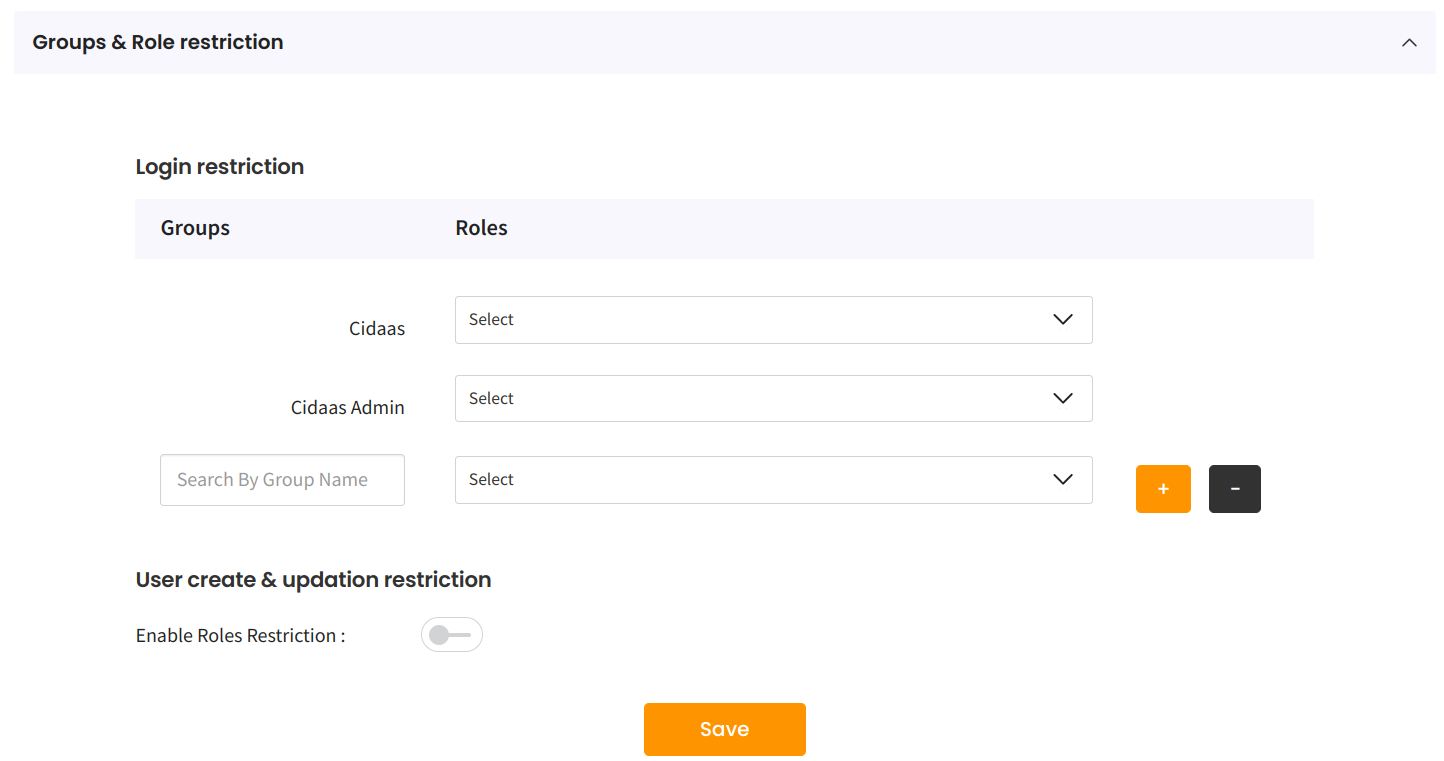
For this, go to Apps > Edit App > App Settings > Advance Settings > Groups & Role restriction.
-
Under Login restriction, select the Roles from the list for cidaas group, cidaas Admin group, and the Custom group created for your organization. Then, save your selections.
-
After this configuration, only the user groups and roles mapped to your app, in the advanced settings configuration will be allowed to log in.
To know more about the configuration of Groups and Roles Restriction you can [refer to this page]/guides/user-management/setup/user-groups)
Once you have configured registration fields in your app settings, the registration page should look like the page shown below,
Related Pages
-
Login Page might be presented first and if user doesn't exist the user may register.
-
Progressive Registration may be presented after the user has registered in one app to collect further information about the user and eventually user consents.
Please contact us directly on our support page or reach out to cidaas support at [email protected].