Multi-Factor Authentication Required
Overview
cidaas allows you to enforce multi-factor authentication (MFA) as a token condition that must be fulfilled before a token is issued. This provides an additional layer of security by requiring users to authenticate using a second factor after their initial login credentials.
The Multi-Factor Authentication is one of the multiple token conditions that are evaluated before issuing a token.
Introduction to MFA Precheck
What is MFA Precheck?
Multi-Factor Authentication (MFA) is a security mechanism that requires users to provide two or more verification factors to gain access to an application. The MFA precheck ensures that users complete this additional authentication step before receiving an access token.
When is MFA?
MFA precheck is triggered when redirecting to the MFA page if one of the following prerequisites is met:
-
MFA by App Setup - The application has MFA configured with one of these modes:
- ALWAYS: MFA is always required for all users accessing this application
- SMART: cidaas automatically determines if MFA is needed based on risk factors, suspicious activities, or user behavior patterns (Smart MFA)
- TIME_BASED: Users must re-authenticate with MFA after a configured time period
-
MFA Enabled on User Account Level - The user has
mfa_enabledflag set totrueon their account, regardless of app-level settings
| Scenario | Description | Configuration |
|---|---|---|
| App-level MFA (ALWAYS) | MFA is always required for a specific application, requiring all users to complete MFA when accessing that app | 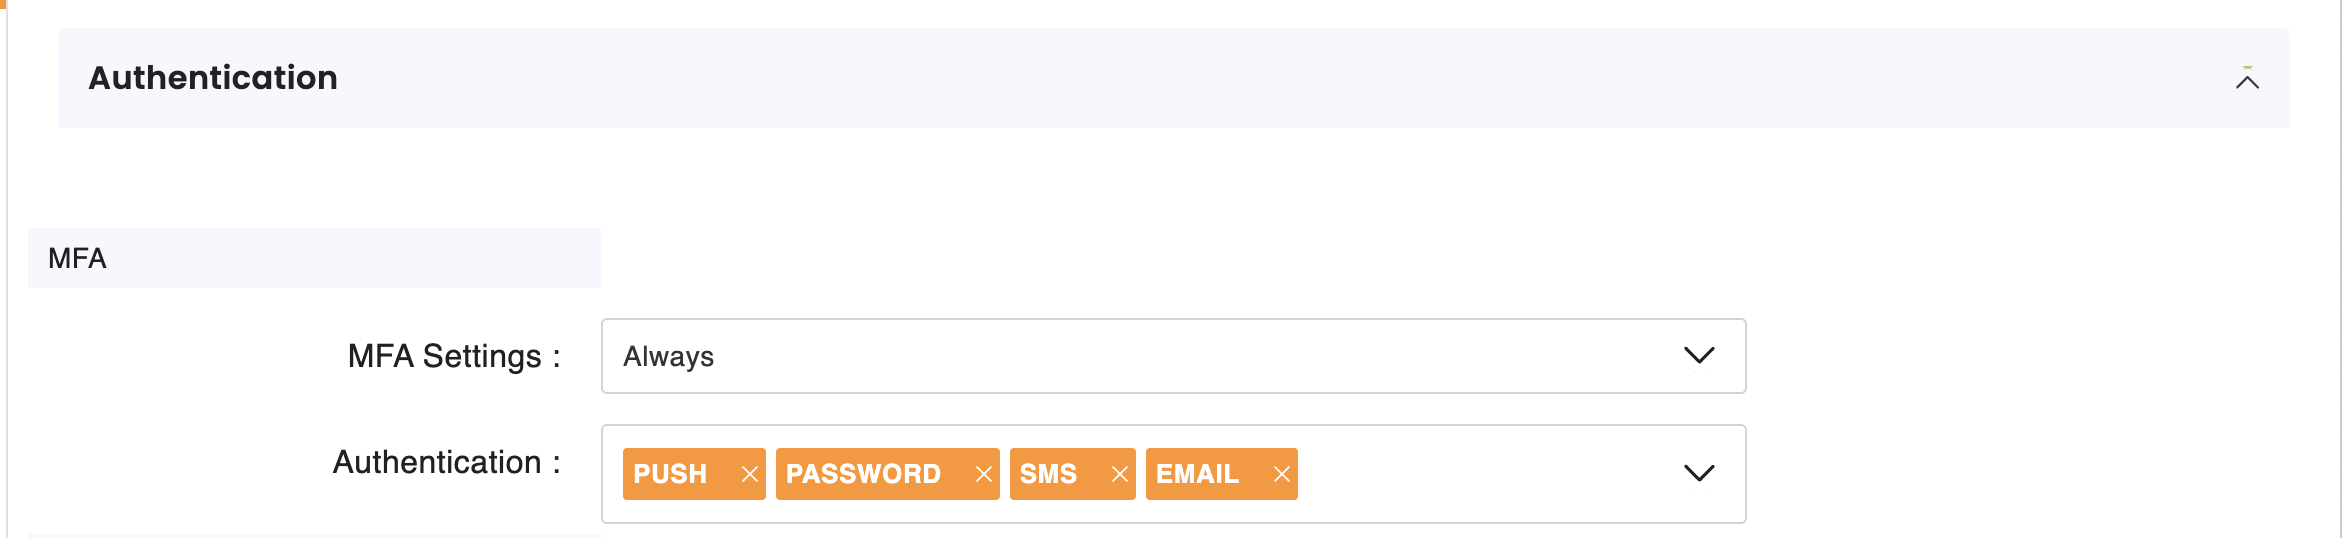 |
| App-level Smart MFA | cidaas automatically determines if MFA is needed based on risk factors, suspicious activities, or user behavior patterns | Configured in app settings with mode: SMART |
| App-level Time-based MFA | Users must re-authenticate with MFA after a configured time period | Configured in app settings with mode: TIME_BASED |
| User-level MFA | A specific user has MFA enabled on their account (mfa_enabled flag set to true) | Configured per user account |
Benefits
- Enhanced Security: Adds an additional layer of protection beyond passwords
- Risk-based Authentication: Smart MFA can trigger based on suspicious activities
- Compliance: Helps meet security requirements for sensitive applications
- Flexible Configuration: Can be enabled at app, user, or tenant level
- Multiple Methods: Supports various MFA methods (SMS, Email OTP, TOTP, Biometric, etc.)
How it works
When MFA is required:
- Token generation pauses - The issuance process is interrupted after initial authentication
- User is redirected - The user is directed to the MFA verification page
- MFA methods are presented - Available MFA methods are displayed for user selection
- Verification is required - The user must complete MFA verification before receiving a token
This ensures that even if credentials are compromised, an attacker cannot access the application without the second factor.
Understanding the Flow and APIs
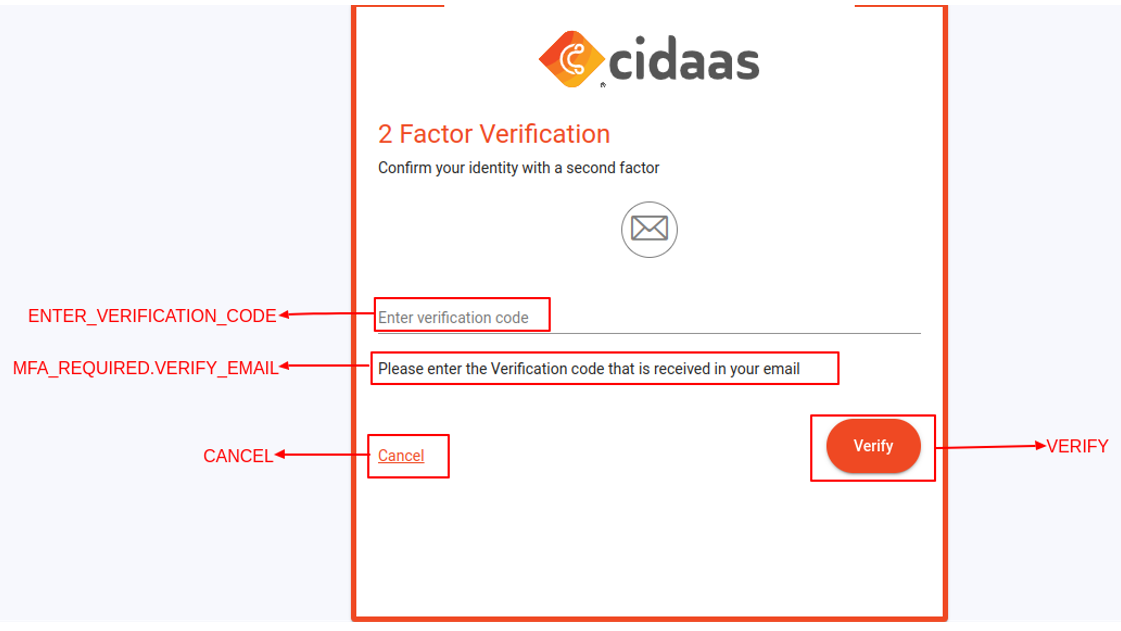
Step 1: Redirection to MFA Verification
After successful initial authentication (username/password), the user will be redirected to the MFA verification page if MFA is required.
This might look like this:

curl 'https://demo.cidaas.de/identity/mfa_required?track_id=958ccb4c-3985-4b17-b325-14cd10da292e&requestId=d8ada94d-47e6-4133-9ae3-b5f0a864f7f5&sub=a05b5498-a8f2-4cf4-89b9-bd2fc0b5e13b' \
  --compressed
The URL is defined by the hosted page key: mfa_required.
track_id which is required as input for the subsequent steps. Furthermore, the hosted page mfa_required is used, which can be configured using the admin dashboard or administrative APIs for managing hosted pages. The track_id is required as input for Step 5 to continue the login process.Step 2: Understanding the Response of Token Prelogin Metadata
The API to return the prelogin metadata information allows you to determine that MFA is required and which verification methods are available.
curl 'https://demo.cidaas.de/token-srv/prelogin/metadata/958ccb4c-3985-4b17-b325-14cd10da292e?acceptLanguage=en-US' \
  --compressed
The response will indicate that mfa_required is the validation type and includes the user's configured MFA methods:
{
  "data": {
    "logged_in": false,
    "validation_type": "mfa_required",
    "meta_data": {
      "amr_values": [
        "10"
      ],
      "userConfiguredMethods": [
        {
          "type": "SMS"
        },
        {
          "type": "FIDO2"
        }
      ]
    },
    "used": false
  }
}
The userConfiguredMethods array contains the MFA methods that are available and configured for the user. Each method has a type (e.g., "EMAIL", "SMS", "TOTP", "FIDO2") and mediums array (which may contain specific medium identifiers).
validation_type of mfa_required indicates that MFA must be completed before the token can be issued. The userConfiguredMethods in the metadata response shows which MFA methods are available for this user.Step 3: Initiate MFA Verification
Use the userConfiguredMethods from the prelogin metadata response (Step 2) to display available MFA methods to the user. Once the user selects an MFA method, initiate the verification process:
curl 'https://demo.cidaas.de/verification-srv/authentication/SMS/initiation' \
  -X 'POST' \
  -H 'Content-Type: application/json' \
  --data-raw '{
    "track_id": "958ccb4c-3985-4b17-b325-14cd10da292e", //returned in url
    "requestId": "d8ada94d-47e6-4133-9ae3-b5f0a864f7f5", //request Id available in url
    "usage_type": "MULTIFACTOR_AUTHENTICATION",
    "sub":"a05b5498-a8f2-4cf4-89b9-bd2fc0b5e13b" //masked sub returned in url
  }' \
  --compressed
Replace SMS with the selected verification type (e.g., EMAIL, TOTP, FINGERPRINT, etc.).
Step 4: Complete MFA Verification
After the user receives the OTP or completes the verification method, verify it:
curl 'https://demo.cidaas.de/verification-srv/authentication/SMS/verification' \
  -X 'POST' \
  -H 'Content-Type: application/json' \
  --data-raw '{
    "exchange_id": "958ccb4c-3985-4b17-b325-14cd10da292e", //exchange_id returned in exchange_id.exchange_id from initiation response
    "sub":"a05b5498-a8f2-4cf4-89b9-bd2fc0b5e13b" //masked sub returned in url
    "code": "123456"
  }' \
  --compressed
For TOTP or other methods, the request body will vary based on the verification type.
Step 5: Continue the Login Process
After successful MFA verification, continue the login process to receive the token:
curl 'https://demo.cidaas.de/login-srv/precheck/continue/958ccb4c-3985-4b17-b325-14cd10da292e' \
  -X 'POST' \
  --compressed
This will complete the authentication flow and redirect to your redirect_uri with the authorization code or issue the token directly, depending on your grant type.
Developer Perspective
| API | Description | Link |
|---|---|---|
| GET Pre-Login Metadata | This API provides information about which precheck is required, including mfa_required, and the userConfiguredMethods array with available MFA methods | View API |
| POST Initiate Verification | Initiates the MFA verification process for the selected method | View API |
| POST Verify Authentication | Completes the MFA verification by providing the verification code or completing the challenge | View API |
| POST Continue Login | Continues the login process after successful MFA verification to issue the token | View API |
Implementation using SDKs
This Implementation Guide is based on the default hosted pages which uses an Angular framework based on TypeScript. It can be implemented in any other programming language as well.
As a first step you will be redirected to the mfa_required page. This section shows the APIs to be called when reaching this page.
To install the cidaas-sdk please perform the following command:
npm install cidaas-javascript-sdk
The import to your webapp will be done by using:
this.cidaas_sdk = new WebAuth(options)
Step 1: Checking if MFA is Required
First, check the prelogin metadata to determine if MFA is required:
const resp = await this.cidaas_sdk.getPreloginMetadata({
  track_id: this.route.snapshot.queryParams['track_id'],
  acceptLanguage: navigator.language,
});

if (resp.data.validation_type === 'mfa_required') {
  // Proceed with MFA flow
}
Step 2: Displaying Available MFA Methods
Use the userConfiguredMethods from the prelogin metadata response (Step 1) to display available MFA methods to the user:
// userConfiguredMethods is already available from Step 1 response
const availableMethods = resp.data.meta_data.userConfiguredMethods;

// Display available methods to user
// Each method has a 'type' property (e.g., "EMAIL", "SMS", "TOTP", "FIDO2")
Step 3: Initiating MFA Verification
Once the user selects a method, initiate the verification:
const selectedMethod = 'SMS'; // or 'EMAIL', 'TOTP', etc.

const initiationResponse = await this.cidaas_sdk.initiateVerification({
  verificationType: selectedMethod,
  track_id: this.route.snapshot.queryParams['track_id'], // returned in url
  requestId: this.route.snapshot.queryParams['requestId'], // request Id available in url
  usage_type: 'MULTIFACTOR_AUTHENTICATION',
  sub: this.route.snapshot.queryParams['sub'], // masked sub returned in url
});
Step 4: Completing MFA Verification
After the user receives the OTP or completes the verification challenge:
// exchange_id comes from the initiation response: initiationResponse.data.exchange_id.exchange_id
const resp = await this.cidaas_sdk.verifyAuthentication({
  verificationType: selectedMethod,
  exchange_id: initiationResponse.data.exchange_id.exchange_id, // exchange_id returned in exchange_id.exchange_id from initiation response
  sub: this.route.snapshot.queryParams['sub'], // masked sub returned in url
  code: userEnteredCode, // OTP code or verification data
});
Step 5: Continue the Login Process
After successful MFA verification, continue the login:
const resp = await this.cidaas_sdk.precheckContinue({
  track_id: this.route.snapshot.queryParams['track_id'],
});
This will complete the authentication flow and redirect to your application with the authorization code or token.
Explore Related Topics
- Smart Multi-Factor Authentication
- Communication Verification
- Password Change
- Group Selection
- Verification Methods Overview
Please contact us on our Support Portal.