Group Selection
Overview
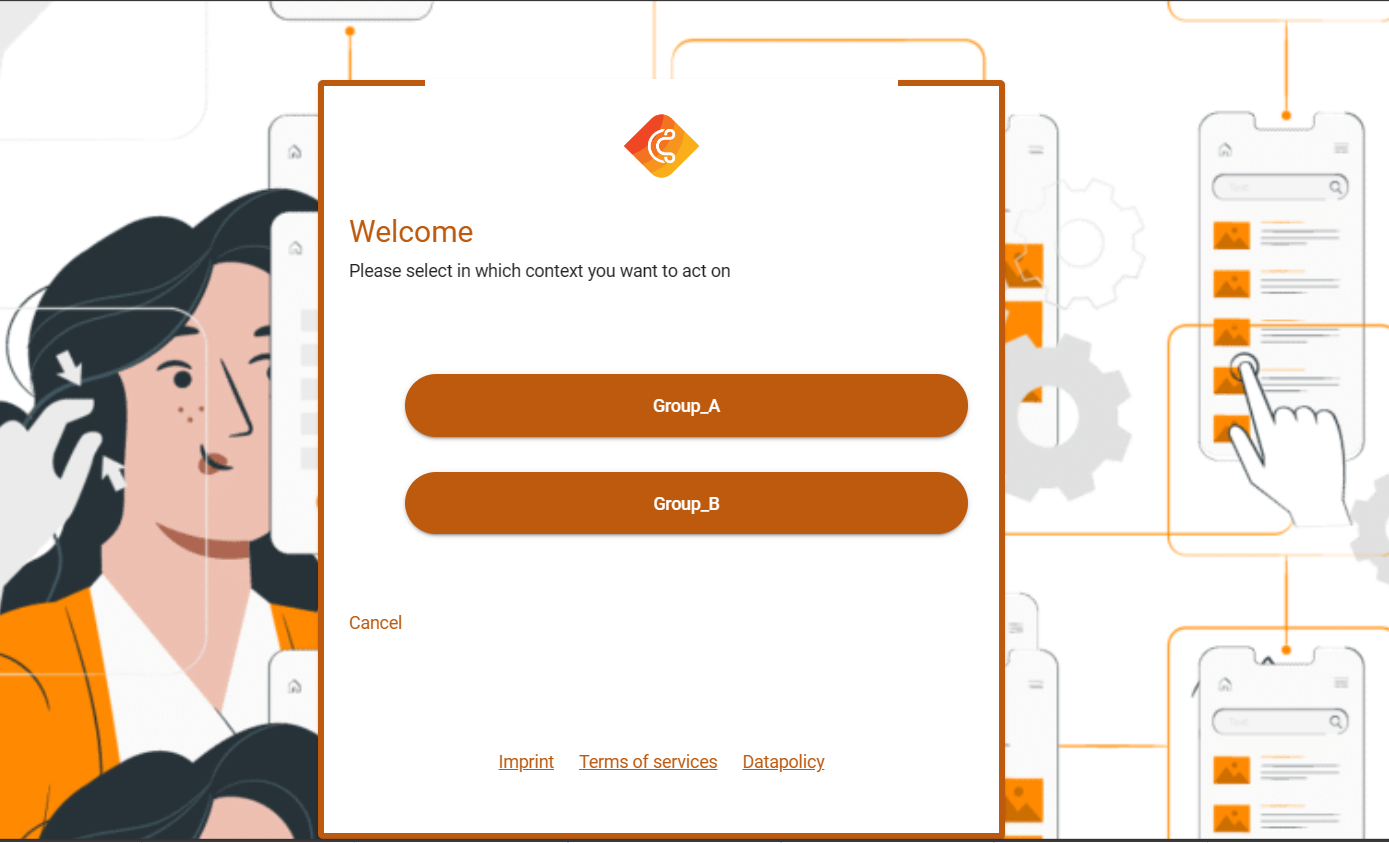
Group selection is a functionality offered by cidaas that gives users the ability to choose the configured groups with which they want to interact with cidaas. When group selection is activated, users are prompted to decide which group they wish to engage with.
Upon activation, the user is presented with a list of existing groups, and they are prompted to select the relevant group. If the chosen group is part of the configured list, this selection is then incorporated into the access token, providing a way to carry context-specific information throughout their interaction with the system.
Introduction to Groups Selection
What are groups?
Groups play a role in managing users based on roles or attributes. Users can be organized into groups, each representing a specific role or level of access. They define broader categories of users, each with its own set of permissions.
For example:
A Group_A that has Admins rights will have access to system functionalities.
A Group_B that has Users rights will have limited access with fewer privileges.
Prerequisites
- User must have multiple groups: Users need to be assigned to multiple groups for group selection to be meaningful. If a user only has one group, no selection prompt will appear.

How to Configure Group Selection
To enable group selection for your application, follow these steps:
- Navigate to Apps > App Settings in the cidaas admin portal
- Click the Edit App icon for the application you want to configure
- Scroll down and click on Advanced Settings
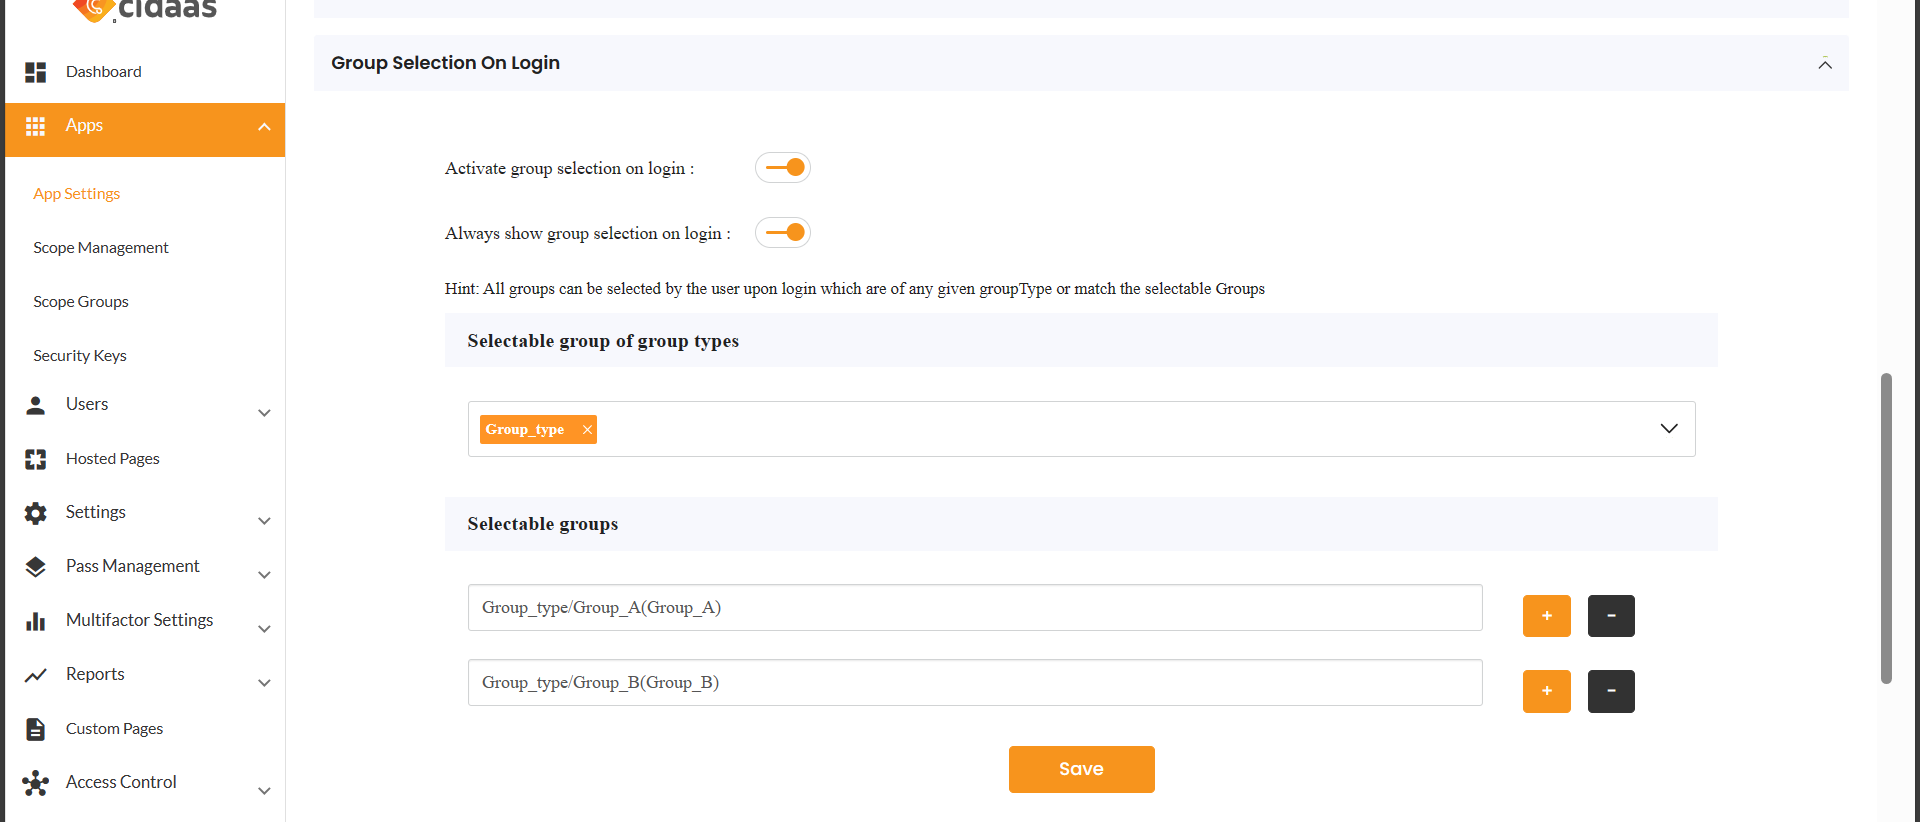
- Scroll down and click on Group Selection on Login

Configuration Options
Activate Group Selection on Login
- Purpose: Enables the group selection feature during login
- Behavior: When enabled, users with multiple groups will be prompted to select a group during authentication
Always Show Group Selection on Login
- Purpose: Forces group selection screen to always display during login
- Behavior: Users will be prompted to choose a group every time they log in, even during Single Sign-On (SSO) when moving between applications
- Use Case: Ensures users are always aware of and can choose their context, making it easy to work in the right group within each application
Selectable Groups
- Purpose: Restricts which groups users can select during login
- Behavior: Users will only see groups that are specified in the 'selectable groups' settings
- Use Case: Limit login access to specific groups only
Selectable Group Types
- Purpose: Allows users to select any group that falls under a specified group type
- Behavior: Users can select from all groups of a specific type during the login process
- Use Case: Organize groups by categories or classifications (e.g., "department", "location", "role_type")
When is Group Selection Shown to Users?
Group selection UI is displayed to users when ANY of the following conditions are met:
| Condition | Description | Example Scenario |
|---|---|---|
| Always Show enabled | Always Show Group Selection on Login is enabled for the application | User logs in and is always prompted to select a group, even if they have a valid previous selection |
| Client forces selection | Client includes prompt=select_group in the authorization request | Application explicitly requests group selection using GET /authz-srv/authz?prompt=select_group&... |
| Invalid previous group | Previously selected group is no longer valid for current application | User previously selected "Sales Team" but current app only allows "Engineering Team" and "Marketing Team" |
| No previous selection | No previous group selection exists and group selection is configured | First time user logs in or previous selection was cleared |
| User has multiple groups | User belongs to multiple groups and group selection is configured | User is member of "Marketing Team", "Engineering Team", and "Sales Team" |
Group Selection Behavior
cidaas provides group selection functionality with intelligent group validation and client-initiated selection prompts.
Key Features
- Smart Group Validation: Validates if previously selected groups are still selectable for the current application
- Client-Initiated Selection: Clients can force group selection UI using
prompt=select_groupin authorization API - Clean Token Data: Removes irrelevant group information when no group selection is configured
Group Validation Logic
The system validates if a previously selected group is still applicable for the current application:
Validation Flow:
IF user has a previously selected group:
  AND group selection is configured for current app:
    IF previous group is in current app's selectable groups:
      → Use previous group (no prompt)
    ELSE:
      → Force new group selection
  ELSE (no group selection configured):
    → Remove group from token
Validation Criteria:
A previous group is considered still selectable if:
- The group ID exists in the current app's
SelectableGroupslist, OR - The group type exists in the current app's
SelectableGroupTypeslist
How to Enforce Group Selection
Method 1: Using Always Show Group Selection Setting
Enable Always Show Group Selection on Login in the app settings. This ensures users are always prompted to select a group during every login, including SSO scenarios.
Method 2: Using Prompt Parameter in Authorization Request
Clients can programmatically force group selection by including prompt=select_group in the authorization request:
GET /authz-srv/authz?
  response_type=code&
  prompt=select_group&
  client_id=your_client_id&
  redirect_uri=your_redirect_uri&
  scope=openid
Behavior with Prompt Parameter:
- Overrides renewal logic: Even for token renewals, group selection UI will be shown
- Respects app configuration: Only works if group selection is configured for the application
- Use Case: Allows applications to give users the option to change their group context on-demand, even if they have a valid previous selection
Example Use Case:
- User is logged in with "Marketing Team" group
- User navigates to a page where they want to switch to "Engineering Team"
- Application redirects to authorization endpoint with
prompt=select_group - User is prompted to select a group, allowing them to switch context
Behavior with prompt=none
When a client uses prompt=none in the authorization request, the system attempts to authenticate without any user interaction. However, if group selection is required (due to app configuration or invalid previous group), the authorization request will fail with an interaction_required error.
Example:
GET /authz-srv/authz?
  response_type=code&
  prompt=none&
  client_id=your_client_id&
  redirect_uri=your_redirect_uri
Response when group selection is required:
{
  "error": "interaction_required",
  "error_description": "group_selection_required"
}
Use Case:
This is useful for silent authentication flows (e.g., iframe-based SSO checks) where you want to detect if user interaction is needed. If interaction_required is returned, the client should redirect to the authorization endpoint without prompt=none to allow the user to select a group.
When Groups are Removed from Tokens
Groups are removed from tokens when:
- No group selection is configured for the current application
- Previously selected group is invalid and no new selection is made
Token Renewal Behavior
For token renewals:
- With valid previous group: Skip group selection (unless forced by prompt)
- With invalid previous group: Force new group selection
- With prompt parameter: Always show group selection
- No group selection configured: Remove groups from token
User Experience Scenarios
-
Scenario 1: Valid Previous Group
User Context: Previously selected "Marketing Team" groupCurrent App: Has "Marketing Team" in selectable groupsResult: Token renewed with "Marketing Team" (no prompt) -
Scenario 2: Invalid Previous Group
User Context: Previously selected "Sales Team" groupCurrent App: Only allows "Engineering Team" and "Marketing Team"Result: User prompted to select from available groups -
Scenario 3: Client-Forced Selection
User Context: Valid previous group existsClient Request: Includes prompt=select_groupResult: User prompted for group selection despite valid previous group -
Scenario 4: No Group Selection Configured
User Context: Previously selected "Marketing Team" groupCurrent App: No group selection configuredResult: Group removed from token, no prompt shown
Understanding the Flow and APIs
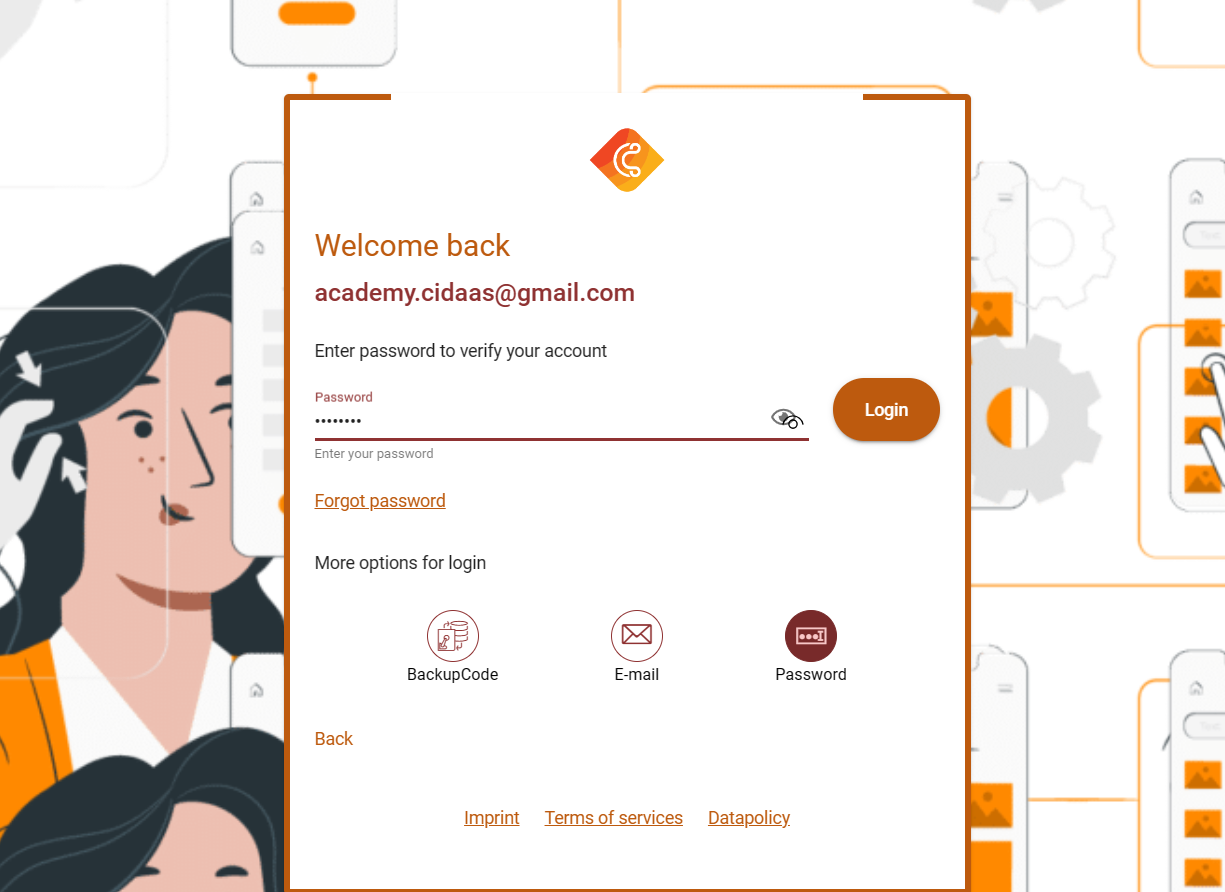
Step 1: Rendering to the User Verification Methods
Before initiating password authentication, you will perform an Authorization (Authz) call and use the requestId in the upcoming calls.
The first call will be to get the configured verification methods for a user. Based on the response you provide a selection of verification methods for your user. A demo of how this can look is to present different icons:
Request
curl --location '{base_url}/verification-srv/v2/setup/public/configured/list' \
--header 'content-type: application/json' \
--data-raw '{
    "request_id": "{{requestId}}",
    "email": "{{email}}"
}'
The response contains the list of all verification methods the user could use. It already filters if the client allows the verification method. Furthermore the medium id is required, it will be provided in the initiation request. The type specifies the verification method and will be provided as value in the initiation request, too.
Response
{
    "configured_list": [
        {
            "type": "EMAIL",
            "mediums": [
                {
                    "id": "72873fb5-0c21-4f15-b4f5-c4a0824e09f4",
                    "key_name": "aca******as@w***s.in"
                }
            ]
        },
        {
            "type": "PASSWORD"
        }
    ]
}
Step 2: Initiating the Authentication
When the user now selects password, you need to initiate the authentication using password as parameter.
Request
curl --location '{base_url}/verification-srv/authentication/password/initation' \
--header 'content-type: application/json' \
--data-raw '{
    "usage_type": "PASSWORDLESS_AUTHENTICATION",
    "request_id": "10696da7-a92a-43d8-bc6e-428c1f6025f1",
    "medium_id": "PASSWORD",
    "type": "password",
    "email": "[email protected]"
}'
The response contains a status_id and exchange_id, those are unique for this process and the following steps will rely on this being provided. If Status is 200, the initiation was successfully triggered.
Response
{
    "success": true,
    "status": 200,
    "data": {
        "exchange_id": {
            "exchange_id": "6915d3b2-c183-40aa-aa2c-e9c82eedda09",
            "expires_at": "2024-01-12T13:11:17.203Z",
            "_id": "93f9d23c-09cc-4947-8df6-87190430409f",
            "createdTime": "2024-01-12T12:41:17.204Z",
            "updatedTime": "2024-01-12T12:41:17.204Z",
            "__ref": "4908129189115a60:736d055ffe8243d2:4908129189115a60:0",
            "id": "93f9d23c-09cc-4947-8df6-87190430409f"
        },
        "sub": "c873de5d-53ce-47-0fce41722138",
        "status_id": "c0667444-1f71-45c5-8f8c-1f7b4"
    }
}
exchange_id and masked sub which are required as input for Step 3Step 3 : Performing the Authentication
Using the exchange_id, requestId, type and password sent in the request the actual authentication will now take place.
curl --location '{base_url}/verification-srv/authentication/password/initation' \
--header 'content-type: application/json' \
--data '{
    "exchange_id": "d594490e-a4da-4433-81a8-2009744ebb48",
    "requestId": "44437a97-ebe5-4c07-87ec-ed31b0c87e1a",
    "type": "password",
    "password": "AdminTesting@456"
}'
The response returns another exchange_id and status 200 success if it was successfully performed.
{
    "success": true,
    "status": 200,
    "data": {
        "exchange_id": {
            "exchange_id": "94669e02-d666-4be5-8f4d-130664c6d57c",
            "expires_at": "2024-01-12T13:24:40.706Z",
            "_id": "a69bb211-387b-47b1-b19d-5da3b91c15ba",
            "createdTime": "2024-01-12T12:54:40.709Z",
            "updatedTime": "2024-01-12T12:54:40.709Z",
            "__ref": "1ede4f31b521fc74:76e4c2fc2e83313a:1ede4f31b521fc74:0",
            "id": "a69bb211-387b-47b1-b19d-5da3b91c15ba"
        },
        "sub": "521bb9c7-eda9-4070-ab28-551825a3b502",
        "status_id": "e3f1ad0e-b32d-4304-8861-d8dff503396a"
    }
}
exchange_id and status_id which are required as input for Step 4. The exchange_id changes between the above steps.Step 4: Performing the login
Continue the login process by performing the login Call. This API will redirect when the authentication was successful to group selection page .
Request
curl --location '{base_url}/login-srv/verification/login' \
--header 'content-type: application/x-www-form-urlencoded' \
--data-urlencode 'requestId=df08cabb-4b8c-4181-9f6f-f6948802ebf7' \
--data-urlencode 'exchange_id=e8896cfe-8371-4d79-b8d5-ae8f14c5666c' \
--data-urlencode 'verificationType=password' \
--data-urlencode 'sub=b0dd23-1a2d-40eb-9gb-2ba3cc1942b' \
--data-urlencode 'status_id=710792ba-32f9-4d2d-8584-fefa3a6d94b8' \
--data-urlencode 'rememberMe=true'
- Login API then automatically redirects the user's browser to the group selection hosted page (
/identity/groupselection). Thetrack_idand other parameters are passed in the redirect URL query parameters.
/identity/groupselection is a hosted page URL, not a direct API endpoint. The user is automatically redirected to this page in their browser where they can select a group from the provided list. The actual API call to continue the flow happens in Step 6 after the user selects a group.
Step 5: Understanding the Response of Token Prelogin Metadata
The API to return the prelogin metadata information allows you to actually find out which groups can be selected.
curl 'https://demo.cidaas.de/token-srv/prelogin/metadata/958ccb4c-3985-4b17-b325-14cd10da292e?acceptLanguage=en-US' \
  --compressed
Retrieving the token prevalidation information will reveal which selectable groups so the user can choose one of those groups, to be able to continue. This response body illustrates an array of selectable groups.
{
  "success": true,
  "status": 200,
  "data": {
    "logged_in": false,
    "validation_type": "group_selection_required",
    "meta_data": {
      "amr_values": [
        "103"
      ],
      "selectableGroups": [
        {
          "groupId": "Group_A",
          "groupName": "Group_A",
          "groupType": "widas_developer"
        },
        {
          "groupId": "Group_B",
          "groupName": "Group_B",
          "groupType": "widas_developer"
        }
      ]
    },
    "used": false
  }
}
Step 6: Understanding the Response of Token Prelogin Continue Call
Continue Authentication Flow after Prechecks. This precheck API will redirect when the authentication was successful to your provided redirect_uri including a code or adding the selected group to access token depending on the OAuth2 Flow used.
curl --location '{base_url}/login-srv/precheck/continue/jbgq2375-a4da-f090-81a8-i90k744ebb4' \
--header 'content-type: application/json' \
--data '{
    "track_id": "jbgq2375-a4da-f090-81a8-i90k744ebb4",
    "selectedGroupId": "Group_A"
}'
The response returns to your provided redirect_uri with an access_token (or authorization code, depending on the OAuth2 flow used) that includes the groupSelected claim.
Developer Perspective
| API | Description | Link |
|---|---|---|
| Authorization Request | Initiates the OAuth2 authorization flow. Use prompt=select_group to force group selection UI. | View API |
| Get the configured authentication methods | Displays the configured authentication methods on the user login page, e.g., after configuring a pattern; The user gets the pattern mfa on the login page. | View API |
| Initiate the authentication | This API is used to initiate the configured authentications, e.g., when a user clicks on the password authentication, it initiates the password authentication. | View API |
| Perform the authentication | After successfully authenticating by entering the password, the enrollment completion will finally enrol the user. | View API |
| Continue Login After Passwordless Authentication | After successfully authenticating, you can proceed the login process | View API |
| Get Pre-Login Metadata | Retrieves the list of selectable groups that the user can choose from during group selection. | View API |
| Continue Authentication Flow after Prechecks | Continue the login process after the user has selected a group. This will add the selected group to the access token. | View API |
prompt=select_group parameter in the authorization request can be used to force group selection UI, even when a valid previous group exists. This is useful when you want to allow users to change their group context.Implementation using SDK
This Implementation Guide is based on the default hosted pages which uses an Angular framework based on Typescript. It can be implemented in any other programming language as well.
As a first step you will be redirected to the login page. This Section starts to show the apis to be called when reaching this page:
To install the cidaas-sdk please perform the following command
npm install cidaas-javascript-sdk
The import to your webapp will be done by using:
this.cidaas_sdk = new WebAuth(options)
Step 1: Rendering the User Verification Methods
To call the getMFAList API to get all the MFA that is configured for the user
const queryParams = new URL(window.location.href).searchParams; // get query params from window.location
const payload = {
    sub: queryParams.get("sub"), // subId of user got from query params
    requestId: queryParams.get("requestId"), // requestId identifying active login flow
}
this.cidaas_sdk.getMFAList(payload)
    .then((response) => {
        if (!response.data || response.status !== 200) {
            // handle error
            return;
        }
        const mfaList = response.data;
        // Populate mfa list
        showMFAList(mfaList); // Add implementation to parse mfa list and show in UI
    })
    .catch((e) => {
        // handle error
    });
Using the response of this API call, you can render the UI as display all verification methods the user is allowed and able to use. Furthermore it is used as input for the next Endpoint.
Step 2: Initiating password
After the user selected the authentication method, To initiate the verification process, the payload needs to be set In this scribble the mfaItems are the items returned by the above api, when already knowing the mfaItem (singular) is the user-selected method and the index.
request_id : It is the requestId that is generated for the login, we can get this id from dataService. usage_type : specifies the type of authentication, for this it is PASSWORDLESS_AUTHENTICATION type : It is the selected verification type from the list, for this the value is password usernameType : It is the key value for the payload, first priority is email, second is user_name & third is mobile_number
let exchangeId: string = "";
const queryParams = new URL(window.location.href).searchParams; // get query params from window.location
const requestId = queryParams.get("requestId");
const type = queryParams.get("type") as string; // It contains either the `email` or `user_name` or `mobile` as a key
const userId = queryParams.get("userIdHint"); // It is either the email, user name or mobile number of the user
const payload = {
    usage_type: "PASSWORDLESS_AUTHENTICATION",
    request_id: requestId,
    [type]: userId
}

// initiate api call which returns exchange_id
this.cidaas_sdk.initiateMFAV2(payload)
    .then((response) => {
        if(response || response.status !== 200){
            // handle error
            return;
        }
        const data = response.data;
        this.exchangeId = data?.exchange_id?.exchange_id;
    })
    .catch(error=>{
        // handle error
    })
Step 3: Performing the Authentication
The next step is to perform the authentication. Thereby the exchangeId as well as verificationType will be provided in the next authentication step. The requestId stays same as before.
const exchangeId = this.exchangeId;  // This is generated after initiate process (Step 3)
const queryParams = new URL(window.location.href).searchParams; // get query params from window.location
const requestId = queryParams.get("requestId");
let payload = {
    requestId: requestId,
    exchange_id: exchangeId,
    type: "password",
    password: "Test1567" // This is the password that user enters while login.
};

this.cidaas_sdk.authenticateMFAV2(payload)
    .then((response) => {
        if(response || response.status !== 200) {
            // handle error
            return;
        }
        const data = response.data;
        this._initiatePasswordlessLogin(data); // initiate the login process
    })
    .catch((error) => {
        // handle error
    })
Step 4: Continue the login Process
The passwordlessLogin will continue the login process and finally the user will be redirected to the provided redirect_uri including a token or code, depending on the OAuth2-grant (OAuth2-Flow) was used during initiating the authentication process.
_intitiatePasswordlessLogin = async (response) => {
    const queryParams = new URL(window.location.href).searchParams; // To get query params from window.location
    const requestId = queryParams.get("requestId");
    let options = {
        requestId: requestId,
        exchange_id: response.exchange_id.exchange_id,
        verificationType: "password", // this is selected from the list of MFA, for this the value is `password`
        sub: response.sub,
        status_id: response.status_id, // The status ID is generated after authenticate process
    };
    await this.cidaas_sdk.passwordlessLogin(options) // here it is going to call groupselection api which will get the list of user selectable groups from the configured list.
};
Step 5: Retrieving the Selectable Groups using Token Prelogin Metadata
    const resp = await this.cidaas_sdk.getPreloginMetadata({
      track_id: this.route.snapshot.queryParams['track_id'],
      locale: navigator.language,
    });
Using the response of this API call, you can render the UI as displayed above. It will present the selectable groups in the meta_data.selectableGroups array.
Step 6: Continue precheck call
This endpoint allows you to continue the authentication process to finally issue a code or token. This call should be performed after successful user interactions that were unfulfilled during the initial login request.
The Track ID was generated during the login call and is issued when a condition is unmet but required. This might be related to the user or related to the app settings.
The redirect_uri specified in the authorization flow is then returned along with either a code or an access token, depending on the authorization flow.
Hence the condition here is group_selection_required and after user selects a group to login with is taken by this endpoint and this will be added in the access token.
    const resp = await this.cidaas_sdk.mfaContinue({
        track_id: this.route.snapshot.queryParams['track_id'],
        selectedGroupId: "Group_A" // this is a group that is selected by user, replace this by your group selection
});
Explore Related Topics
Please contact us directly on our support page or reach out to cidaas support at [email protected].