Email and SMS OTP (Authentication)
This is a technical guide on how you can implement the Email or SMS OTP by simply following the steps below.
What are Email or SMS OTPs?
Email and SMS OTPs are so-called One-Time-Passwords, a few-digits code, that is sent to the respective mailbox or messenger. The UI will show the box to enter the OTP and on submit will verify whether the OTP sent is correct.
It is one of multiple different authentication methods.

When is a user able to use Email or SMS OTP?
| Criteria | Example | Configuration |
|---|---|---|
| User Verification Setup | As soon as a user provides their email address they can use Email OTP (as well as Magic Link). Same applies for SMS, as soon as a user provides their mobile number, they are able to use SMS OTP. | |
| Allowed Verification Methods | This is an app setting that can be configured in the app management's Authentication Section. | 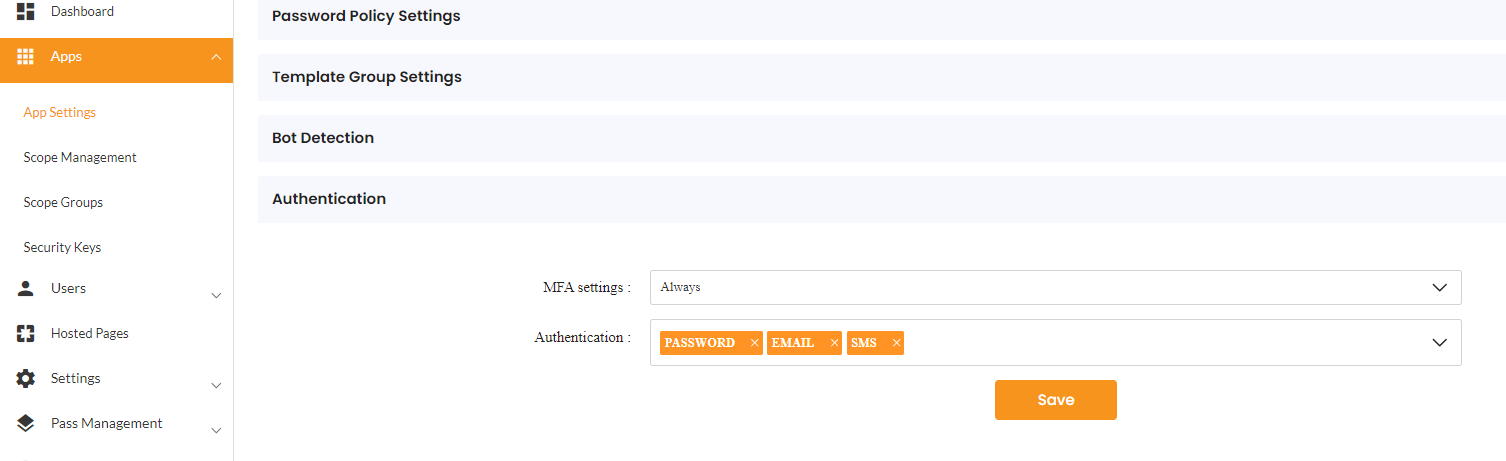 |
Understanding the Flow and APIs
| API | Description | Link |
|---|---|---|
| Get the configured authentication methods | Displays the configured authentication methods on the user login page, e.g., after configuring a pattern; The user gets the pattern mfa on the login page. | Link to API |
| Initiate the authentication | This API is used to initiate the configured authentications, e.g., when a user clicks on the Backup code authentication, it initiates the Backup code authentication. | Link to API |
| Perform the authentication | After successfully authenticating by entering the Backup code, the enrollment completion will finally enroll the user. | Link to API |
| Continue Login After Passwordless Authentication | After successfully authenticating, you can proceed with the login process" | Link to API |
Step 1: Allow SMS and Email OTPs in Your App
In the Admin portal, you need to make the EMAIL and SMS verification type an allowed authentication methods under App advanced settings.
To do that,
You can change your existing application, by navigating to Apps> App settings > Adv settings > Authentication > Add Email and SMS as Authentication Method.
Step 2: Rendering the User Verification Methods
Before initiating the OTP, you will perform an Authorization (Authz) Call and use the requestId in the upcoming calls.
The first call will be to get the configured verification methods for a user. Based on the response, you provide a selection of verification methods for your user. Below is a demo of how this can look by presenting different verification icons.
Call the configured verification methods of a user. This will filter the user configured verification methods and the app level configuration.
curl --location '{{base_url}}/verification-srv/public/graph/user/setup' \
--header 'content-type: application/json' \
--data-raw '{
    "request_id": "{{requestId}}",
    "identifier": "{{identifier}}"
}'
The response contains a list of all verification methods the user could use. It already filters if the client allows the verification method. Furthermore, the medium id is required, it will be provided in the initiation request. The type specifies the verification method and will be provided as a value in the initiation request, too.
{
  "configured_list": [
    {
      "type": "EMAIL",
      "mediums": [
        {
          "id": "41197703-15c8-41c4-a49c-5b0b04eb7bce",
          "key_name": "m******ter@gm***.com"
        }
      ]
    },
    {
      "type": "PASSWORD"
    },
    {
      "type": "SMS",
      "mediums": [
        {
          "id": "41197703-15c8-41c4-a49c-5b0b04eb7bce",
          "key_name": "+49******672"
        },
        {
          "id": "7a212a50-63bf-4dcb-96e1-7fbd1c91bd25",
          "key_name": "+49******627"
        }
      ]
    },
    {
      "type": "FIDO2"
    }
  ]
}
| API | Description | Link |
|---|---|---|
| Get the configured authentication methods | Displays the configured authentication methods on the user login page, e.g., after configuring a pattern; The user gets the pattern mfa on the login page. | Link to API |
This API requires to provide the user identifier and the requestId. It returns the medium_id and a friendly name, which you can use to display for your user during authentication in step 3.
Step 3: Initiating a Email/SMS OTP
When the user selects Email or SMS, you need to initiate the authentication using the respective method as a parameter.
Important: The medium_id finally determines to which email or mobile number the OTP is sent, e.g., if a user has multiple identities.
curl --location '{{base_url}}/verification-srv/authentication/email/initiation' \
--header 'content-type: application/json' \
--data-raw '{
    "usage_type": "PASSWORDLESS_AUTHENTICATION",
    "request_id": "df08cabb-4b8c-4181-9f6f-f6948802ebf7",
    "medium_id": "ca46cs99-2fc1-4aaa-9e35-e097c3c2ceff",
    "email": "[email protected]"
}'
The response contains a status_id and an exchange_id, these are unique for this process, and the following steps will rely on these being provided. If Status is 200, the initiation was successfully triggered.
{
"success": true,
"status": 200,
"data": {
"exchange_id": {
"exchange_id": "455fd20d-837d-43a6-a212-a02eeea1a46b",
"expires_at": "2024-01-10T20:45:51.781Z"
},
"sub": "6837c08e-d748-4091-8d8e-a3e24f30e0f8",
"status_id": "710792ba-32f9-4d2d-8584-fefa3a6d94b8"
}
}
| API | Description | Link |
|---|---|---|
| Initiate the authentication | This API is used to initiate the configured authentications, e.g., when a user clicks on the touch id authentication, it initiates the touch id authentication. | Link to API |
It returns an exchange_id and masked sub which is required as input for the Step 4
Step 4 : Performing the Authentication
Using the exchange_id and sub as well as the OTP sent in the email or to the mobile number as SMS the actual authentication will now take place.
curl --location '{{base_url}}/verification-srv/authentication/email/verification' \
--header 'content-type: application/json' \
--data '{
    "sub": "b0284e23-1a2d-40eb-9c6b-2bea3cc1942b",
    "exchange_id": "d594490e-a4da-4433-81a8-2009744ebb48",
    "pass_code":"182884"
}'
The response returns another exchange_id and status 200 success if it was successfully performed.
{
    "success": true,
    "status": 200,
    "data": {
        "exchange_id": {
            "exchange_id": "e8896cfe-8371-4d79-b8d5-ae8f14c5666c",
            "expires_at": "2024-01-10T21:09:54.810Z"
        },
        "sub": "b0284e23-1a2d-40eb-9c6b-2bea3cc1942b",
        "status_id": "710792ba-32f9-4d2d-8584-fefa3a6d94b8"
    }
}
It returns an exchange_id and status_id which is required as input for the Step 5. The exchange_id has changed between the above steps.
Step 5: Continue the Login Process
Continue the Login Process by performing the login Call. This API will redirect when the authentication is successful to your provided redirect_uri, including a code or an access_token depending on the OAuth2 Flow used. Link to API
curl --location '{base_url}/login-srv/verification/login' \
--header 'content-type: application/x-www-form-urlencoded' \
--data-urlencode 'requestId=df08cabb-4b8c-4181-9f6f-f6948802ebf7' \
--data-urlencode 'exchange_id=e8896cfe-8371-4d79-b8d5-ae8f14c5666c' \
--data-urlencode 'verificationType=email' \
--data-urlencode 'sub=b0dd23-1a2d-40eb-9gb-2ba3cc1942b' \
--data-urlencode 'status_id=710792ba-32f9-4d2d-8584-fefa3a6d94b8' \
--data-urlencode 'rememberMe=true'
| API | Description | Link |
|---|---|---|
| Perform the authentication | After successfully authenticating the user can receive an access token | Link to API |
| Continue Login After Passwordless Authentication | After successfully authenticating, you can proceed the login process | Link to API |
Implementation using SDK
This Implementation Guide is based on the default hosted pages which uses an Angular framework based on Typescript. It can be implemented in any other programming language as well.
As a first step you will be redirected to the login page. This section starts to show the APIs to be called when reaching this page:
To install the cidaas-sdk please perform the following command
npm install cidaas-javascript-sdk
The import to your webapp will be done by using:
this.cidaas_sdk = new WebAuth(options)
Step 1: Rendering the User Verification Methods
    const resp = await this.cidaas_sdk.getMFAListV2({
      identifier: e.identifier,
      requestId: this.route.snapshot.queryParams['requestId'],
});
Using the response of this API call, you can render the UI to display all verification methods the user is allowed and able to use. Furthermore, it is used as input for the next Endpoint.
Step 2: Initiating a Email/SMS OTP
After the user selected the authentication method, you can trigger or show the options to which email or mobile_number the OTP should be sent to. In this example, the mfaItems are the items returned by the above API, when the mfaItem (singular) is the user-selected method and the index is the preferred mobile number or email if they have multiple.
    const payload: IInitiateMFAPayload = {};
    const medium_id = mfaItem[0]['mediums'] && mfaItem[0]['mediums'].length > 0 ? mfaItem[0]['mediums'][index]['id'] : mfaItem[0]['type'];
    payload['usage_type'] = 'PASSWORDLESS_AUTHENTICATION';
    payload['request_id'] = this.route.snapshot.queryParams['requestId'];
    payload['medium_id'] = medium_id;
    payload['type'] = type;
    if (isCidaasSystemUserId(this.route.snapshot.queryParamMap.get('type'))) {
      payload[this.usernameType == 'mobile' ? 'mobile_number' : this.usernameType == 'user_name' ? 'username' : this.usernameType] =
        this.username;
    } else {
      payload['customFields'] = {
        [this.usernameType]: this.username
      };
    }
    const resp = await this.cidaas_sdk.initiateMFAV2(payload);
};

export const isCidaasSystemUserId = (loginMethod: string): boolean => {
    switch (loginMethod.toLowerCase()) {
        case UserIdType.Email:
        case UserIdType.Mobile:
        case UserIdType.Username:
      return true;
    }
  return false;
}
Step 3: Performing the Authentication
The next step is to perform the authentication. The exchangeId as well as verificationType will be provided in the next authentication step. The requestId stays the same as before.
    let options = {
        requestId: this.route.snapshot.queryParams['requestId'],
        exchange_id: this.exchangeId,
        type: this.verificationType,
    };
    this.cidaas_sdk.authenticateMFAV2(options)
Step 4: Continue the Login Process
The passwordlessLogin will continue the Login process and finally the user will be redirected to the provided redirect_uri including a token or code, depending on the OAuth2 grant (OAuth2 Flow) was used during initiating the authentication process.
    let options = {
      requestId: this.route.snapshot.queryParams['requestId'],
      exchange_id: this.exchangeId,
      verificationType: this.verificationType,
      sub: this.sub,
      status_id: this.status_id,
      rememberMe: this.rememberMe,
      lat: this.location.lat,
      lon: this.location.lon,
    };
    if(this.linkId) options["link-id"] = this.linkId;
    this.cidaas_sdk.passwordlessLogin(options);
Please contact us directly on our support page or reach out to cidaas support at [email protected].