Account Linking
What is Account Linking?
Account linking is the process of connecting multiple user identities to a single user account in cidaas. This allows users to access their account using any of their linked identities (email, mobile number, username, or social provider accounts like Google, Facebook, etc.).
What happens when accounts are linked:
- Multiple identities are associated with one user account
- All user information is merged into a single account
- Users can log in using any of their linked identities
- All linked identities share the same user profile, groups, roles, and permissions
Why is Account Linking Needed?
When providing multiple different login providers, there are cases when user conflicts arise. For example:
-
Manual account linking: A user uses different identifiers (e.g., registers using email
[email protected]and[email protected]). The user notices that both accounts are hers and would like to merge both accounts into one single account. -
Social account linking: A user has already registered using email as self identity and afterwards tries to log in using Facebook, Google or any other login provider that contains the same userId as for the self identity. In this case a user conflict arises.
The primary purpose of account linking is to unify all the user accounts on a single platform, merging all relevant information in one place. By doing so, users can access their own accounts using any of their linked identities without creating duplicate accounts.
Manual account linking
In manual linking, you need to enter your account or mobile number or user name that you want to link. cidaas will then initiate the linking process, integrating your provided information with the existing account.
Technical Integration
| API | Description | Link |
|---|---|---|
| Initiate a new user link | Initiates a new user link to link for existing users | Link to API |
Process of Manual account linking
Click here to know more about functionalities of user profile UI.
For manual account linking :
- Log in to your user profile.
- Click link My ID, you will find the below screen.
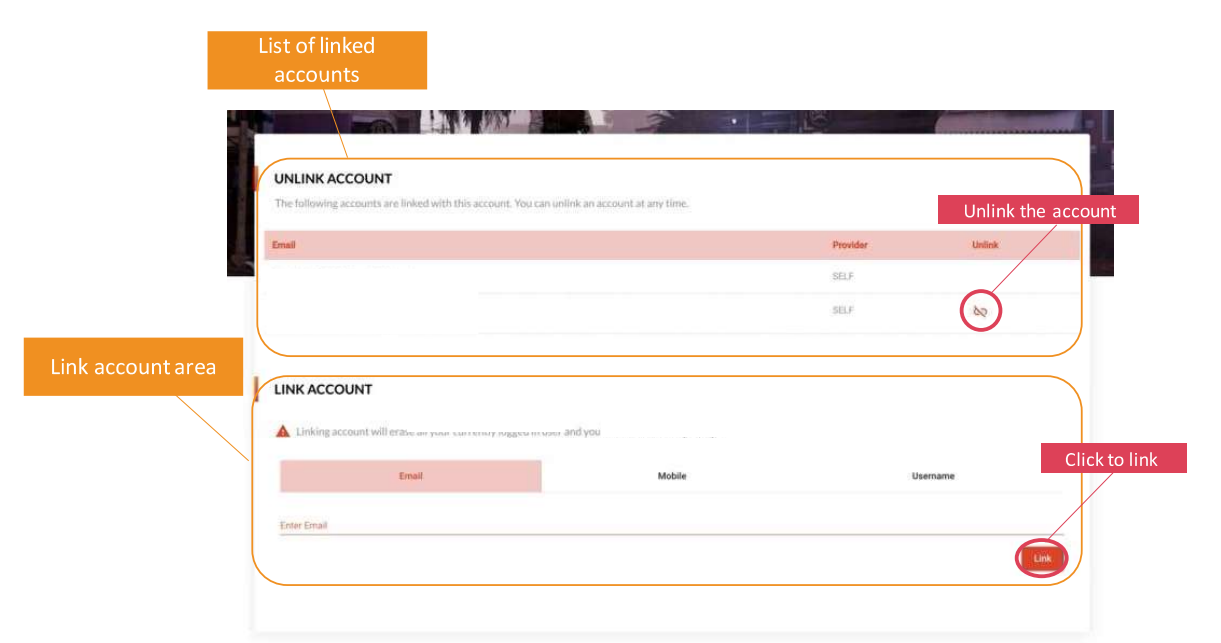
- Enter the account/mobile/username you want to link in the link area and click on link. The user has to enter a valid username (like email, mobile_number, username etc.) of another existing account (user B). Prerequisites: the used username needs to be configured as allowed login method.
- The user will get redirected to the login page with username of user B as
login_hint. In the default hosted pages the username is prefilled based on thelogin_hint - Afterwards the user will perform the login with the already registered account, to confirm this account also belongs to them. In the successful login call a header param link ID is passed.
- All user information from user B is now linked to the user account of user A.
Once two user accounts are linked, the user or admin can unlink these two accounts"
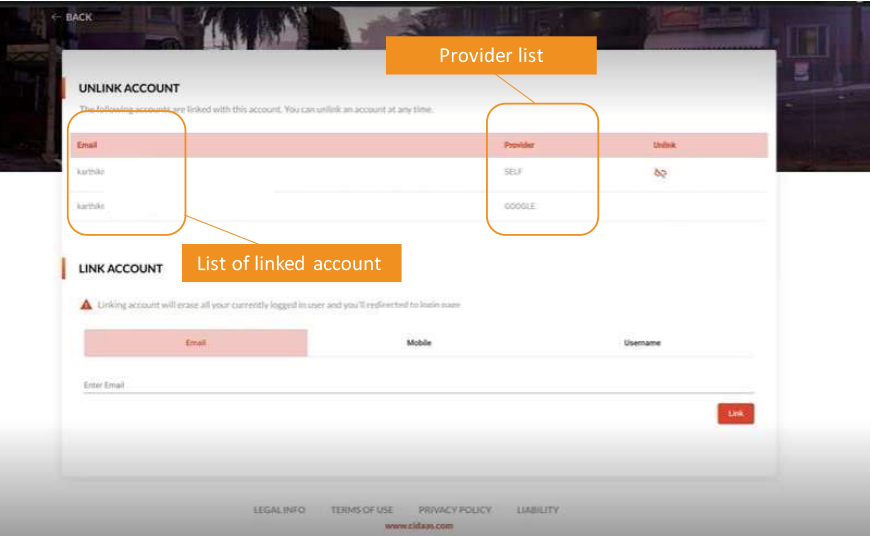
- All linked accounts are listed in the link/ unlink section in the user information.
- Once the user or admin would like to unlink one account (user B) they can select unlink for the account.
- A verification code will be sent to the selected email id (email of user B).
- Once verification is successful, the accounts are unlinked.
Note: Once an account is unlinked, the unlinked account (user B) loses its identity and henceforth any login with that account information is not possible.
Social account linking
Social account linking refers to the process of integrating your social media accounts such as Google,Facebook, etc. into cidaas. By doing so, you can effortlessly log in using any of your linked social media accounts.
To link a social media account, you need to have a self cidaas account or social registration account. When you register a new account with the same email/mobile but a different provider, it can be linked automatically if track_id is provided in the registration request. Without track_id, a conflict error will be returned instead of automatic linking.
Related: For more details on automatic account linking during registration, see Account Linking During Social Registration.
Process of social account linking
For social account linking :
-
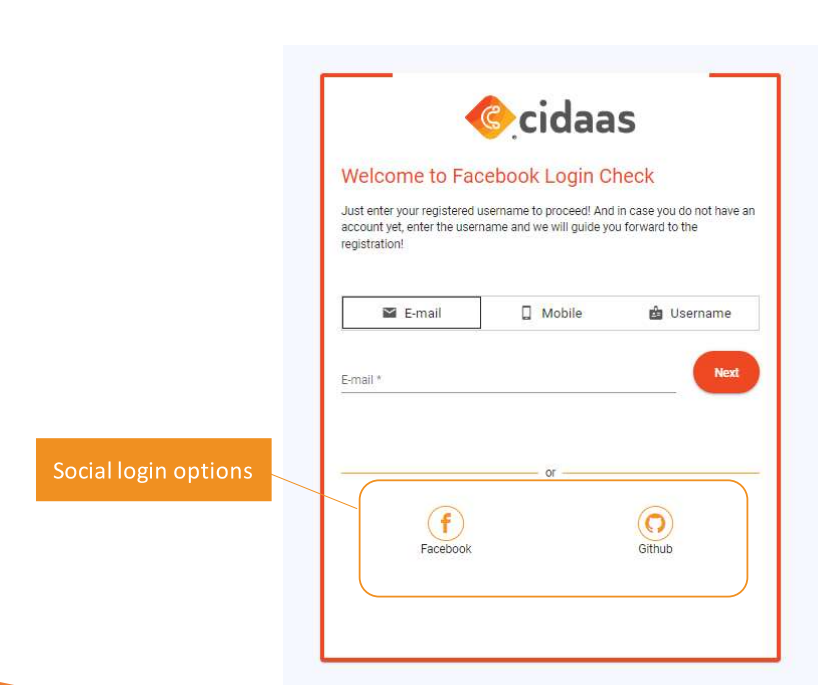
Open the cidaas login page.
-
Register a new account using social login providers after allowing your instance to register with social login information.
- You'll need to create a new account either using the SELF Account option or via a Social Account using the Register API. Make sure to use the same email address as registered in the social provider you'll use for login.
API Description Link Register a new user To register a new user, you can use this endpoint. It allows to provide all information you would like to request from the user. Link -
If the application requires more fields than already provided by the social provider, the user will be redirected to the progressive profiling and the final register Call will be completed from the UI. In this case the API will return
StatusCode 200and aredirect_uriin the body to continue to. -
If the application does not require further information the user will be redirected to the login page immediately and asked for authentication using the existing user account
-
The next step involves making an authorization call to generate a unique requestId. This requestId will be used in subsequent steps for authentication and verification purposes.
API Description Link Authorization call This API can be used to perform the following oauth2/openid flows. Link -
Choose a social login provider. It's important that the provider returns
email_verifiedas false. This is necessary to prompt the user for linking their social account with their existing account. -
Use the Social Login with request ID endpoint to initiate the login process with the chosen social provider. After logging in, you'll be redirected to a callback URL (
/login-srv/social/callback/:provider_name) with a code.API Description Link social login with request ID This API logs in to the social provider using the request ID(generated during authz call). Link Get callback URL This API takes the callback URL from the application with a code. Link -
The next step is to exchange the code for a token and user information, Here, take the code received in the callback URL and exchange it for a token and user information.
- At this point, a conflict might occur if the user's social account email doesn't match any existing account. In such a case, the user will be redirected to the login page with additional parameters.
-
Provide all options for the user to login i.e., If it's a self account (i.e., not a social account), provide all available login options such as email OTP (One-Time Password) or password.
-
If the user chooses to log in using a password, initiate the password verification process using the
/verification-srv/authentication/password/initationand/authentication/password/verificationendpoints. Provide therequestIdgenerated earlier in the process.API Description Link Initiate verification This API is used to initiate the verification of the user depending on the type of verification configured. Link Perform the authentication This API is used to initiate authentication depending on the type of verification configured. Link -
Retrieve
status_id. After verifying the password, astatus_idwill be returned in the POST call. Thisstatus_idis needed for the next step. -
Finally, use the
/login-srv/verification/loginendpoint to log in. Provide thelink-idandstatus_idobtained in previous steps.API Description Link Login after authentication This API completes the login after a user successfully completed the passwordless authentication Link
Note: Admin must configure the social media options on the login page for the user.
Automatic Linking: Your social account will be automatically linked to an existing account if:
- During registration: You register with a social provider using the same email/mobile as an existing account, and
track_idis provided in the registration request - During login: You successfully authenticate with an existing account after being prompted to link (following the process described above)
Note: Automatic linking during registration requires track_id. Without it, you'll receive a conflict error and need to use the manual linking process instead.
List of All linked Accounts
| API | Description | Link |
|---|---|---|
| List all linked accounts | Provides the list of all linked accounts for the user using the identities scope in the access token | Link to API |
Please contact us directly on our support page or reach out to cidaas support at [email protected].