Social Login
Integrating Social Login in cidaas
In this section, you will find how you can enhance the login experience of your application, by allowing login using popular social providers like Google, Facebook, LinkedIn and many more.
Once you sign up with cidaas, you can create apps for your customers in the cidaas admin portal. cidaas allows you to develop your own UI and enhance login functionality for your apps. cidaas allows you to integrate a number of social providers (that use OAuth2 protocol) to enable seamless registration and login for your customers.
If you are in this section, we assume you already created an application in your cidaas account and want to integrate social login functionality in that application.
If you don't have any active application in your cidaas account, refer to the steps to create cidaas app in the later sections of this tutorial.
The overall process would be
- Generate RequestID
- Get all social providers available
- Call Social login API
- Validations and Verifications
- Access token issuance The flow is illustrated below,
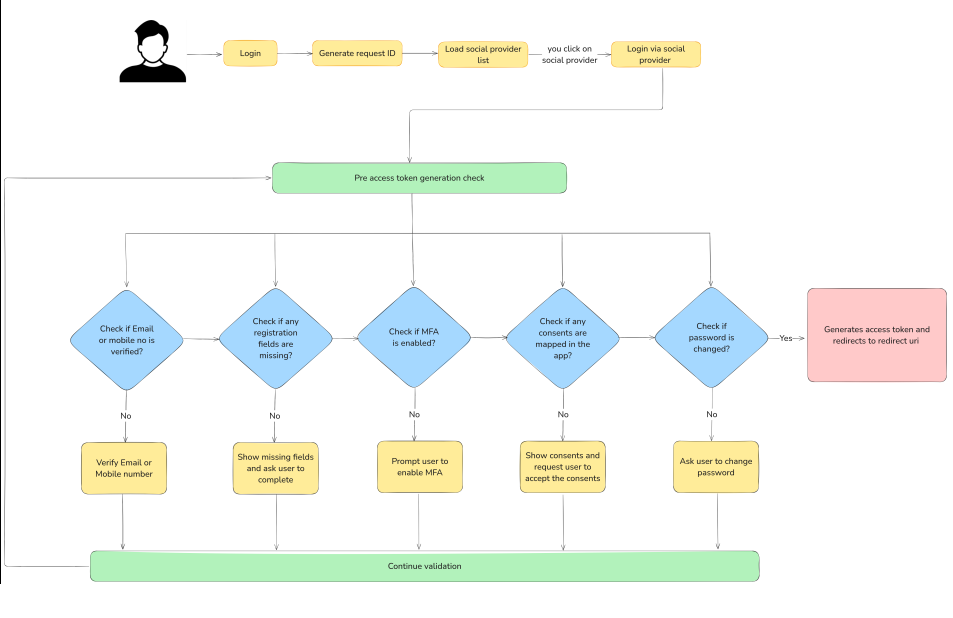
Here, numbering is used to notify the index of the API calls listed below,
- RequestId Generation API
- Get all configured social providers API
- Social Login API
- Initiate Verification API
- Verify user code API
- Missing fields API
- Progressive Registration Process
- Initiate MFA API
- Authenticate MFA API
- Initiate Consent Management API
- Acceptance of consent management process
- Change password API
You will find the elaborate usage of these APIs in the later sections of this tutorial.
We will guide you through the process — it's pretty easy!
Generate RequestID
RequestID is a unique id generated by cidaas which is used to track the user's pre-login status. You can use the generated requestID throughout the session to call other APIs.
RequestID Generation API
In this section, we are explaining the steps to create RequestID using RequestId Generation API of cidaas.
You need to call RequestId Generation API before loading your login page. You need to send your client id, redirect_uri , scope and response_type in the api request
{{baseurl}}/authz-srv/authrequest/authz/generate' \
--header 'Content-Type: application/json' \
--data '{
	"client_id":"string",
	"redirect_uri":"string",
	"response_type":"code",
	"scope":"openid identities",
	"nonce":"123"
}'
Response
{
    "success": true,
    "status": 200,
    "data": {
        "requestId": "string"
    }
}
To know more about how to get client ID, client secret and required app details from cidaas, refer to Steps to get cidaas app details section of this tutorial.
Get all social providers available
In this section, you'll find steps to get a list of all social providers enabled for your application using Get all configured social providers API.
In case no providers are enabled for your application, you can follow Configure social providers for your application section in this tutorial to enable required social providers for your application.
Get all configured social providers API
You need to call Get all configured social providers API, once requestID is generated. You need to send your recently generated requestID as 'path param' in the API request.
The listed providers will appear in the login screen of your application.
Call Social Login API
Now, you need to call the Social login API provided by cidaas, during the onClick of each social provider button on your login page. The call will redirect to the corresponding provider's login screen.
Social Login API
In this section, you'll find steps on how to call Social Login API provided by cidaas.
You need to call Social Login API, by mentioning the provider and requestId as 'path params'. You also need to mention the port to return, in case any error occurs during third-party redirection or authentication in 'query param'.
eg. Consider Facebook provider is enabled for your application. Then your login with facebook API call will look like the one below,

{{baseurl}}/login-srv/social/login/facebook/*****************************?return_to=http://localhost:8080
GET API  : {{baseurl}}/login-srv/social/login
provider : facebook
requestID : ****************************
return url : http://localhost:8080
If all the properties you sent are valid, then you'll get "Success" in the response.
Success Response:
code: 200
Validations and verifications
Once you get a success code in the response of social login API, then cidaas will continue with the token generation.
This pre-access-token generation involves several validations such as:
- Account verification check
- Missing fields check
- Consent management check
- MFA enabled check
- Change password on first login check
Account verification check
Social login API will check whether your user account is verified or not.
If your account is already verified, then Social Login API directly moves to the next verification.
If your email / mobile number does not get verified, then you need to verify them before proceeding to log in. You can verify your account either by link flow or by code flow.
Link flow - Verification link will be sent to the user via email. Once the user clicks on that link verification process starts.
Code flow - Verification link along with verification code will be sent to the user via email. Once user clicks on that link, they will be redirected to the page to enter verification code. If the code entered is valid then only the verification process. will start.
Initiate Verification API
Now, you need to call the Initiate Verification API, to initiate your account verification process by email or phone-number.
Initiate Verification API :
{{baseurl}}/verification-actions-srv/account/initiation
API METHOD : POST
Request Body:
{
  "requestId":"***********************************",
    "email":"enter_your_email_id",
    "verificationMedium":"email",
    "processingType":"CODE"
}

Note: If you want to verify with link flow then send "processingType" as "LINK"
Success Response:
- success: true
- status: 200
- data:
- accvid: ********************************
- email: your email address
User Code Verification API
Now, you need to call User Code Verification API to verify your account by validating the link/code you get in the response of Initiate Verification API to complete your verification process.
Verify user code API :
{{baseurl}}/verification-actions-srv/account/
API METHOD : POST
Request Body:
{
  "accvid" : "********************************",
  "code" : "910176" // Enter code sent to your email/mobile
}
Success Response:
- success: true
- status: 200
- data:
- suggested_action: "LOGIN"
- trackId: 98d73327-c992-4164-8a08-3b09f4896b40
Missing fields check
cidaas needs some fields as mandatory to proceed login process, if values for those fields are not present in your user account and you try to log in, then cidaas will show progressive registration screen to add those mandatory fields.
If your account has all valid fields, then Social Login API directly moves to next verification
Missing fields API
Now, you need to call the Missing fields API, to proceed with progressive registration to get all mandatory fields, refer here.
Missing  fields API :
{{baseurl}}/token-srv/prelogin/metadata/:track_id
API METHOD : GET
path param : track_id
Success Response:
- success: true
- status: 200
Progressive Registration Process
If the response from Missing fields API returns true, then cidaas will show progressive registration screen to add those mandatory fields. To know more about progressive registration process, refer here.
MFA enabled check
If your account is enabled for Multi-factor authentication or your app has MFA enabled by default, then Social Login API will check for the successful Multi-factor authentication.
If you are not enabled for any MFA configuration, then Social Login API directly moves to next verification
Check MFA API
Now, you need to call the MFA API, to perform multi-factor authentaion process.
MFA process involves,
- Get list of all MFA methods configured to your account.
- Select an MFA method as per your wish.
- Initiate authentication
- Perform Authentication. To know more about,
Get MFA list API, refer here
Authenticate MFA API
Once you get the list of configured methods choose any of them and start verification process by using the following APIs
Consent management check
If you enabled the option to show consent at the time of registration, then Social Login API will check for the acceptance of that consent.
If you are not enabled for any consent or you already accepted your consent then Social Login API directly moves to next verification.
In case your account is enabled for some consent and you haven't accepted it, then you need to accept it before proceeding to log in.
Consent Management API
For that, you need to call the Consent Management API, to show consent screen where you can accept it.
Consent Management API :
{{baseurl}}/consent-management-srv/v2/consent/usage/public/info
API METHOD : POST
Request Body :
{
 "consent_id": "**********************",
 "consent_version_id": "**********************",
 "sub": "**********************"
}
Success Response:
- success: true
- status: 200
- data:
- consent_id: "**************************"
- consent_version_id: "**************************"
- content: "content of your consent"
- consent_name: "name of your consent"
- sub: "**************************"
Acceptance of consent management process
If the Consent Management API returns true, then you will be redirected to the consent screen where you need to accept the consent that displays to proceed with login.
The user must accept the consent to proceeds with login. To know more about Consent management in cidaas, refer here
Change password on first login check
Once you successfully signup with cidaas, you will receive a system-generated password from cidaas admin. You need to log in to your account with that password and must reset your password before next login.
So, when you call Social login API, it will check whether you have performed reset password or not. If you have already set a new valid password then Social Login API will proceeds directly to next step of token generation.
Change password API
If you didn't reset your password, then you need to call Change password API to reset your password.
Reset Password API :
{{baseurl}}/login-srv/precheck/continue/{{lsid}}
API METHOD : POST
Request Body :
{
  "old_password": "**********************",
  "new_password": "**********************",
  "confirm_password": "**********************",
  "loginSettingsId": "**********************"
}
Access token generation
Now, we are done with all the validations.
If all conditions are valid, then Social Login API will generate access_token and other attributes then it will redirect to your redirect_uri which means your login is successful.
Note : If you want to know more about the APIs we discussed, refer to the API Details section of this tutorial.
API Details
| API | Details | Link |
|---|---|---|
| RequestId Generation | Authorization request | API |
| Login | The login endpoint allows to perform a login using password as authentication mechanism | API |
| Account Verification | Verify the user's account by either verifying the email or mobile number. | API |
| Missing Fields during Registration | Retrieve pre-authentication validation metadata for a user, based on the provided trackid. | API |
| Always ask MFA | Displays and allows the user to configure the available verification methods | API |
| Consent Management | Find consent information for a particular user | API |
| Change password on first-time login | This API endpoint is used to continue the login flow by setting a new password | API |
Please contact our developer support team directly.