Permission Management
Permission management may sound complex, but in simple terms, it is security for your resources.
Once you know which resources you need to protect, you can use cidaas and the OAuth 2.0 standard to implement proper API security.
This section introduces the key mechanisms you need to understand. The following sections will show you how to use them.
Core Concepts
| Concept | Description |
|---|---|
| Scopes | Permissions assigned to apps (clients). Clients can request scopes via the client_credentials flow or by providing scope as a query parameter in the authz request for other flows. |
| Roles | Permissions assigned to user accounts. A user can have multiple roles in the CIDAAS_USERS group or in several other groups. |
| Groups | Classifications such as Department, Application, or any other organizational structure that defines permissions. Each group can define roles that can be assigned to users. A user account can be assigned to multiple groups with different roles in each group. |
Security Mechanisms
| Mechanism | Description |
|---|---|
| Interceptor | Validates incoming requests to determine if they are authorized to access a resource. Interceptors intercept the request, validate the token, and either continue processing or return an unauthorized response. cidaas provides out-of-the-box interceptors with configurable validation options. |
| Offline Validation | Validates the token and its matching conditions directly in the interceptor locally, without making external API calls. |
| Online Validation | Validates the token by calling the introspection endpoint remotely. This approach can detect revoked tokens and perform group validations that are not available in offline validation. |
| Introspection Endpoint | An OAuth 2.0 endpoint that performs online/remote validation of tokens. When validation succeeds and matches the specified conditions, it returns active: true. View API |
Scopes
Scopes are permissions that are assigned to apps (clients). Clients can then request them via the client_credentials flow or for other flows by providing scope as a query parameter in the authz request.
Scopes will be present in the token itself. The initial request is significant to inform the system which scopes to add.
| API | Description | Link to API |
|---|---|---|
| Get Client Credentials Token | Issues a client_credentials token. You can identify such a token by parsing it (e.g., using authkit.io) and verifying that the sub claim equals "ANONYMOUS". In the request body, you can provide scope with a space-separated list of scopes to include in the token. | View API |
| Initiate Authentication Process | Initiates the authentication process. If the user is not authenticated, they will be prompted to log in. You can add scope as a query parameter with a space-separated list of scopes to include in the token. | View API |
When Are Scopes Added to the Token?
Scopes are added to the token when they are:
- Requested in the API call - Either in the
client_credentialsflow (for non-interactive clients) or in theauthzrequest (for interactive clients when a user authenticates) - Allowed by the client - The client must be configured to allow the requested scopes
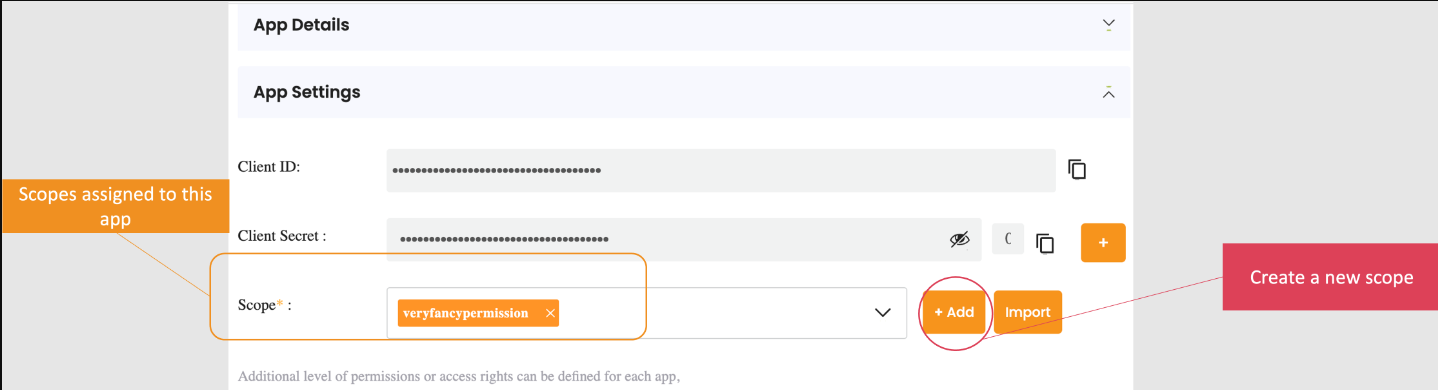
You can configure which scopes are allowed or restricted for each client in the app settings:
To configure scopes for an app:
- Navigate to Apps > App Settings
- Click the Edit App icon for the app you want to configure
- You will see the scope configuration screen:
Group/Role Restriction
Users can belong to various groups and have multiple roles assigned to their accounts.
This section provides a brief overview of how user accounts are structured and how to assign groups and roles via the admin dashboard. For complete details, see the User Groups and Roles documentation.
Each application has a Group and Role Restrictions section where you can restrict access to specific groups and roles.
To configure group and role restrictions:
- Navigate to Apps > App Settings
- Click the Edit App icon for the app you want to restrict
- Scroll down and click on Advanced Settings
- Scroll down and click on Group and role restrictions
You will see the following screen:
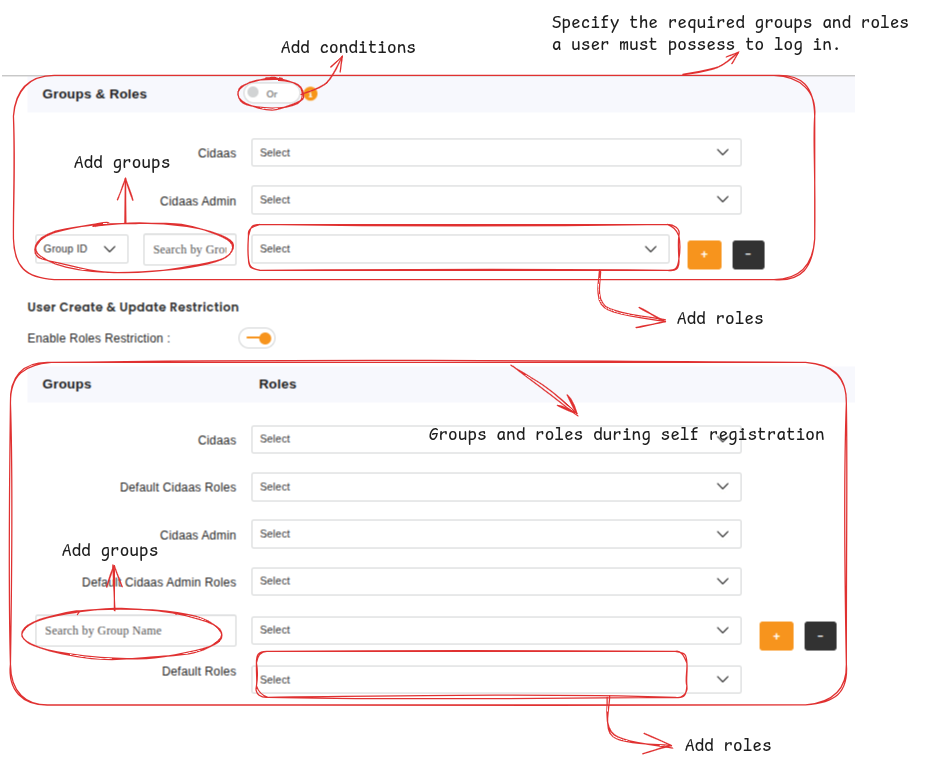
By adding groups and roles, only users who have all specified roles and belong to all specified groups will be allowed to log in to this application.
Learn more about Group Role Restriction - The system allows cidaas to control user access during login or SSO by verifying group memberships and roles dynamically.
Group Selection on Login
Group selection is a cidaas feature that prompts users to choose which group context they want to use when interacting with the system.
For more details about the group selection feature, see Token Conditions and Prechecks or navigate directly to the group selection documentation. The documentation explains how to enable the feature, its conditions, use cases, and implementation details.
Why It Matters for Permission Management
When group selection is enabled and a user specifies a group during login, that group information is added to the access token. This allows applications to make authorization decisions based on the selected group context.
To enable group selection for an app:
- Navigate to Apps > App Settings
- Click the Edit App icon for the app you want to configure
- Scroll down and click on Advanced Settings
- Scroll down and click on Group Selection on Login
Important: Token Size Considerations
Only roles are added to the access token in cidaas, not groups. This is because users can belong to many different groups, which could result in extremely large tokens. Oversized tokens can cause "Header Too Large" errors and cause requests to fail.
Implications for validation:
- Online validation (introspection): Can validate groups because it queries the server directly
- Offline validation (interceptor): Can only validate roles and groups that are present in the token itself
If you need to validate group memberships in offline validation, ensure the relevant group information is included in the token, or use online validation via the introspection ensdpoint.
Need Support?
Please contact us directly on our support page.