User-Initiated Password Reset
When a user forgets their password and wants to request a password reset, this is called user-initiated password reset.
To land on the page, where a user can set a new password is possible in two ways: Using CODE and the user enters a code on the page they triggered it or LINK when the user clicks on the link and is prompted to set a new password.
Code-Flow for Password Reset
Introduction to User Initiated Password using Code-Flow
The Reset Code Flow consists of four steps, after the login page was opened. For complete overview, please also find the authorization Request and Public-Reset in the documentation now using the CODE-Flow
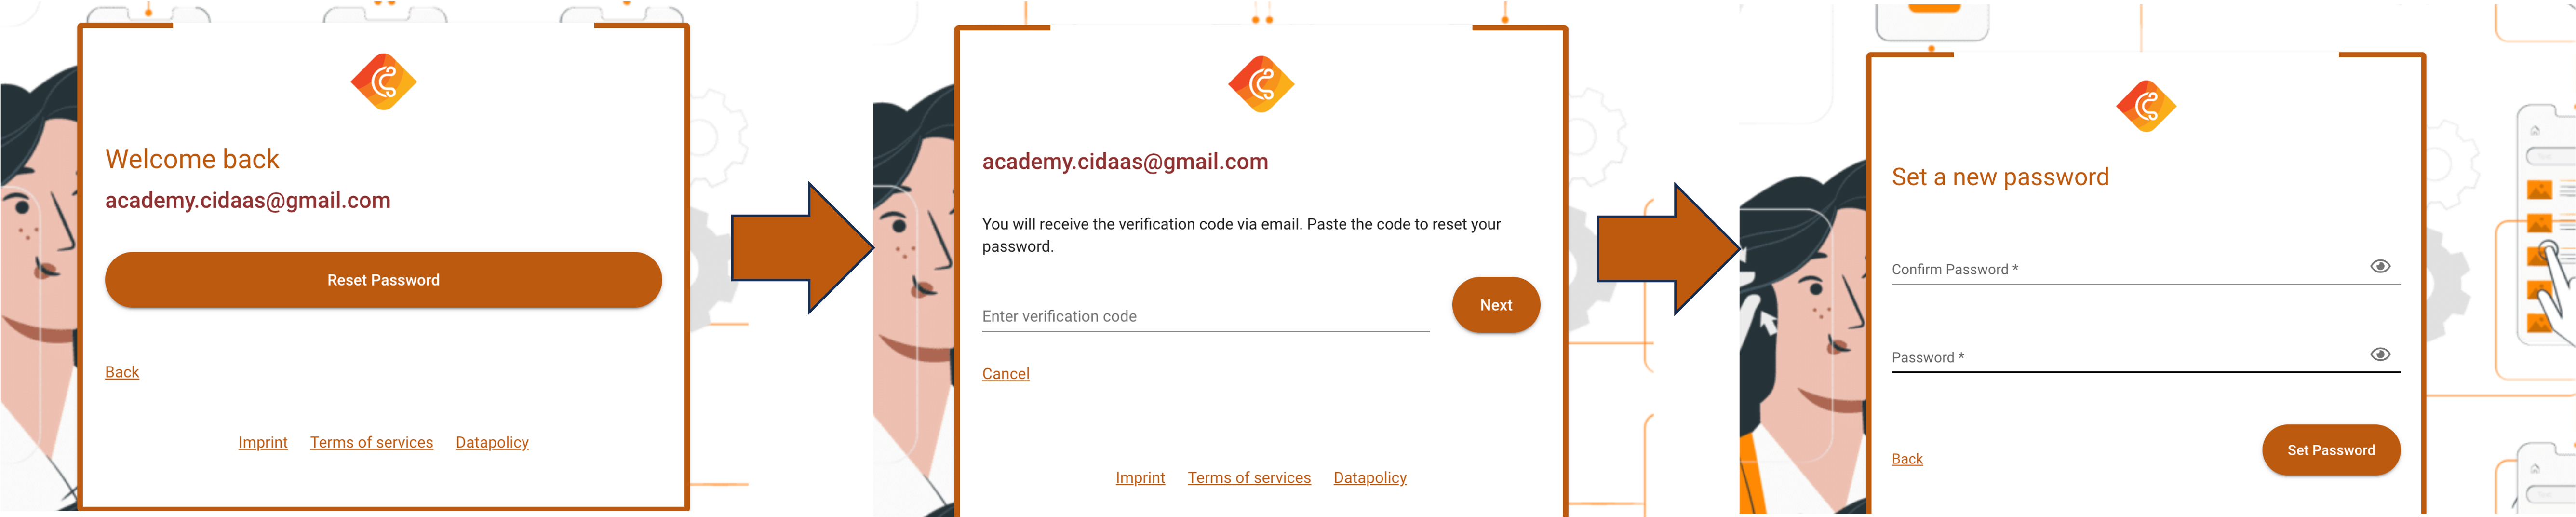
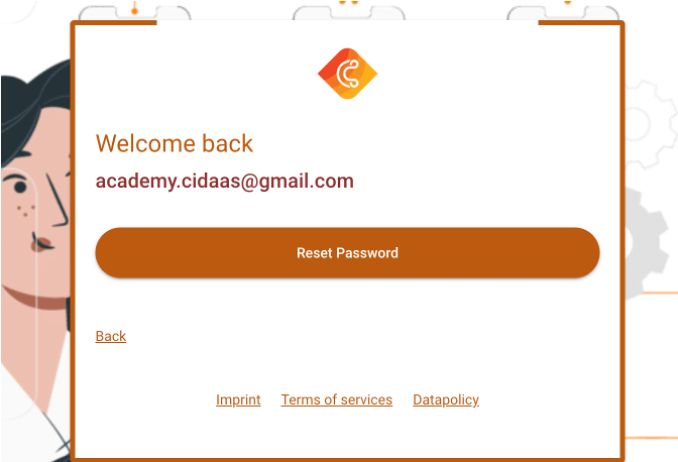
Step 1: Initiate Reset Password
To initiate the password reset you can offer the user a "forgot password" button after entering the identifier. An identifier can be email or mobile number.
Step 2: One-Time-Password Validation
The Initiation will send an email or SMS to the user including the Code he needs to enter.
The UI will present a text field, that accepts the code and triggers the validation of the code.
It will automatically redirect to the password_set page after the user successfully enters their code.

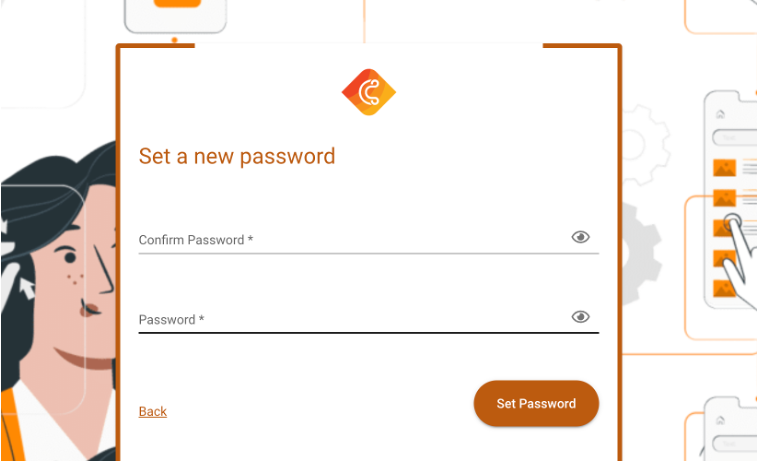
Step 3: Setting the password
The next step is for the user to enter the password they would like to use in the future.
Understanding the Flow and APIs
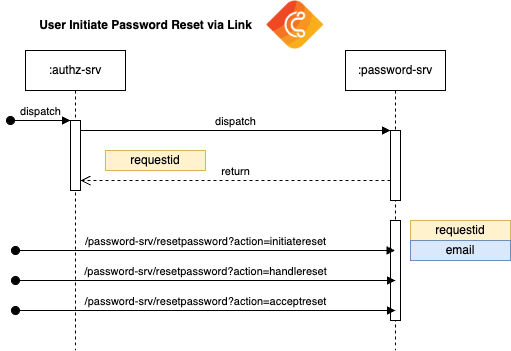
The User-initiated Password Reset flow when using the link is illustrated in the below flow-chart.

| No | API | Description |
|---|---|---|
| 1 | Authz | The authorization request allows to start the login, registration or the single sign on process. |
| 2 | Password Policy | The response returns a field password_policy containing the respective information to verify the password policy on UI-side |
| 3 | Initiate Password Reset | To initiate the password reset this API allows to define for which user and if using LINK or CODE-Flow. Provide processingType=CODE in this requestbody to start this flow. |
| 4 | Handle Password Reset | The handle password reset API is automatically performed by cidaas and must not be included in any UI. It will return the values to continue to actually perform the password change |
| 5 | Validate Code | The Validate Code API will verify if the code matches the one sent in the Email after triggering the initiation API |
| 6 | Accept Password Reset | This API will change the password for this user. |
To render the UI you can use following APIs
| API | Description | Link |
|---|---|---|
| GET Password Policy Information | To retrieve the password policy constraints to set a new password, this API can be used to find out the min length, number of special character etc. | Link to the API |
| GET Fieldsetup | This API allows to receive the translations for a particular field. | Link to API |
Step 1: Start the Authorization
When clicking on a login button the Authorization Request will be performed. When a user needs to log in, they will land on the login page.
https://demo.cidaas.de/identity/login?requestId=9080d117-43e2-4a03-8215-a9f7a03e2999&view_type=login
| No | API | Description |
|---|---|---|
| 1 | Authz | The authorization request allows to start the login, registration or the single sign-on process. |
It returns a requestId which is required as input for the Step 2.
Step 2: Initiate Reset Password
To initiate the password reset you can offer the user a "forgot password" button after entering the identifier. An identifier can be email or mobile number.
{
"requestId": "9080d117-43e2-4a03-8215-a9f7a03e2999",
"processingType": "CODE",
"resetMedium": "email",
}
| No | API | Description |
|---|---|---|
| 3 | Initiate Password Reset | To initiate the password reset this API allows to define for which user and if using LINK or CODE-Flow. Provide processingType=CODE in this requestbody to start this flow. |
| Template Key | Processing Type | Description |
|---|---|---|
| RESET_PASSWORD | CODE | This Template will be sent when a user triggers the forgot password and the UI implements the Code Flow for user-initiated password reset. |
It returns a rprq which is required as input for the Step 3.
Step 3: One-Time-Password Validation
The Initiation will send an email or SMS to the user including the Code he needs to enter.
The UI will present a text field, that accepts the code and triggers the validation of the code.
It will automatically redirect to the password_set page after the user successfully entered his code.
The resetRequestId is the rprq which was returned in the initiation-Request.
curl 'https://demo.cidaas.de/password-srv/resetpassword?action=validatecode' \
  -H 'accept: text/html,application/xhtml+xml,application/xml;q=0.9,image/avif,image/webp,image/apng,*/*;q=0.8,application/signed-exchange;v=b3;q=0.7' \
  -H 'content-type: application/json' \
  --data-raw '{
  "resetRequestId":"9c503149-efb7-4ab4-8f70-d049d2abd3eb",
  "code":"548979"}\
  --compressed
It redirects to the password_set page including the exchangeId as query parameter which is required as input for the Step 4.
| No | API | Description |
|---|---|---|
| 5 | Validate Code | The validate Code API will verify if the code matches the one sent in the Email after triggering the initiation API |
Step 4: Setting the password
The next step is for the user to enter the password he would like to use in future.
https://demo.cidaas.de/identity/password_set?exchangeId=057389f3-8680-4559-bf7d-53ea9567686a&requestId=9080d117-43e2-4a03-8215-a9f7a03e2999&rprq=9c503149-efb7-4ab4-8f70-d049d2abd3eb
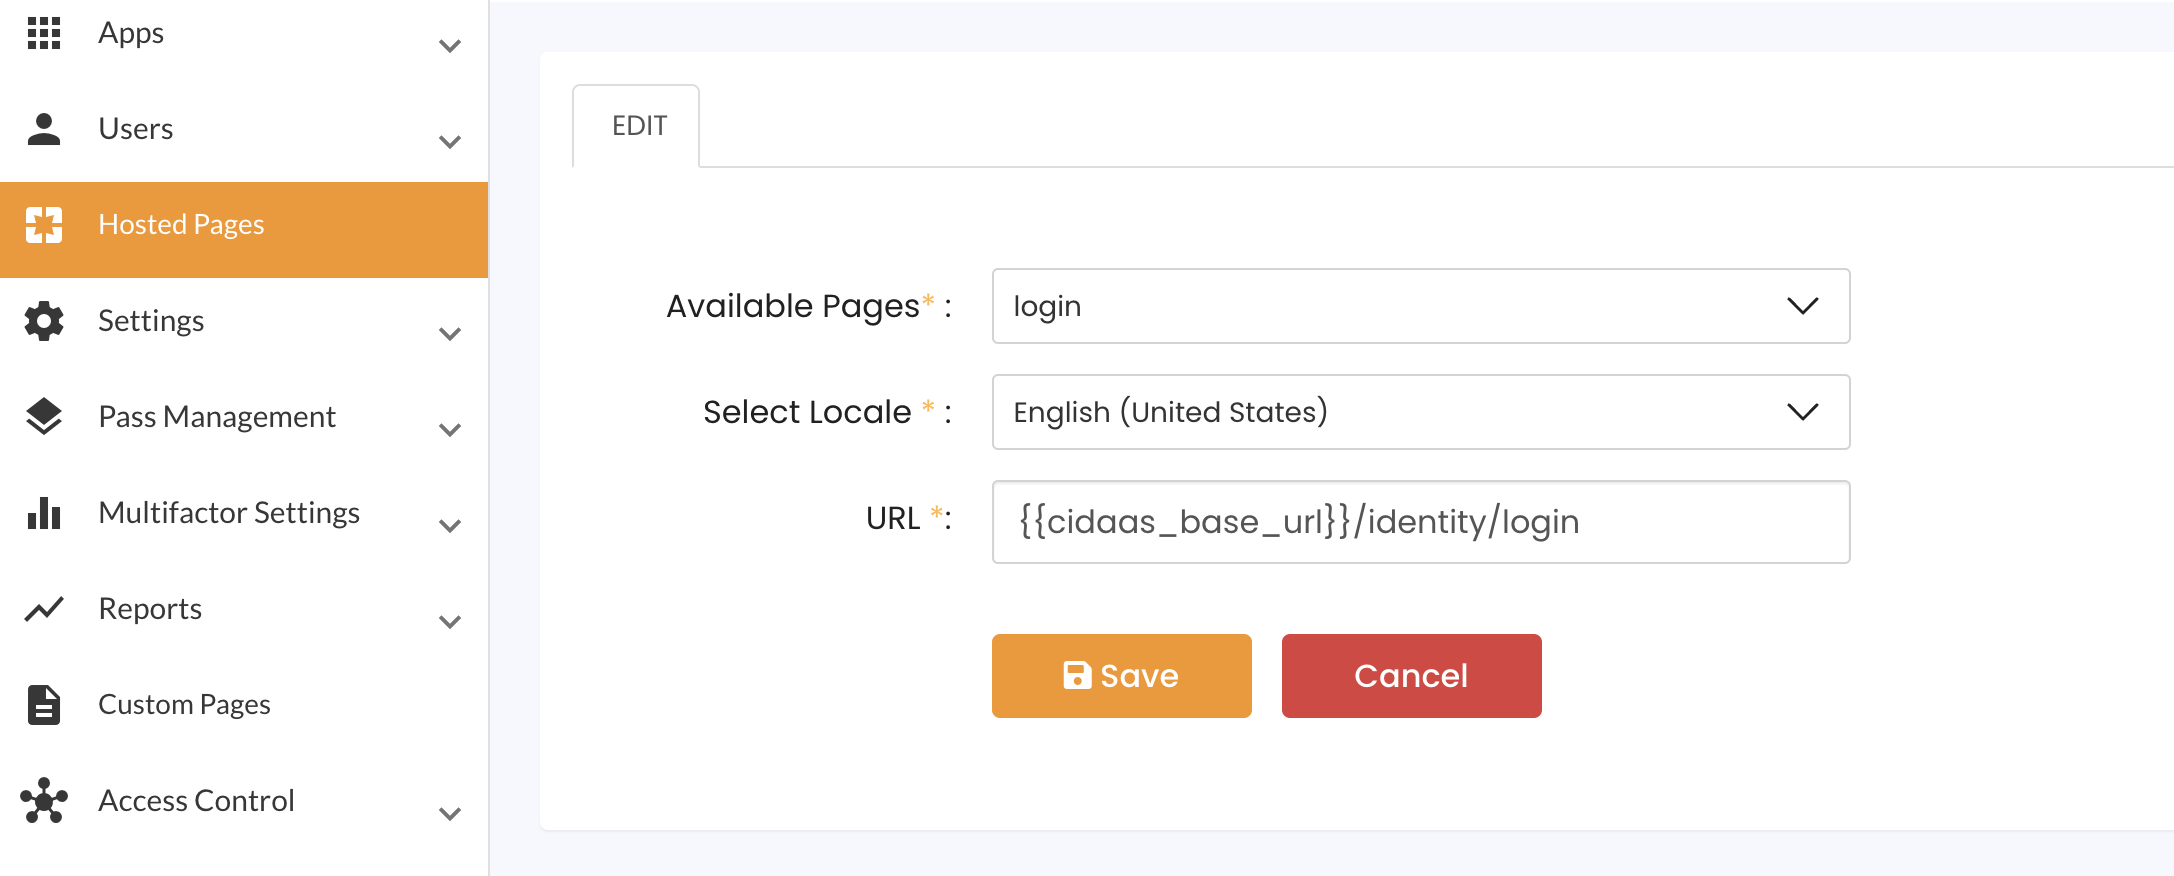
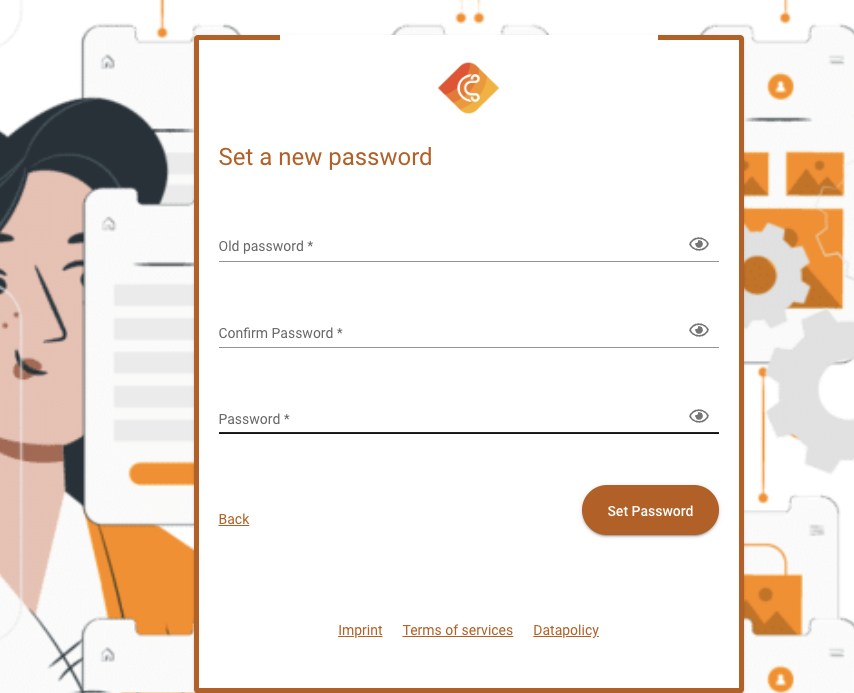
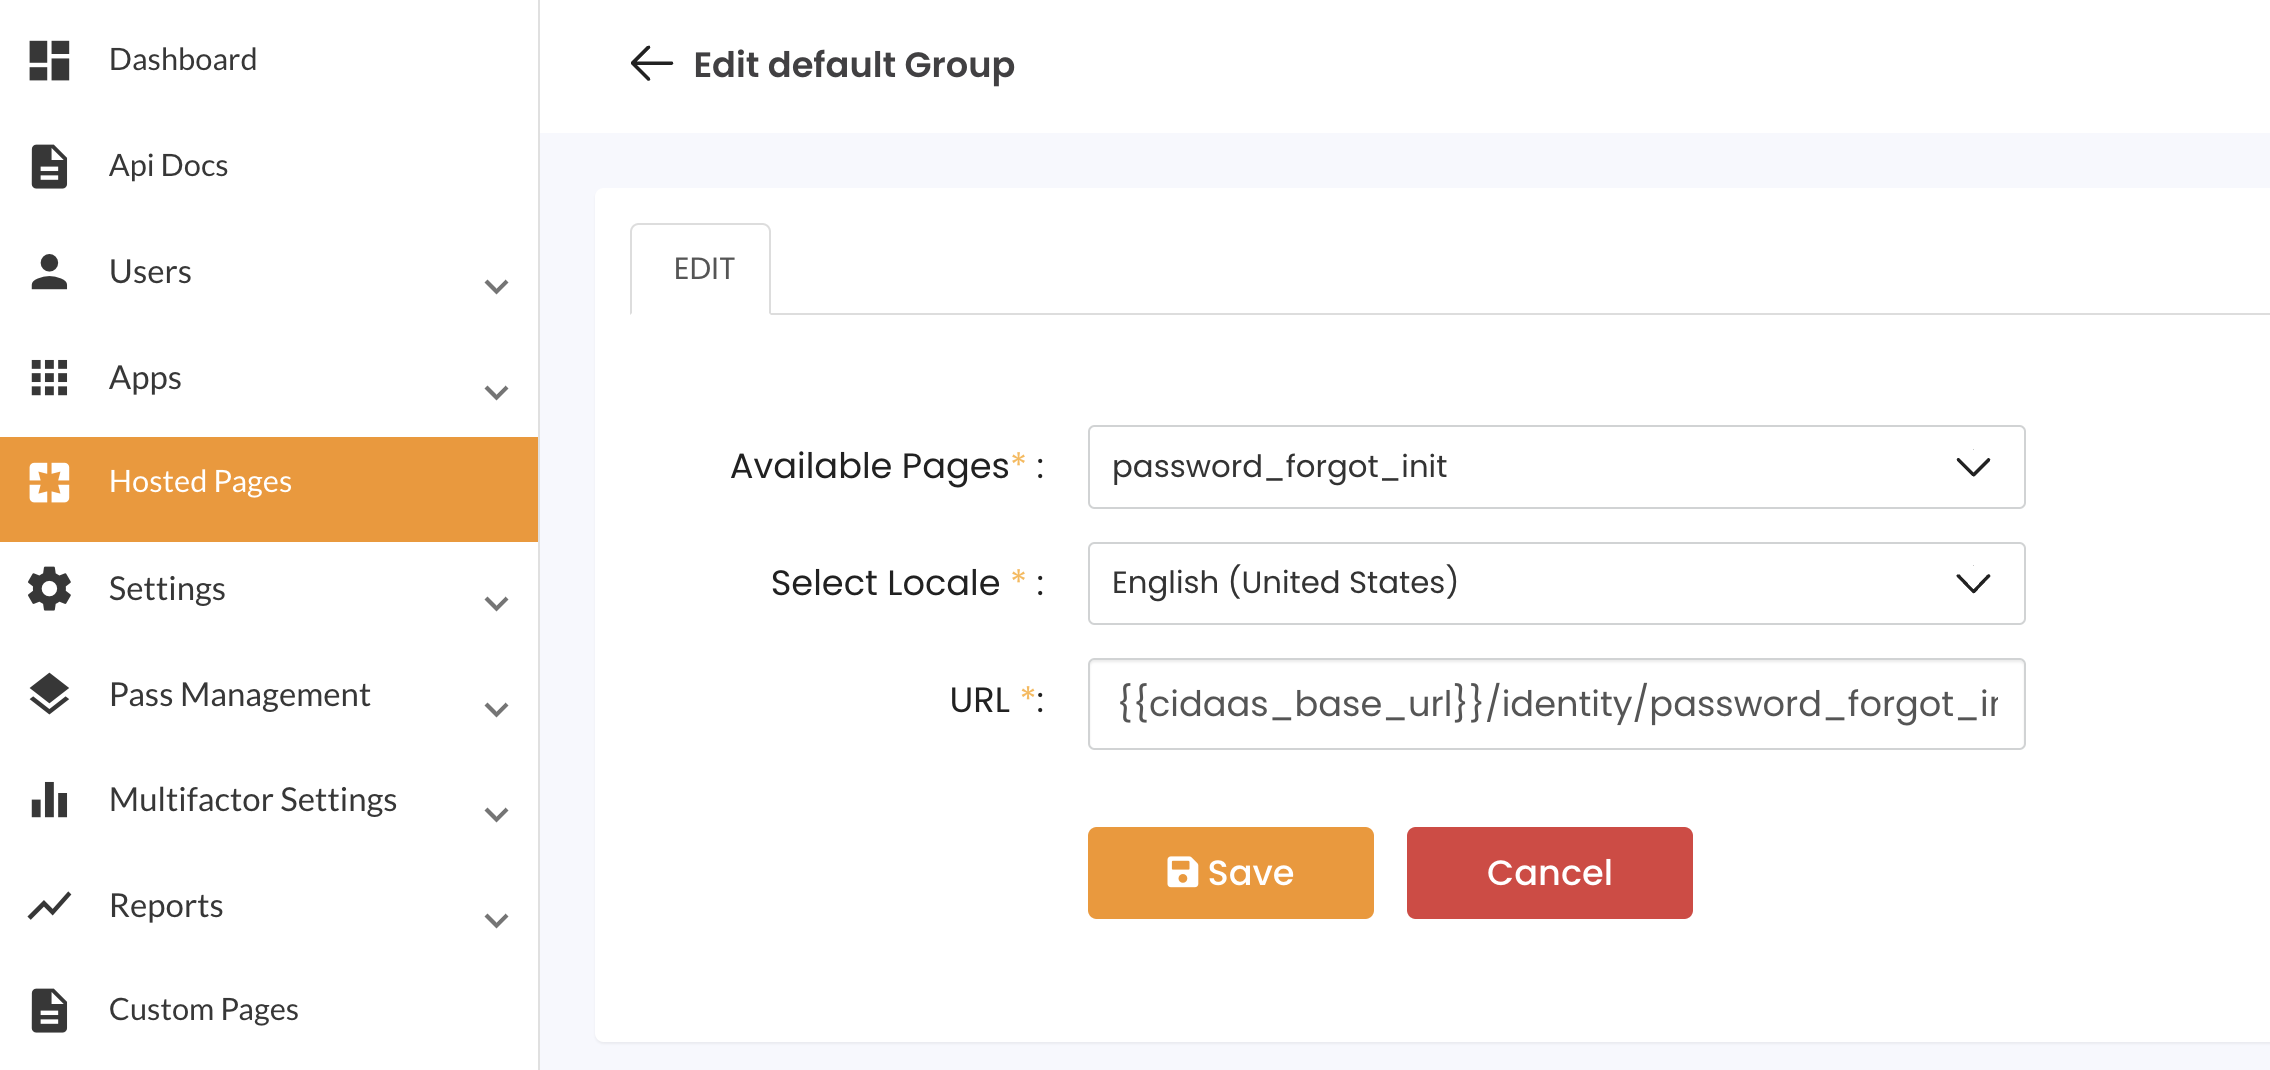
The user lands on the following hosted page. You can configure the path in hosted page section of your admin dashboard.

Now the text boxes to enter the password and confirm password should be displayed.
Please be aware that for translation you can use the public registration fieldsetup API, which allows to receive localized fields by providing the accept language.
curl 'https://demo.cidaas.de/password-srv/resetpassword?action=acceptreset'
  -H 'content-type: application/json' \
  --data-raw '{
  "resetRequestId":"9c503149-efb7-4ab4-8f70-d049d2abd3eb", \
  "exchangeId":"057389f3-8680-4559-bf7d-53ea9567686a", \
  "password":"Test12", \
  "confirmPassword":"Test12" \
  }' \
  --compressed
| No | API | Description |
|---|---|---|
| 6 | Accept Password Reset | This API will change the password for this user. |
Implementation using SDK
This Implementation Guide is based on the default hosted pages which uses an Angular framework based on Typescript. It can be implemented in any other programming language as well.
As a first step you will be redirected to the password_forgot_init page. This Section starts to show the APIs to be called when reaching this page:
To install the cidaas-sdk please perform the following command
npm install cidaas-javascript-sdk
The import to your webapp will be done by using:
this.cidaas_sdk = new WebAuth(options)
Step 1: Initiate Reset Password
To initiate the password reset you can offer the user a "forgot password" button after entering the identifier. An identifier can be email or mobile number.
let resetInitiatePayload = {
requestId: this.queryParams.requestId,
processingType: 'CODE',
resetMedium: 'email',//email or sms
};
this.cidaas_sdk.initiateResetPassword(resetInitiatePayload)
| No | API | Description |
|---|---|---|
| 3 | Initiate Password Reset | To initiate the password reset this API allows to define for which user and if using LINK or CODE-Flow. Provide processingType=LINK in this requestbody to start this flow. |
Step 2: Validating the Code
The Initiation will send an email or SMS to the user including the code they need to enter.
The resetRequestId is the rprq which was returned in the initiation-Request.
const resetAuthenticatePayload = { resetRequestId: this.data.rprq, code: e.code };
this.cidaas_sdk.handleResetPassword(resetAuthenticatePayload)
Step 3: Rendering the UI
The UI will immediately display the password fields, so the user can enter the new password and continue to log in.
To be able to render the fields properly in the UI, you want to request all localized fields, with all respective data like maxLength, even error messages displayed when not having this field filled or fields not matching the respective password policy.
    let options = {
      acceptlanguage: this.queryParams.ui_locales? this.queryParams.ui_locales : navigator.language,
      requestId: this.route.snapshot.queryParams['requestId'],
    };
    const resp = await  this.cidaas_sdk
      ._getRegistrationSetup(options);
After retrieving the fields filter the fields for dataType "PASSWORD"
let fields = resp.data.filter((registerField) => registerField.dataType === 'PASSWORD' && registerField.fieldType === "SYSTEM");
Then add the validation for password policies to those fields. Therefore the below password policy will be loaded and saved as passwordpolicy.
    let options = {
      requestId: this.route.snapshot.queryParams['requestId'],
    };
    const resp = await  this.cidaas_sdk
      ._getClientInfo(options);
The next part is just an example how to implement the password policy.
_addPasswordPolicy = (field: any) => {
    let validations = ['lowerAndUpperCase', 'maximumLength', 'minimumLength', 'noOfDigits', 'noOfSpecialChars'];
    validations.forEach((key) => {
      if (validations.includes(key)) {
        if (key == 'maximumLength') {
          field.fieldDefinition['maxLength'] = this.passwordPolicy['maximumLength'] || undefined;
          let translationValue = (field.fieldDefinition['maxLength'] === 1)? "FORM.VALIDATION.PASSWORD.POLICY.CHAR_MAX_ONE" : "FORM.VALIDATION.PASSWORD.POLICY.CHAR_MAX";
          this.translate
            .get(translationValue, { count: field.fieldDefinition['maxLength'] })
            .subscribe((res) => {
              field.localeText['maxLength'] = res;
            });
        }
        if (key == 'minimumLength') {
          field.fieldDefinition['minLength'] = this.passwordPolicy['minimumLength'] || undefined;
          let translationValue = (field.fieldDefinition['minLength'] === 1)? "FORM.VALIDATION.PASSWORD.POLICY.CHAR_MIN_ONE" : "FORM.VALIDATION.PASSWORD.POLICY.CHAR_MIN";
          this.translate
            .get(translationValue, { count: field.fieldDefinition['minLength'] })
            .subscribe((res) => {
              field.localeText['minLength'] = res;
            });
        }
        if (key == 'noOfDigits') {
          field.fieldDefinition['digitsLength'] = this.passwordPolicy['noOfDigits'] || undefined;
          let translationValue = (field.fieldDefinition['digitsLength'] === 1)? "FORM.VALIDATION.PASSWORD.POLICY.CHAR_DIGIT_ONE" : "FORM.VALIDATION.PASSWORD.POLICY.CHAR_DIGIT";
          this.translate
            .get(translationValue, { count: field.fieldDefinition['digitsLength'] })
            .subscribe((res) => {
              field.localeText['digitsLength'] = res;
            });
        }
        if (key == 'noOfSpecialChars') {
          field.fieldDefinition['specialLength'] =
            this.passwordPolicy['noOfSpecialChars'] || undefined;
            let translationValue = (field.fieldDefinition['specialLength'] === 1)? "FORM.VALIDATION.PASSWORD.POLICY.CHAR_SPECIAL_ONE" : "FORM.VALIDATION.PASSWORD.POLICY.CHAR_SPECIAL";
          this.translate
            .get(translationValue, { count: field.fieldDefinition['specialLength'] })
            .subscribe((res) => {
              field.localeText['specialLength'] = res;
            });
        }
        if (key == 'lowerAndUpperCase') {
          field.fieldDefinition['lowerupperCase'] = this.passwordPolicy['lowerAndUpperCase'] || undefined;
          this.translate.get('FORM.VALIDATION.PASSWORD.POLICY.CHAR_LOWER_UPPER').subscribe((res) => {
            field.localeText['lowerupperCase'] = res;
          });
        }
      }
    });
    return field;
  };
| API | Description | Link |
|---|---|---|
| GET Password Policy Information | To retrieve the password policy constraints to set a new password, this api can be used to find out the min length, number of special character etc. | Link to the API |
| GET Fieldsetup | This API allows to receive the translations for a particular field. | Link to API |
Step 4: Setting the password
The next step is for the user to enter the password he would like to use in future.
https://demo.cidaas.de/identity/password_set?exchangeId=057389f3-8680-4559-bf7d-53ea9567686a&requestId=9080d117-43e2-4a03-8215-a9f7a03e2999&rprq=9c503149-efb7-4ab4-8f70-d049d2abd3eb
You will land with the above queryparams on the password_forgot_init page.
let resetPayload = {
      resetRequestId:  this.queryParams.rprq,
      exchangeId:  this.queryParams.exchangeId,
      password: e.password,
      confirmPassword: e.password_echo,
    };
this.cidaas_sdk.resetPassword(resetPayload);
| No | API | Description |
|---|---|---|
| 5 | Accept Password Reset | This API will change the password for this user. |
Link-Flow for Password Reset
Introduction to User Initiated Password using Link-Flow
The Reset Link Flow consists of three steps, after the login page was opened. For complete overview, please also find the authorization Request and Public-Reset in the documentation
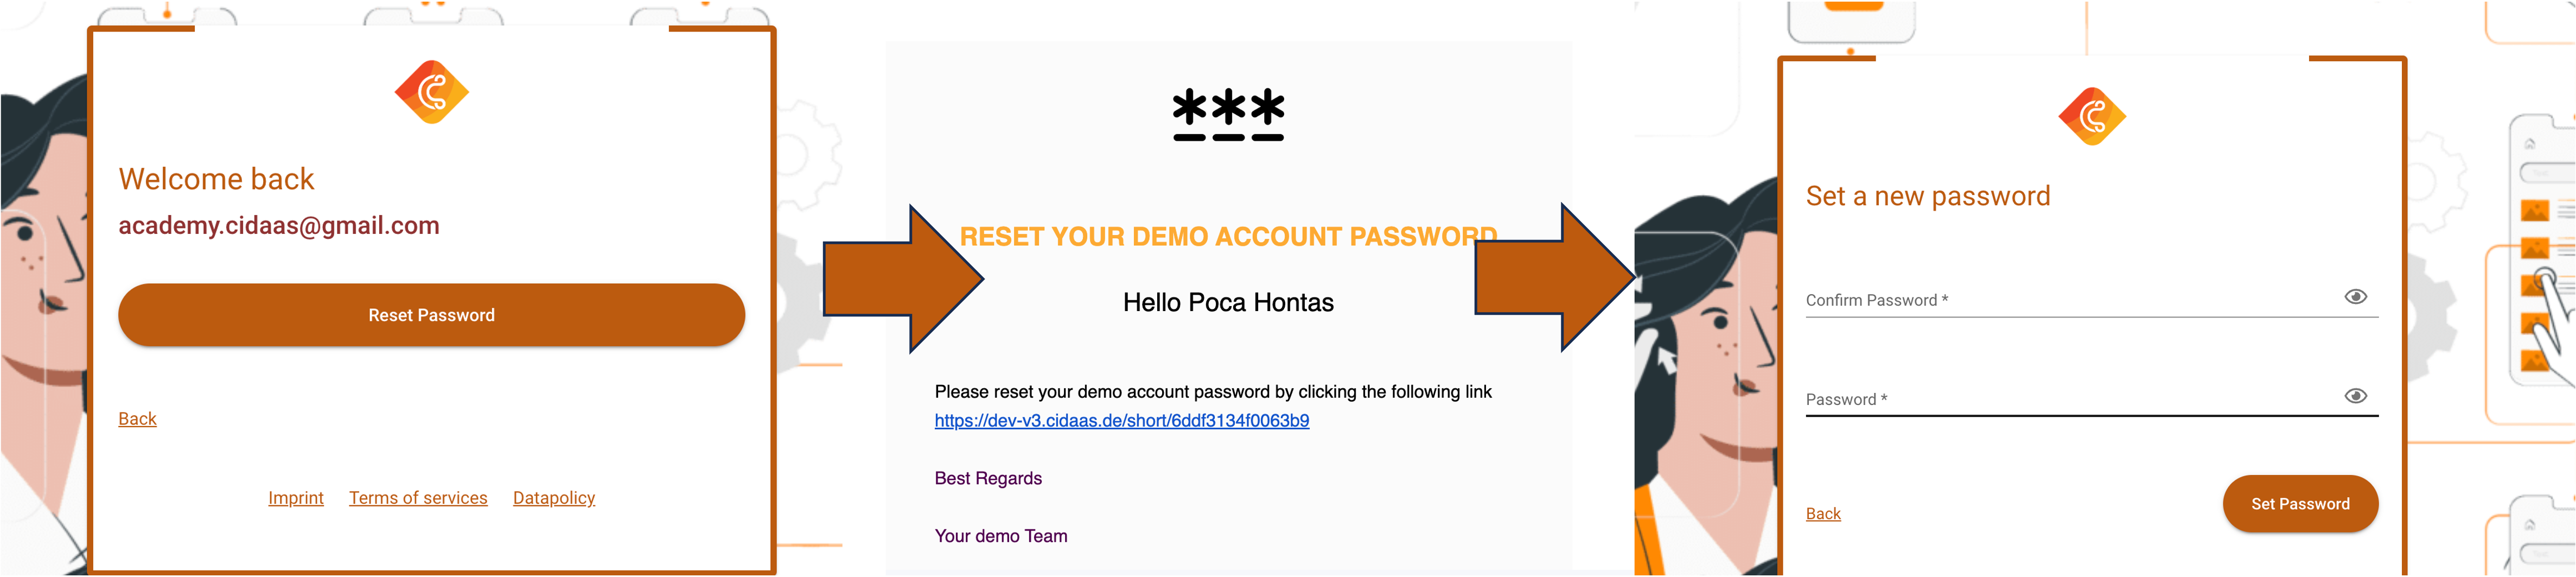
Step 1: Initiate Reset Password
To initiate the password reset you can offer the user a "forgot password" button after entering the identifier. An identifier can be email or mobile number.
The user will receive a link and by clicking on the link, the user will be prompted to set a new password.
Step 2: Setting the password
The next step is for the user to enter the password he would like to use in future.
Understanding the Flow and APIs
The User-initiated Password Reset flow when using the code is illustrated in the below flow-chart.
| No | API | Description |
|---|---|---|
| 1 | Authz | The authorization request allows to start the login, registration or the single sign on process. |
| 2 | Password Policy | The response returns a field password_policy containing the respective information to verify the password policy on UI-side |
| 3 | Initiate Password Reset | To initiate the password reset this API allows to define for which user and if using LINK or CODE-Flow. Provide processingType=LINK in this requestbody to start this flow. |
| 4 | Handle Password Reset | The handle password reset API is automatically performed by cidaas and must not be included in any UI. It will return the values to continue to actually perform the password change |
| 5 | Accept Password Reset | This API will change the password for this user. |
To render the UI you can use following APIs
| API | Description | Link |
|---|---|---|
| GET Password Policy Information | To retrieve the password policy constraints to set a new password, this api can be used to find out the min length, number of special character etc. | Link to the API |
| GET Fieldsetup | This API allows to receive the translations for a particular field. | Link to API |
Step 1: Start the Authorization
When clicking on a login button the Authorization Request will be performed. When a user requires to login, he will land on the login page.
https://demo.cidaas.de/identity/login?requestId=9080d117-43e2-4a03-8215-a9f7a03e2999&view_type=login
| No | API | Description |
|---|---|---|
| 1 | Authz | The authorization request allows to start the login, registration or the single sign on process. |
It returns a requestId which is required as input for the Step 2.
Step 2: Initiate Reset Password
To initiate the password reset you can offer the user a "forgot password" button after entering the identifier. An identifier can be email or mobile number.
{
"requestId": "9080d117-43e2-4a03-8215-a9f7a03e2999",
"processingType": "LINK",
"resetMedium": "email",
}
| No | API | Description |
|---|---|---|
| 3 | Initiate Password Reset | To initiate the password reset this API allows to define for which user and if using LINK or CODE-Flow. Provide processingType=LINK in this requestbody to start this flow. |
| Template Key | Processing Type | Description |
|---|---|---|
| RESET_PASSWORD | LINK | This Template will be sent when a user triggers the forgot password and the UI implements the Link Flow for user-initiated password reset. |
It returns a rprq which is required as input for the Step 3.
Step 3: Setting the password
The next step is for the user to enter the password he would like to use in future.
https://demo.cidaas.de/identity/password_forgot_init?exchangeid=af7c2f3d-ba79-4d07-92e4-05e04c624bb6&requestId=9c503149-efb7-4ab4-8f70-d049d2abd3eb&resetMedium=email&rprq=9c503149-efb7-4ab4-8f70-d049d2abd3eb&type=link
The user landed on following hosted page. You can configure the path in hosted page section of your admin dashboard.
Now the text boxes to enter the password and confirm password should be displayed.
Please be aware that for translation you can use the public registration fieldsetup API, which allows to receive localized fields by providing the accept language.
curl 'https://demo.cidaas.de/password-srv/resetpassword?action=acceptreset' \
  -H 'content-type: application/json' \
  --data-raw '{
  "resetRequestId":"9c503149-efb7-4ab4-8f70-d049d2abd3eb", \
  "exchangeId":"af7c2f3d-ba79-4d07-92e4-05e04c624bb6", \
  "password":"Test12", \
  "confirmPassword":"Test12" \
  }' \
  --compressed
| No | API | Description |
|---|---|---|
| 5 | Accept Password Reset | This API will change the password for this user. |
Implementation using SDK
This Implementation Guide is based on the default hosted pages which is using a angular framework based on Typescript. It can be implemented in any other programming language as well.
As a first step you will be redirected to the password_forgot_init page. This Section starts to show the apis to be called when reaching this page:
To install the cidaas-sdk please perform following command
npm install cidaas-javascript-sdk
The import to your webapp will be done by using:
this.cidaas_sdk = new WebAuth(options)
Step 1: Initiate Reset Password
To initiate the password reset you can offer the user a "forgot password" button after entering the identifier. An identifier can be email or mobile number.
let resetInitiatePayload = {
requestId: this.queryParams.requestId,
processingType: 'LINK',
resetMedium: 'email',//email or sms
};
this.cidaas_sdk.initiateResetPassword(resetInitiatePayload)
| No | API | Description |
|---|---|---|
| 3 | Initiate Password Reset | To initiate the password reset this API allows to define for which user and if using LINK or CODE-Flow. Provide processingType=LINK in this requestbody to start this flow. |
Step 2: Rendering the UI
The UI will immediately display the password fields, so the user can enter the new password and continue to login.
To be able to render the fields properly in the UI, you want to request all localized fields, with all respective data like maxLength, even error messages displayed when not having this field filled or fields not matching the respective password policy.
    let options = {
      acceptlanguage: this.queryParams.ui_locales? this.queryParams.ui_locales : navigator.language,
      requestId: this.route.snapshot.queryParams['requestId'],
    };
    const resp = await  this.cidaas_sdk
      ._getRegistrationSetup(options);
After retrieving the fields filter the fields for dataType "PASSWORD"
let fields = resp.data.filter((registerField) => registerField.dataType === 'PASSWORD' && registerField.fieldType === "SYSTEM");
Then add the validation for passwordpolicies to those fields. Therefore the below password policy will be loaded and saved as password policy.
    let options = {
      requestId: this.route.snapshot.queryParams['requestId'],
    };
    const resp = await  this.cidaas_sdk
      ._getClientInfo(options);
The next part is just an example how to implement the password policy.
_addPasswordPolicy = (field: any) => {
    let validations = ['lowerAndUpperCase', 'maximumLength', 'minimumLength', 'noOfDigits', 'noOfSpecialChars'];
    validations.forEach((key) => {
      if (validations.includes(key)) {
        if (key == 'maximumLength') {
          field.fieldDefinition['maxLength'] = this.passwordPolicy['maximumLength'] || undefined;
          let translationValue = (field.fieldDefinition['maxLength'] === 1)? "FORM.VALIDATION.PASSWORD.POLICY.CHAR_MAX_ONE" : "FORM.VALIDATION.PASSWORD.POLICY.CHAR_MAX";
          this.translate
            .get(translationValue, { count: field.fieldDefinition['maxLength'] })
            .subscribe((res) => {
              field.localeText['maxLength'] = res;
            });
        }
        if (key == 'minimumLength') {
          field.fieldDefinition['minLength'] = this.passwordPolicy['minimumLength'] || undefined;
          let translationValue = (field.fieldDefinition['minLength'] === 1)? "FORM.VALIDATION.PASSWORD.POLICY.CHAR_MIN_ONE" : "FORM.VALIDATION.PASSWORD.POLICY.CHAR_MIN";
          this.translate
            .get(translationValue, { count: field.fieldDefinition['minLength'] })
            .subscribe((res) => {
              field.localeText['minLength'] = res;
            });
        }
        if (key == 'noOfDigits') {
          field.fieldDefinition['digitsLength'] = this.passwordPolicy['noOfDigits'] || undefined;
          let translationValue = (field.fieldDefinition['digitsLength'] === 1)? "FORM.VALIDATION.PASSWORD.POLICY.CHAR_DIGIT_ONE" : "FORM.VALIDATION.PASSWORD.POLICY.CHAR_DIGIT";
          this.translate
            .get(translationValue, { count: field.fieldDefinition['digitsLength'] })
            .subscribe((res) => {
              field.localeText['digitsLength'] = res;
            });
        }
        if (key == 'noOfSpecialChars') {
          field.fieldDefinition['specialLength'] =
            this.passwordPolicy['noOfSpecialChars'] || undefined;
            let translationValue = (field.fieldDefinition['specialLength'] === 1)? "FORM.VALIDATION.PASSWORD.POLICY.CHAR_SPECIAL_ONE" : "FORM.VALIDATION.PASSWORD.POLICY.CHAR_SPECIAL";
          this.translate
            .get(translationValue, { count: field.fieldDefinition['specialLength'] })
            .subscribe((res) => {
              field.localeText['specialLength'] = res;
            });
        }
        if (key == 'lowerAndUpperCase') {
          field.fieldDefinition['lowerupperCase'] = this.passwordPolicy['lowerAndUpperCase'] || undefined;
          this.translate.get('FORM.VALIDATION.PASSWORD.POLICY.CHAR_LOWER_UPPER').subscribe((res) => {
            field.localeText['lowerupperCase'] = res;
          });
        }
      }
    });
    return field;
  };
| API | Description | Link |
|---|---|---|
| GET Password Policy Information | To retrieve the password policy constraints to set a new password, this api can be used to find out the min length, number of special character etc. | Link to the API |
| GET Fieldsetup | This API allows to receive the translations for a particular field. | Link to API |
Step 3: Setting the password
The next step is for the user to enter the password he would like to use in future.
https://demo.cidaas.de/identity/password_forgot_init?exchangeid=af7c2f3d-ba79-4d07-92e4-05e04c624bb6&requestId=9c503149-efb7-4ab4-8f70-d049d2abd3eb&resetMedium=email&rprq=9c503149-efb7-4ab4-8f70-d049d2abd3eb&type=link
You will land with the above queryparams on the password_forgot_init page.
let resetPayload = {
      resetRequestId:  this.queryParams.rprq,
      exchangeId:  this.queryParams.exchangeid,
      password: e.password,
      confirmPassword: e.password_echo,
    };
this.cidaas_sdk.resetPassword(resetPayload);
| No | API | Description |
|---|---|---|
| 5 | Accept Password Reset | This API will change the password for this user. |
Need help implementing this?
Please contact us on our Support Portal.