Authentication and Token Generation Process
The Authentication to cidaas follows a sequential flow with three main steps. This documentation explains how to implement the complete authentication process.
Authentication Flow Overview
The authentication process consists of three sequential steps:
| Step | Description | What Happens |
|---|---|---|
| 1. Authorization (Authz) | Entry point to start the authentication process | Calls the Authz service to either perform Single Sign-On (if user has valid session) or redirect to the login page. Returns a requestId for subsequent steps. |
| 2. Authentication | User authenticates using their chosen method | After Authz redirects to login page, user selects and completes authentication (password, OTP, FIDO2, etc.). Various authentication methods are available. |
| 3. Login / Precheck Continue | Complete the login and handle any required conditions | After successful authentication, the login process completes. If prechecks are required (e.g., group selection, consent, password change), they must be fulfilled before the code/token is issued. |
| 4. Code Exchange | Exchange authorization code for tokens | Final step: Exchange the authorization code (from step 3) for access tokens using the token endpoint. |
Flow Diagram
Detailed Flow Explanation
-
Authz (Authorization): The Authorization call is the first call and entry point to start the authentication process.
- If the user is already logged in and has a valid session, they will be redirected to the given
redirect_uriwith a code/token (SSO scenario). - If the user is not authenticated or has an invalid session, they will be prompted to the login page with a
requestId.
- If the user is already logged in and has a valid session, they will be redirected to the given
-
Authentication: After Authz redirects to the login page, the user needs to authenticate using their chosen method.
- The user selects an authentication method (password, email OTP, SMS OTP, FIDO2, etc.).
- Authentication APIs are called to initiate and complete the authentication process.
- After successful authentication, the user proceeds to the login step.
-
Login / Precheck Continue: After successful authentication, the login process continues.
- If no prechecks are required, the user is redirected to
redirect_uriwith an authorization code. - If prechecks are required (group selection, scope consent, password change, etc.), the user must fulfill these conditions first.
- Once all conditions are met, call the precheck continue API to complete the login and receive the authorization code.
- If no prechecks are required, the user is redirected to
-
Code Exchange: The final step exchanges the authorization code for access tokens, ID tokens, and refresh tokens.
Implicit vs. Authorization Code vs. PKCE
Why we start with this section? Because first it is important to understand which parameter you need to pass to in the various steps starting with the step Authorization. To ensure you are using the most secure and recommended authentication flow we only explain the PKCE flow below, but first we provide the overview about the difference between the Implicit and Authorization code.
| Flow name | Description |
|---|---|
| Implicit Grant | The implicit flow is initiated by providing response_type as type token. In this case the after performing a successful login step the token will be directly issued to the provided redirect_uri. This is less secure and not recommended. |
| Authorization Code Grant | The current oauth2.1 specification states that the Authorization Code Grant should be replaced by the PKCE Grant in all applications. Until now, this is mandatory for client-side web applications and mobile apps, because it is not possible to hide the client_secret. In Authorization Code Grant the client_secret is required to change code to token. |
| PKCE Grant | recommended: The PKCE allows to provide a code_challenge. This provides higher security to protect your user accounts. |
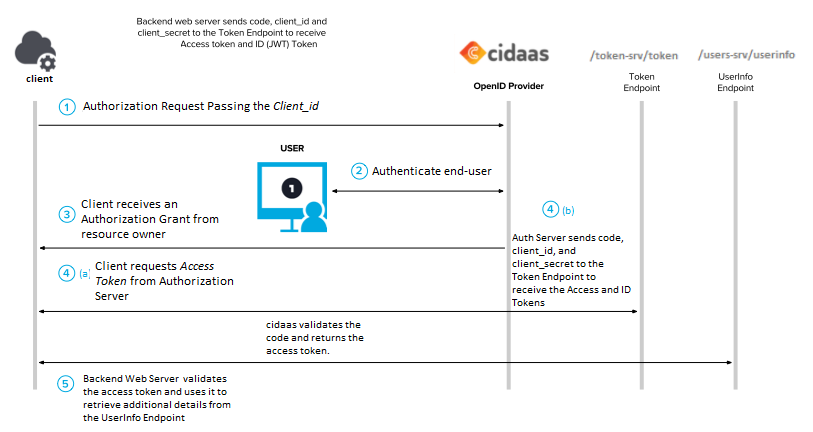
Step 1: The user attempts to start a session with your client app and is redirected to cidaas which passes in the unique client ID for that application.
Step 2: Client (your app) requests authorization from resource owner (end user) who has their protected resource on a resource server.
Step 3: The Client receives an Authorization Grant from resource owner
Step 4(a): The Client then requests Access Token from Authorization Server. A one-time-use code is passed back to the web server using a predefined Redirect URI.
Step 4(b): Once successfully identified, a token is issued by the Authorization Server to the Client. The web server passes the code, Client ID, and Client secret to cidaas’s token endpoint, and cidaas validates the code and returns a temporary access token.
Step 5: The Resource Server validates the Access Token and uses it to service the request/ retrieve additional details from the /users-srv/userinfo Endpoint.
Note
Here, the Authorization Grant is based on the type of Client (your Application), and how secure the communication protocols are between Client (your App) and Authorization Server.
Step 1: Authorization (Authz)
The Authz URL is the entry point of the user authentication. This authz URL parameters define how the login/register is going to happen.
When Authz is performed:
- User clicks "Login" in your application
- Your application redirects user to cidaas authorization endpoint
- cidaas checks if user has valid session:
- If valid session exists: User is redirected back to
redirect_uriwith code/token (SSO) - If no valid session: User is redirected to login page with
requestIdparameter
- If valid session exists: User is redirected back to
The below URL helps you to verify the Authorization Code Flow With PKCE
curl --location -g --request GET https://{{base_url}}/authz-srv/authz?client_id={{client_id}}&redirect_uri={{redirect_url}}&response_type=code&code_challenge={{enter_the_code}}&code_challenge_method=S256
We guide you to fill out the placeholders:
| Step | Description | Link |
|---|---|---|
| 1 | Create a unique string with the below code, to create a code_verifier | |
| 2 | Create a SHA256 hash of the code_verifier and base64 url encode it this will be the code_challenge | |
| 3 | Call the above authz URL |
var code_verifier = 'some-random-string'
This acts as your code_verifier. We recommend you store the code_verifier, as it's needed for the second request in the Authorization Code flow.
This is your code_challenge, send it with code_challenge_method=S256 when you request the initial Authorization Code.
const crypto = require('crypto')
const base64url = require('base64url')

var hash = crypto.createHash('sha256').update(code_verifier).digest();
var code_challenge = base64url.encode(hash)
| Parameter Name | Description |
|---|---|
| client_id | client which represent the business-App in cidaas, where the Resource Owner want to have access |
| redirect_uri | URI where cidaas should redirect to, after login |
| scope | scope which the user ask for. E.g. profile give access to profile data |
| response_type | type of response. In PKCE it has to be code. In cases of the hybrid flow in OIDC it could also be code id-token |
| code_challenge | BASE64-URL-encoded string of the hash of the code_verifier |
| code_challenge_method | Method which was used for hashing code_challenge. In oauth there are two options - plain which means no hashing or S256 |
| state | random onetime string which will generate at the beginning of the flow. Recommended to avoid CSRF |
| view_type | the view_type defines if user should be prompted to the register or login page |
Step 2: Authentication
After Authz redirects to the login page, authentication will happen using various authentication methods.
What happens during authentication:
- User is presented with available authentication methods (password, email OTP, SMS OTP, FIDO2, etc.)
- User selects their preferred method
- Authentication APIs are called to initiate and complete the authentication:
- Initiate authentication: Call the initiate endpoint for the selected method
- Perform authentication: Complete the authentication (enter password, verify OTP, etc.)
- After successful authentication, the user proceeds to the login step
Available Authentication Methods:
- Password authentication
- Email/SMS OTP
- Magic Link
- FIDO2 / WebAuthn
- TOTP
- Pattern
- And more...
For detailed information about each authentication method, see the Verification Flow documentation.
Key APIs for Authentication:
- Initiate Authentication - Start the authentication process for a selected method
- Perform Authentication - Complete the authentication (verify password, OTP, etc.)
- Login after Authentication - Complete login after passwordless authentication
Important: After successful authentication, you may need to call the login endpoint or handle prechecks before the authorization code is issued.
Step 3: Login / Token Conditions (Prechecks)
After successful authentication, the login process continues. However, token conditions (also called prechecks) may be required before the authorization code or token can be issued.
What are Token Conditions / Prechecks?
Token conditions are additional requirements that must be fulfilled after successful authentication but before a token/code is issued. They act as a security and compliance layer in the authentication flow.
Key points about token conditions:
- They occur after authentication is successful but before code/token issuance
- They block the flow until fulfilled - no code/token is issued until conditions are met
- They are configured per application/client in cidaas
- They ensure security, compliance, and data completeness
When Do Token Conditions Occur?
Token conditions are evaluated immediately after successful authentication in Step 2. The system checks:
- If any prechecks are configured for your application
- If the user has already fulfilled them
- If any conditions are still unmet
Flow behavior:
- If no prechecks are required: User is immediately redirected to
redirect_uriwith authorization code - If prechecks are required: Flow pauses, user must fulfill conditions, then continue
Scenario A: No Token Conditions Required
If no prechecks are configured or all conditions are already met:
- The user is automatically redirected to your
redirect_uriwith an authorization code - The code is in the format:
{{redirect_uri}}?code=ea2707b0-1bb3-49de-9d32-4c5aa79722ad - Proceed directly to Step 4: Code Exchange
Scenario B: Token Conditions Required
If prechecks are required, the authentication flow is paused and you must:
-
Receive the track_id:
- After authentication, if prechecks are required, you'll receive a
track_idinstead of an immediate redirect - This
track_idis used to continue the flow after fulfilling conditions - The
track_idis valid for 6 hours or until used
- After authentication, if prechecks are required, you'll receive a
-
Get precheck information:
- Call the prelogin metadata API to understand what conditions need to be fulfilled
- This API returns details about which prechecks are required (e.g., "group_selection", "scope_consent", "password_change")
- API: Get Pre-Login Metadata
-
Fulfill the precheck conditions:
- Present the required UI to the user based on the precheck type:
- Group Selection: Show group selection UI
- Scope Consent: Show consent form for requested scopes
- Password Change: Show password change form
- Missing Fields: Show form to collect required profile information
- And more...
- Collect the necessary information from the user
- Present the required UI to the user based on the precheck type:
-
Continue the login process:
- Call the precheck continue API with the
track_idand any required data - API: Continue Login after Precheck
- This will redirect to your
redirect_uriwith the authorization code - Only after this call will the code be issued
- Call the precheck continue API with the
Common Token Conditions / Prechecks
| Precheck Type | Key | Description | When It Occurs |
|---|---|---|---|
| Group Selection | group_selection | User must select a group before login completes | When user belongs to multiple groups and app requires group selection |
| Scope Consent | scope_consent | User must consent to requested scopes | When app requests scopes that require user consent (Third Party clients) |
| Claim Consent | claim_consent | User must consent to specific user claims/fields | When app requests specific claims that require consent |
| Password Change | password_change | User must change password on next login | When admin resets password or creates user with temporary password |
| Missing Required Fields | missing_required_fields | User must provide additional profile information | When app requires fields that user hasn't provided (Progressive Profiling) |
| MFA Required | mfa_required | Additional authentication factor required | When app requires multi-factor authentication |
| Communication Verification | communication_medium_verification | Email or phone must be verified | When app requires verified communication medium |
| Common Consent | common_consent | User must accept terms/conditions | When app requires acceptance of terms or privacy policy |
Important: What Developers Need to Know
- Always check for prechecks: After authentication, check if a
track_idis returned instead of an immediate redirect - Handle the pause: Your application must handle the paused flow and present appropriate UI
- Track ID validity: The
track_idis valid for 6 hours - ensure you complete the flow within this timeframe - Multiple prechecks: Multiple prechecks may be required in sequence - check the metadata API for all requirements
- Order matters: Prechecks are evaluated in a specific order (security-related first, then data collection)
For detailed information about each precheck type and how to implement them, see the Token Conditions / Prechecks documentation.
Step 4: Code Exchange
After completing Steps 1-3, you will receive an authorization code in the redirect. Now exchange this code for tokens:
| Step | Description | Link |
|---|---|---|
| 1 | Extract the Authorization code from the redirect URI: {{redirect_uri}}?code=ea2707b0-1bb3-49de-9d32-4c5aa79722ad | |
| 2 | Call the token endpoint with the authorization code and code_verifier (from Step 1) | Link to API |
Note: Enter the Authorization Code that was issued and code verifier in the below API
curl --location -g --request POST '{{baseurl}}/token-srv/token'
--header 'Content-Type: application/x-www-form-urlencoded'
--data-urlencode 'grant_type=authorization_code'
--data-urlencode 'client_id={client_ID}'
--data-urlencode 'code={code_obtained_in_previous_step}'
--data-urlencode 'redirect_uri={{redirect_uri}}'
--data-urlencode 'code_verifier=7RTGpnRYR64SHYWqOw125Hk8PnjpP0hfrdOXU9_oMQ0'
| Parameter Name | Description |
|---|---|
| client_id | client which represent the business-App in cidaas, where the Resource Owner want to have access |
| code_verifier | The code verifier is a cryptographically random string using the characters A-Z, a-z, 0-9, and the punctuation characters -._~, between 43 and 128 characters long. |
| grant_type | authorization_code needs to be mentioned in code-exchange call to get a token |
| code | The code was issued after successful login |
| redirect_uri | URI where cidaas should redirect to, after login |
How it Works?
- Client (your app) creates the
code_verifier. (RFC 7636, Section 4.1) - Client creates the
code_challengeby transforming thecode_verifierusing S256 encryption. (RFC 7636, Section 4.2) - Client sends the
code_challengeandcode_challenge_methodwith the initial authorization request. (RFC 7636, Section 4.3) - Server responds with an
authorization_code. (RFC 7636, Section 4.4) - Client sends
authorization_codeandcode_verifierto the token endpoint. (RFC 7636, Section 4.5) - Server transforms the
code_verifierusing thecode_challenge_methodfrom the initial authorization request and checks the result against the code_challenge. If the value of both strings match, then the server has verified that the requests came from the same client and will issue anaccess_token. (RFC 7636, Section 4.6)
Need Support?
Please contact us directly on our support page