Group Admin Dashboard
The Group admin dashboard is one of the dashboards that provides user management functionalities.
The background of the Group Admin dashboard is that instead of having access to the entire user pool of the instance, only users of one or more specific groups are displayed.
After logging in, a selection of all groups for which you are an administrator will appear:
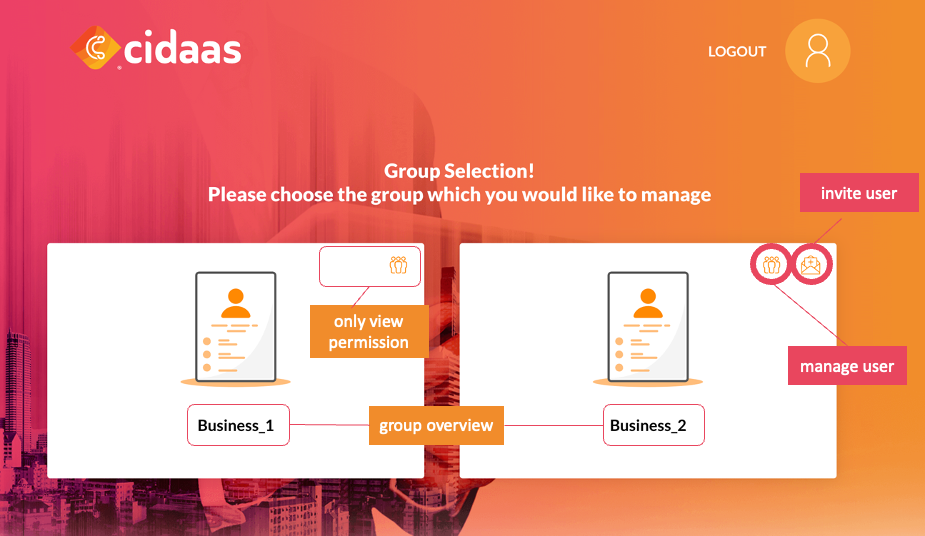
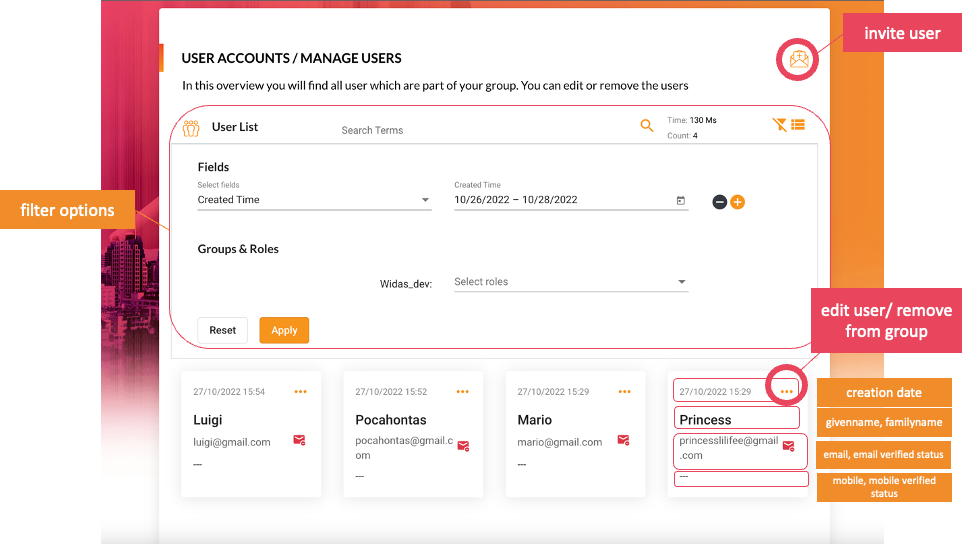
Once a specific group is selected, the user search for users in that group appears.
Group Management
Click here to find out more about the Group Management
API Reference
For developers building your own Delegated Group Admin Dashboard, see the Delegated Group Management API for complete API documentation and endpoints.
Use Cases - Different Perspectives at one glance
To understand how you can best use this Group Admin Dashboard, we have prepared a few perspectives on the different examples: B2B Perspective, Business Perspective, Family&Friends Perspective
B2B Perspective
In a company that has several B2B Customers or Partners, you would like to onboard the right people. Previously, a shared address like "info@" was used, but now you can invite the manager of your customer's organisation and make them the group administrator of their company. Thereby, they can manage their users (onboard and offboard) to use your portals, shops, etc.
Business Perspective
In a company, this might be structured into several sub-organisations, departments, or teams.
Each organisation or department might be responsible for its own application and providing services to customers. Users that are using a particular application can be assigned to this respective group related to the application.
Having this setup, the application owners can manage, view the users themselves, see their activities, and see the usage frequency. Furthermore, they can offer their own support in case of an incoming customer request and have the possibility to help users efficiently.
Family and Friends
On a music streaming platform, you can typically purchase a shared account. Now you need an easy way to invite your family or friends. In this case, you assign the group owner admin rights for his "family and friends group", so he can use the functionalities (even via API) to invite his family to this shared account.
Good to know section ;)
Feature Overview
The functionalities that should simplify the lives of the group administrators in the group admin dashboard are:
- invite users (with automatic assignment to the group of the group admin)
- adding/removing users from their group
- viewing data, as well as activities and consents to consents
- updating user data
- deleting users
Step-by-Step Usage Guide
How to Invite Users to Your Group
Step 1: Access the Group Admin Dashboard
- Log in to your cidaas instance
- Navigate to the Group Admin Dashboard using the URL:
{{yourCidaasDomain}}/group-admin/{{client_name}} - Select the group you want to manage from the group selection screen
Step 2: Initiate User Invitation
- In the user management section, click on Invite User Email Icon
- Fill in the required user information:
- Email address (required)
- First name and last name
- Any additional custom fields configured for your group
- Select the roles to assign to the invited user within the group
- Select the App and Redirect URI (Portal URI) the user should use to sign up and login after successful signup
Step 3: Send the Invitation
- Review the invitation details
- Click Send Invitation
- The user will receive an email invitation to join the group
- Monitor the invitation status in the Pending Invitations section
How to Add Existing Users to Your Group or Change Permission
Step 1: Select the group you want to add the user to
- Select the group you want to manage from the group selection screen
- Click on the Invite Button and provide the users email address
- Set the respective roles for the user
- Select the App and Redirect URI (Portal URI) the user should use to sign up and login after successful signup - if he does not yet exist in the system. If the user is already in the system registered, he will not receive a email, but automatically gets the persmissions assigned
- Send the Invite
Or
Step 1: Search for Existing Users in the top-level group
- In the Group Admin Dashboard, go to the User Management section
- Use the search functionality to find existing users by:
- Email address
- Name
- User ID
- Other configured search fields
Step 2: Add User to Group
- From the search results, select the user you want to add
- Navigate to Group & Roles section change
- Select the appropriate roles for the user within your group or add additional groups
- Confirm the addition by clicking the "save"-button
How to Update User Information
Step 1: Locate the User
- Use the search or filter functionality to find the user
- Click on the user's name or profile to access their details
Step 2: Edit User Data
- In the user profile view, click Edit or Update
- Modify the fields you have permission to update:
- Basic information (name, email, etc.)
- Custom fields
- Group-specific roles
- Save your changes
How to Remove Users from Your Group
Step 1: Find the User
- Search for the user you want to remove
- Access their profile or select them from the user list
Step 2: Remove from Group
- Click Groups & Roles and remove the respective Permission OR
- Click the Three Dots and Remove User
How to View User Activities and Consents
Step 1: Access User Profile
- Search for and select the user whose information you want to view
- Navigate to their detailed profile
Step 2: Review User Information
- Activities Tab: View the user's login history, actions, and system interactions
- Consents Tab: Review the user's consent status for various services and data processing
- Profile Tab: View the user's complete profile information (based on visibility settings)
Permissions
The Group Admin Role is always required. By specifying permission for particular functions, the MEMBER_XXX roles are used to restrict or grant access.
| Role | Description |
|---|---|
| GROUP_ADMIN | Allowed to view or remove users inside a group |
| MEMBER_UPDATER | Allowed to update users inside of the group |
| MEMBER_INVITER | Allowed to invite users to a group in case the user does not exist in the system |
| MEMBER_ADDER | Allowed to add existing users to a group |
Visibilities of users
For each group, it is possible to set Member Profile Visibility and non-Member Profile Visibility.
Based on those settings, the group administrator is able to access user data.
Field Setup
The user data specification is configured via Field Setup
How to activate the Group Admin Dashboard
The Group Admin Dashboard is not activated and enabled by default, but it requires some minor configurations to be able to provide it to the respective teams.
Step 1: Access Cspace Portal
- Navigate to your Cspace portal
- Log in with your administrator credentials
Step 2: Enable Group Admin Dashboard
- In the Cspace dashboard, locate the Dashboard section in the main navigation
- Click on Add ons from the dropdown menu
- Find Group admin Dashboard in the list of available add-ons
- Click on Enable or Activate to turn on the Group Admin Dashboard
Step 3: Configure Group Permissions
- After activation, go to Settings > Groups and Roles
- Create or select the groups that will use the Group Admin Dashboard
- Assign the following roles to group administrators:
GROUP_ADMIN(required for all group admins)MEMBER_UPDATER(if admins should update user data)MEMBER_INVITER(if admins should invite new users)MEMBER_ADDER(if admins should add existing users)
Step 4: Set User Visibility Settings
- For each group, configure the visibility settings:
- Member Profile Visibility: Define what data group admins can see about group members
- Non-Member Profile Visibility: Define what data group admins can see about non-members
- These settings control the level of user data access for group administrators
Step 5: Test the Setup
- Create a test user with group admin permissions
- Access the Group Admin Dashboard using the URL pattern:
{{yourCidaasDomain}}/group-admin/{{client_name}} - Verify that the group admin can see and manage users in their assigned groups
Scale your Group Admin Dashboard for different layouts
The URL pattern follows a consistent structure to ensure easy navigation and maintenance.
URL Pattern:
{{yourCidaasDomain}}/group-admin/{{client_name}}
Example:
https://auth.yourdomain.com/group-admin/acme-corp
Please contact us directly on our support page or reach out to cidaas support at [email protected].