SAML Setup Guide
This guide describes the steps an administrative user needs to perform to set up a SAML integration with cidaas as the identity provider (IdP). Before proceeding, ensure that this is the configuration you want to use for your system, as different systems may require different SAML setups. For an overview of the supported SAML configurations in cidaas, refer to our SAML 2.0 SSO Page
Goal
In this SAML scenario, we connect cidaas to an external system using the SAML 2.0 protocol. This allows users to log in to the external system via cidaas SSO, while their user data is provisioned to the external system based on the information stored in cidaas.
As a result, the SAML IDP setup in cidaas is required.
Configuration steps
To set up the SAML login, you need administrative access to the SSO settings in the external system, as well as access to the cidaas login providers and cidaas apps (requiring the SECONDARY_ADMIN role or both APP_CREATE and SETTINGS_CREATE roles in the CIDAAS_ADMINS group).
Setup steps cidaas Admin Dashboard
- Login to your Admin UI
- Navigate to the Apps Section
- If you have not yet created an App for the connected system, create an cidaas app of type
REGULAR_WEBfor it- The application needs the
profilescope set. - You will need to configure the correct SAML redirect URL and logout URL for the external system. This information will only be available after the SAML provider has been set up, which requires the application itself. For now, use the cidaas base domain as a placeholder value; this will be replaced in a later step.
- For the SAML integration, the
implicitgrant type must be enabled underadvanced settings->OAuth2/OIDC Settings- All other grant types may be disabled for this client.
- Complete the remaining required company information and save the application.
- The application needs the
- Navigate to
Settings->Login Provider->SAML - For the SAML IDP Setup, click on
SAML IDP(For the differentiation between both please check Understanding IDP vs SP)- In the selection menu, choose the application you just created.
- Click on
Enable SAML-IDP-Provider - The system will generate the default SAML configuration for this application. For the integration with the external system, note the
SAML Meta Data URL
SAML Setup step in the external system
The setup screens in different systems may vary slightly, but they generally follow the same integration steps:
- Create a new SSO provider in the external system with a meaningful name (e.g. “cidaas”).
- If the system provides a list of predefined SAML providers and cidaas is not available, select
Custom SAML 2.0 - The system will prompt you to enter provider details. Use the information shown in the cidaas Admin UI under the SAML provider you created earlier.
- The system will request the SAML SSO URL (and optionally a logout URL). Here, you must provide the login URI generated by cidaas.
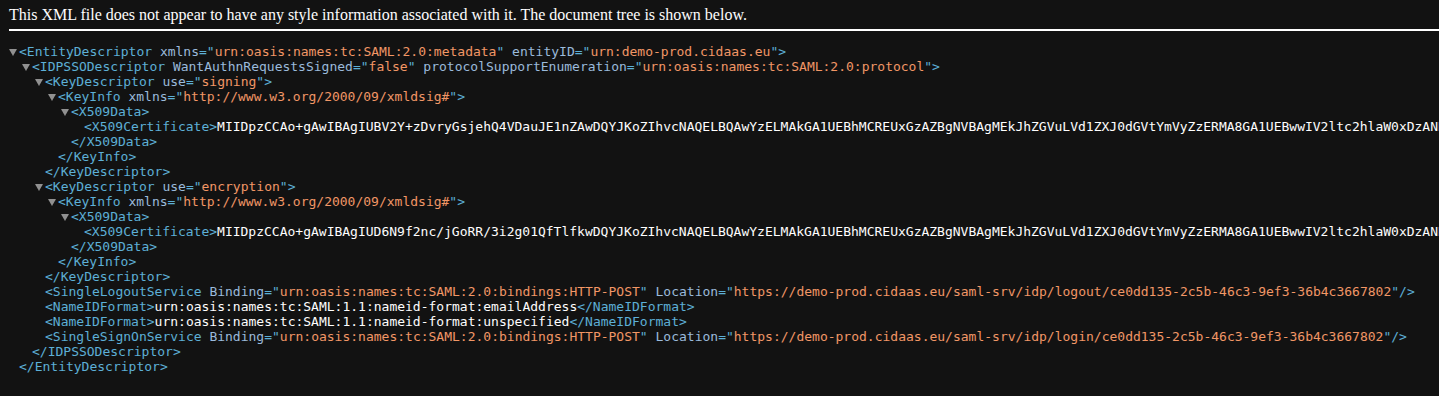
- To retrieve the cidaas SAML SSO URL, copy the
SAML Metadata URLand open it in a browser. The browser will display the parsed SAML XML file. - In the XML, locate the
SingleSignOnServicenode and copy theLocationvalue. It should look similar to:https://demo.cidaas.eu/saml-srv/idp/login/ce0dd135-2c5b-46c3-9ef3-36b4c3667802. The structure is always:{{domain}}/saml-srv/idp/login/{{client_id}} - The same URL must also be configured in the cidaas app under the
redirect_urisettings. - For logout, locate the
SingleLogoutServicenode. The URL will look similar to:https://demo.cidaas.eu/saml-srv/idp/logout/ce0dd135-2c5b-46c3-9ef3-36b4c3667802
- To retrieve the cidaas SAML SSO URL, copy the
- The system will request the
issuerof the identity provider. You can find this value in theentityIDattribute of the top-levelEntityDescriptornode. It will look like:entityID="urn:demo-prod.cidaas.eu". In the external system, use only the value:urn:demo-prod.cidaas.eu. - Most systems require a public certificate to verify signed SAML responses. This certificate can be found in the created login provider under
Signing Certificateand must be copied into the external system.
The SAML Metadata view should look like this in your browser:
SAML Attribute mapping setup
To provision users to the external system, you need to configure the SAML attribute mapping and the NameID format. This defines which attribute keys cidaas uses to send specific user data to the external system, as well as how the primary user identifier is represented.
To complete this configuration, refer to the documentation of the external system. It should specify which attributes are required for SAML login and user provisioning to function correctly.
NameId
The NameID is the primary identifier in the SAML protocol. Whenever possible, we recommend using the cidaas subject (sub) as the primary identifier.
In SAML, the NameID can be represented in different formats depending on how the systems map users between each other. These formats define how the user is identified across those systems.
Refer to the documentation of the external system, which should specify its required format in a structure similar to the following:
<saml:Subject>
<saml:NameID Format="urn:oasis:names:tc:SAML:2.0:nameid-format:persistent"
NameQualifier="YOURDOMAIN.system.com" SPNameQualifier="https://system.com">Your
Unique Identifier</saml:NameID>
</saml:Subject>
In this case, the NameID format is persistent. To configure this in cidaas, go to the SAML attribute settings and open the NameID Format configuration. Enter the field key of the attribute you want to use to identify the user in the external system.
In this example, we use the cidaas subject (sub) as the identifier. Select sub as the value and choose the persistent option from the dropdown on the right side.
Depending on the external system, you may also need to configure other formats such as emailAddress, transient, entity, or unspecified.
Note that, if possible, you should avoid using the emailAddress mapping. With this setup, changes to a user’s email address may result in the external system treating them as a new user.
Other Attributes
Most systems also require additional attributes to be configured for SAML login to work correctly.
These are typically listed in a format similar to the NameID, for example:
<saml:Attribute Name="Email"
NameFormat="urn:oasis:names:tc:SAML:2.0:attrname-format:unspecified">
</saml:AttributeValue>
</saml:Attribute>
Firstname
<saml:Attribute Name="FirstName"
NameFormat="urn:oasis:names:tc:SAML:2.0:attrname-format:unspecified">
<saml:AttributeValue xsi:type="xs:anyType">FirstName
</saml:AttributeValue>
</saml:Attribute>
Givenname
<saml:Attribute Name="LastName"
NameFormat="urn:oasis:names:tc:SAML:2.0:attrname-format:unspecified">
<saml:AttributeValue xsi:type="xs:anyType">LastName
</saml:AttributeValue>
</saml:Attribute>
With these descriptions, you can configure the SAML attribute mapping in cidaas.
In the mapping table, enter the external system’s attribute key on the left side and map it to the corresponding cidaas field key on the right side.
For the example above, the configuration should look like this:
| external system attribute key | field type | cidaas registration field key |
|---|---|---|
| String | ||
| FirstName | String | given_name |
| LastName | String | family_name |
Once configured, click Save.
Redirect URI Setup
Finally, if you have not already done so, you need to configure the correct redirect_uri in the cidaas application and replace the placeholder value used during setup.
This URL is the same one you previously configured in the external system under the SAML SSO URL field. You can retrieve it by following step 4.2 in the SAML setup in the external system section.
This URL must be added to the corresponding cidaas application configuration.
Troubleshooting
Common mistakes during SAML setup include:
cidaas error page "An error occurred"
Check the URL for error query parameters. It will typically look like:
/identity/error?error_descriptor=invalid_request: given url is not allowed by the application configuration&error_code=AUTH10009
-> This usually indicates that the redirect_uri is not correctly configured in the cidaas application.
Parsing error after login
SSO error: missing required attribute E-Mail in the SAML response from the identity provider.
-> This usually means the SAML attribute mapping is not configured correctly.
Next Steps
- Setup Groups Roles Restriction to limit the access to the external system to your user group
- Customize your Hosted Pages to represent your branding