Configuring Webhooks
Whenever an ID validation is done, your system ideally wants to be notified about it. This is where Webhooks come into play. They are an easy and streamlined way to enable communication between both your and the cidaas system. In order to get started, please head to the Admin UI via your browser.
Once you are logged in, please open the section Settings and then click on the entry Webhook. After the page loaded, please click on the "+ Create Webhook" button in the top-right corner.

In the dropdown field Webhook Events you can select both IDVALIDATOR_CASE_STARTED and IDVALIDATOR_CASE_FINISHED. As the naming already suggests, these webhook events will be triggered when a ID validation case is started and finished respectively.
Watch Out!
In the dropdown you will also find the webhook events IDVALIDATOR_VALIDATION_FINISHED, IDVALIDATOR_BTX_FINISHED and IDVALIDATOR_DOCSIGN_FINISHED. These are deprecated events and only kept for backwards compatibility purposes.
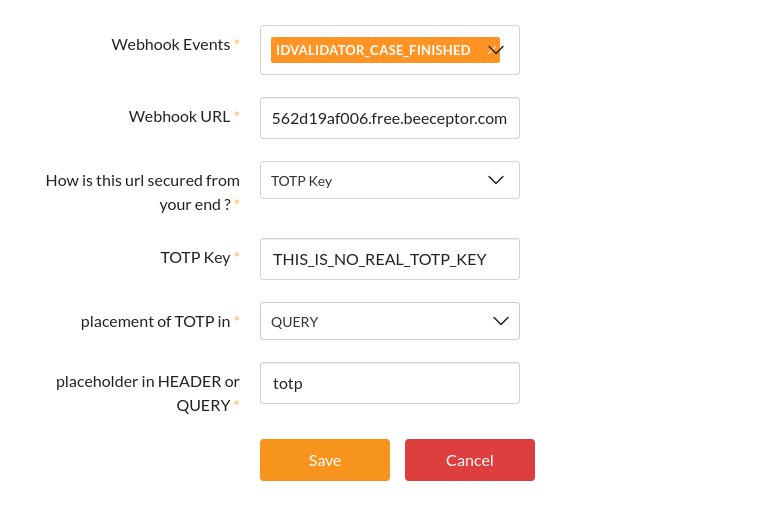
Afterwards fill out the rest of the details according to your systems API specifications, hit the "Save" button and you are already good to go!
Depending on your system, the setup could look similar to below example.
From now on when an ID validation process completes, your endpoint will receive a POST request with a JSON payload similar to:
{
  "eventtype": "IDVALIDATOR_CASE_FINISHED",
  "createTime": "2025-11-21T06:57:06.549Z",
  "client_id": "",
  "tenantKey": "cidaas-your-tenants-name",
  "actorId": "",
  "metaData": {
    "case_id": "ff98f0d9-e8b2-4d8c-bd1a-427f7033c807",
    "execution_parameter.external_reference": "YourExternalReference",
    "status": "FINISHED"
  },
  "objectId": "ff98f0d9-e8b2-4d8c-bd1a-427f7033c807",
  "objectType": "idvalidations"
}
The Webhook Management Documentation provides further details.