Integrating with your System
In this section we explore how you can set up your system to communicate with the cidaas ID validator, in order to create ID validation cases, retrieve their results and perform other various actions.
Enabling communication between your system and cidaas
cidaas utilizes so-called applications to manage API authorization. Hence, as a first step we need to create a cidaas application via the Admin UI. To do this please open the Admin UI in your browser. In the sidebar menu click on the section Apps and afterwards click on the entry App Settings.
In the newly opened page click on the "+ Create New App" button.

Once the page loaded, please search for App Type and select Non-Interactive.
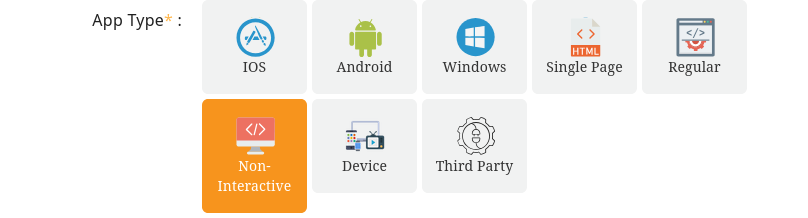
In the field App Name choose a descriptive name, e.g. ID Validation Backoffice Application.
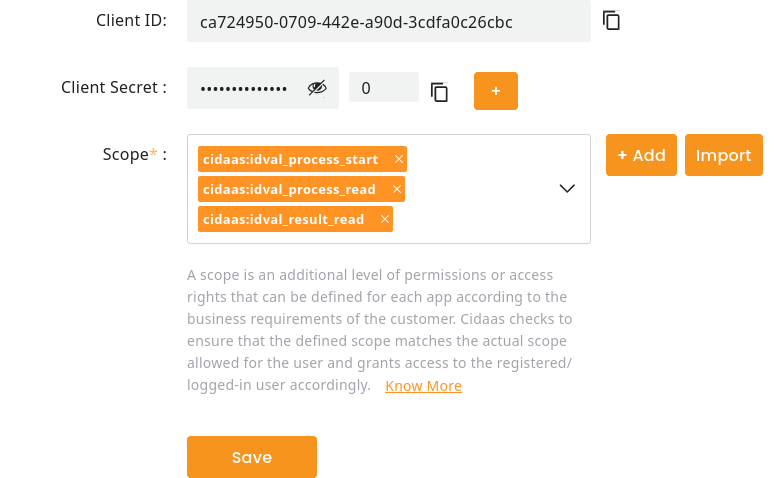
Afterwards expand the section App Settings and open the dropdown menu Scope. Select the following scopes:
cidaas:idval_process_startcidaas:idval_process_readcidaas:idval_result_read
If you plan to manage ID validator configurations via API, please also select the following scopes:
cidaas:idval_settings_writecidaas:idval_settings_readcidaas:idval_settings_delete
Finally expand the section Company Details. Fill out the mandatory fields and finally hit the button "Submit" to create the application.
Whenever your system wants to communicate with secured cidaas API endpoints - in our case the cidaas ID validator API - you first need to ensure you provide a valid token in the headers of the request.
Obtaining an OAuth2 Token
As already mentioned in the last section you need to provide a token in all requests to the cidaas ID validator API. You can do this by sending a request to the token-srv.
First you need to obtain the Client ID and Client Secret of your just created cidaas application.
In the App Overview - the screen where you earlier selected the "+ Create New App" button - find your newly created application, which will most likely be a the top of the list, and press the "edit" icon.

Now copy both the Client ID and Client Secret from the App Settings section.
Be Careful!
Please make sure to never publish both Client ID and Client Secret publicly and also do not make it otherwise accessible to other parties. Parties in possession of these details can generate valid tokens at any time.
Using these "credentials" you can send a request to the token-srv. Below you can find the details
URL: POST {{base_url}}/token-srv/token (e.g. https://demo.cidaas.de/token-srv/token)
As payload provide following JSON payload:
{
    "client_id": "{{client_id}}", // replace with your Client ID
    "client_secret": "{{client_secret}}",  // replace with your Client Secret
    "grant_type": "client_credentials",
    "provider": "self"
}
As response you will receive the token payload:
{
    "access_token": "eyJhbGciO...",
    "expires_in": 86400,
    "token_type": "Bearer",
    "sub": "ANONYMOUS",
    "sid": "8d3ce52a-906f-4308-9c6c-f3782cbffe38"
}
The field expires_in indicates how many seconds the token will be valid. In this example 86400 seconds equal 24 hours. The field access_token holds the token, which you need to include in the headers of each further request to the cidaas ID validator API.
Creating an ID validation
If you have not yet read and performed the actions in the chapter Prerequisites, please head there now and complete it first.
To create an ID validation you need to have following information at hand.
- The desired ID validator configuration
- The URL you want the user to be redirected to after completing the ID validation
- Be aware whether the consent was already obtained in your system or if the user shall grant their consent during the ID validation
Afterwards your system can be configured to create ID validations. The request to create an ID validation is as follows:
POST {{base_url}}/id-val-srv/processes
You also need to include a JSON payload. The following is an example of the minimum set of key-values.
{
"validation_settings_id": "61df0ecd-dcc1-4025-8d35-d67d4bf14553",
"external_reference": "YourExternalReference",
"redirect_url": "https://example-eshop.com/age-verification",
"user_id_type": "email" // sub, email or phone
}
Depending on your ID validator configuration additional details have to be provided. There are two potentially needed additional fields.
custom_attributesconsents
Custom Attributes
Custom Attributes are mandatory if either Prevalidation or Document Data Matching are enabled in the used ID validator configuration. For each enabled field within these configs you need to provide a key-value pair, where the key matches the defined field_key. Let's use an example.
In our example configuration we have enabled the feature Document Data Matching and set it up as seen below.
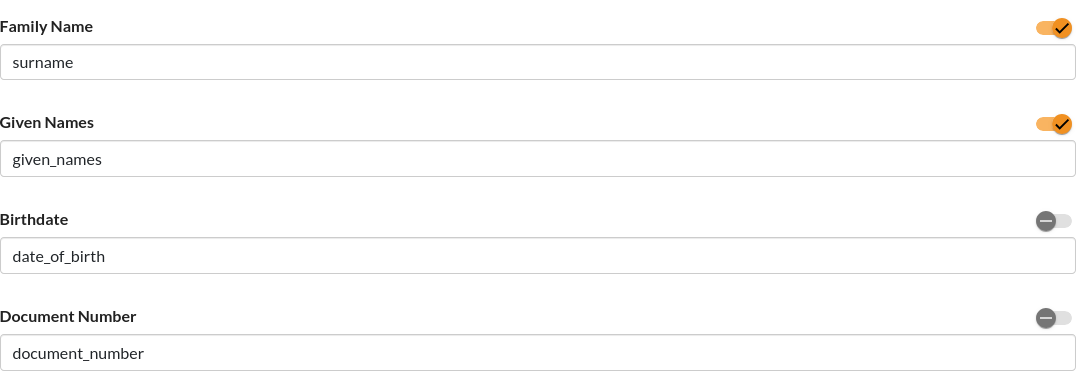
As you can see, only the fields "Family Name" (surname) and "Given Names" (given_names) are currently enabled. Hence we need to provide a "ground truth" for these in the payload. Taking the above example payload as base, we extend it with the mandatory fields.
{
"validation_settings_id": "61df0ecd-dcc1-4025-8d35-d67d4bf14553",
"external_reference": "YourExternalReference",
"redirect_url": "https://example-eshop.com/age-verification",
"user_id_type": "email",
"custom_attributes": {
"given_names": "Hans",
"surname": "Hansemann"
}
}
Now let's assume we also have enabled the Prevalidation feature, since we already know some details about the user and want to make sure that only they can perform the ID validation. The configuration is the following.
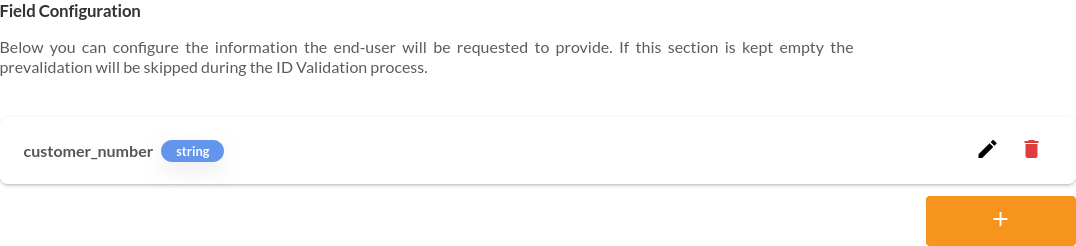
We have added a field with the key customer_number. Same as already done in the Document Data Matching we now also need to provide a key-value pair for this entry. Putting it all together we would end up with the below payload.
{
"validation_settings_id": "61df0ecd-dcc1-4025-8d35-d67d4bf14553",
"external_reference": "YourExternalReference",
"redirect_url": "https://example-eshop.com/age-verification",
"user_id_type": "email",
"custom_attributes": {
"given_names": "Hans",
"surname": "Hansemann",
"customer_number": "DE42018769"
}
}
Consent(s)
As already discussed in the chapter Prerequisites the consent for the ID validation can either be obtained as part of the process in the application itself or you can obtain the consent in your system earlier and provide it to us as part of the payload.
If you opted to already obtain the consent and the consent configuration is disabled in the ID validator configuration, then the field consents must be included in the payload. This is simply done by providing a list of all obtained consent. See below for an example.
{
"validation_settings_id": "61df0ecd-dcc1-4025-8d35-d67d4bf14553",
"external_reference": "YourExternalReference",
"redirect_url": "https://example-eshop.com/age-verification",
"user_id_type": "email",
"custom_attributes": {
"given_names": "Hans",
"surname": "Hansemann",
"customer_number": "DE42018769"
},
"consents": [
{
"name": "processing-consent",
"url": "https://www.example.com/consents/id-validation"
}
]
}
You can supply as many consents as you want, but there needs to be a minimum of one.
Response Payload
If your payload is valid and you are authorized by using a valid OAuth Token, your system will receive a 200 OK response.
{
    "success": true,
    "status": 200,
    "data": {
        "processId": "3df810ae-66c6-4a48-80af-3d753c91518c",
        "caseId": "ff98f0d9-e8b2-4d8c-bd1a-427f7033c807",
        "executionStatus": "paused",
        "user_task_url": "https://demo.cidaas.de/id-validator-webapp/processes/3df810ae-66c6-4a48-80af-3d753c91518c/tasks/consent",
        "user_redirect_url": "https://example.com/age-verification",
        "browser_redirect": false
    }
}
| Key | Description |
|---|---|
| success | Whether the request was successful |
| status | HTTP Status Code |
| processId | ID which can be used to obtain the current status of the ID validation |
| caseId | ID which can be used to obtain the result of the ID validation |
| executionStatus | Internal field which simply states whether the process is currently waiting for manual actions e.g. user performing a specific task |
| user_task_url | URL to which the user shall be redirected to in order to proceed in the ID validation process. You could embed this in a button or automatically redirect the user. |
| user_redirect_url | URL to which the user will be redirected to after they complete the ID validation process. |
| browser_redirect | Internal field which simply states whether an automated redirect took place |
The ID validation has now been successfully created! You can now proceed by either redirecting the user in their browser using the user_task_url or by providing them a button or similar UI element in your own web application that navigates them into the ID validation.
Obtaining the result of an ID validation
Once your system received the webhook informing it about a completed ID Validation you can fetch the results of the ID validation by calling the following endpoint.
GET {{base_url}}/id-val-srv/idcases/{{caseID}}/result
For a detailed description of the returned fields please head to the API Documentation. For now, the most important field is the overall case result. You can check it by accessing the field result.status. On a failed/rejected ID validation it will hold the value FAILED, while on a successful/approved one it will be SUCCESS. If the ID validation was approved there will also be a field jwt_signature present.
Media Files
Some of the task results (result.task_results) include the field image_urls. It is an Array of URLs, which can be directly called in order to obtain selected images related to the task. At the moment only the tasks iddocanalysis and idfaceanalysis include media files.
Reviewing via Admin UI
In the cidaas Admin UI under the section ID Validator you will also find the entry ID Validation Cases. Here you can lookup all performed validations and their current status.
Clicking on one of the validations will open a view, which presents the most important validation result data, such as the status, used document, history of the validation, media files and more.