SAML Setup Guide
cidaas supports both SAML roles:
| Role | Meaning | Typical use |
|---|---|---|
| cidaas as IdP | Users authenticate in cidaas, then access an external app via SAML | Connect a third-party tool (HR, collaboration, …) to cidaas SSO |
| cidaas as SP | Users authenticate at an external IdP; cidaas consumes the SAML assertion | Corporate AD / enterprise IdP login into cidaas |
For the product overview and attribute details, see SAML 2.0 SSO (IdP vs SP).
On cidaas 4.x, configure SAML in Trustdesk (/trust-desk). Trustdesk is the new administration UI and gradually replaces the legacy Admin Dashboard (/admin-ui / cSpace). See Introducing Trustdesk.
On older instances, use the Admin Dashboard paths noted below in parentheses.
cidaas as Identity Provider (IdP)
Users log in to cidaas SSO; the external system trusts cidaas and receives user data via SAML. In the Admin UI this is the SAML IdP setup (Trustdesk: application type / wizard for SAML SP apps — see product docs for your version).
Prerequisites
- Admin access to SSO settings in the external system
- Access to cidaas applications and login providers (
SECONDARY_ADMIN, or bothAPP_CREATEandSETTINGS_CREATEinCIDAAS_ADMINS)
Setup steps in cidaas
- Open Trustdesk (Integrations → Applications). (Legacy: Apps → App Settings.)
- If you have not yet created an app for the connected system, create a
REGULAR_WEBapp (or the SAML-oriented app type available on your version):- Set the
profilescope. - Configure SAML redirect and logout URLs for the external system. Those URLs are often only known after the provider is created — use the cidaas base domain as a placeholder and replace it later.
- Under advanced OAuth2/OIDC settings, enable the
implicitgrant if your version still requires it for SAML IdP; other grants may be disabled for this client. (Verify against current app-type guidance on 4.x.) - Complete company information and save.
- Set the
- Open Providers → Identity Providers and configure SAML IdP for that application. (Legacy: Settings → Login Provider → SAML → SAML IdP.)
- Select the application you created.
- Enable the SAML IdP provider.
- Note the generated SAML Metadata URL for the external system.
Setup in the external system
Screens differ by product, but the flow is usually:
- Create a new SSO / SAML provider (name it e.g. “cidaas”).
- If only predefined vendors are listed and cidaas is missing, choose Custom SAML 2.0.
- Enter provider details from the cidaas SAML IdP configuration.
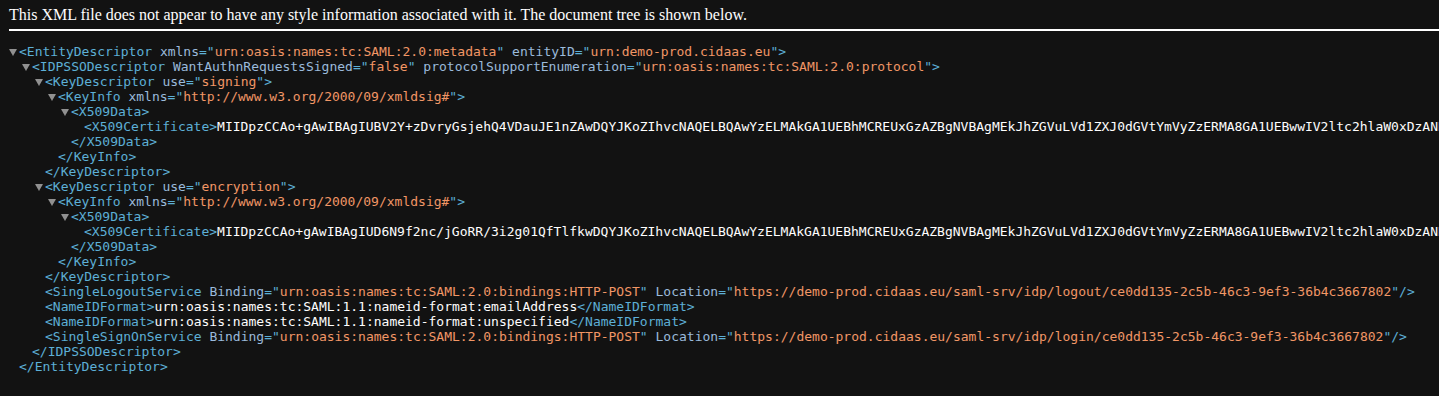
- Set the SAML SSO URL (and optionally logout URL) from cidaas metadata:
- Open the SAML Metadata URL in a browser.
- Find
SingleSignOnService→Location(pattern:{{domain}}/saml-srv/idp/login/{{client_id}}). - Add the same URL as
redirect_urion the cidaas app. - For logout, use
SingleLogoutService→Location(…/saml-srv/idp/logout/{{client_id}}).
- Set the IdP issuer from the metadata
entityID(e.g. useurn:demo-prod.cidaas.eufromentityID="urn:demo-prod.cidaas.eu"). - Copy the Signing Certificate from the cidaas provider into the external system.
Metadata in the browser looks like this:
SAML attribute mapping
Configure NameID and attributes so the external system can provision or match users. Prefer the cidaas sub as NameID when possible (persistent format). Avoid email as NameID if email changes should not create new users in the SP.
Map external attribute keys to cidaas field keys, for example:
| External attribute key | Field type | cidaas field key |
|---|---|---|
| String | ||
| FirstName | String | given_name |
| LastName | String | family_name |
Then replace any placeholder redirect_uri on the cidaas application with the final SSO URL.
Troubleshooting (cidaas as IdP)
cidaas error page “An error occurred”
Check query parameters such as error_code=AUTH10009 — usually a missing or wrong redirect_uri on the app.
Parsing error / missing attribute after login
Usually incorrect SAML attribute mapping (e.g. missing E-Mail).
cidaas as Service Provider (SP)
Users authenticate at an external IdP (e.g. corporate AD FS / Azure AD / another SAML IdP). cidaas trusts that IdP and creates or links the local user.
Configure in Trustdesk: Providers → Identity Providers (SAML). (Legacy: Settings → Login Providers.) Then enable the provider on the relevant applications under Integrations → Applications.
Step-by-step metadata, bindings, and attribute mapping for this direction live in the product guide:
→ SAML 2.0 SSO — cidaas as Service Provider
Next steps
- Limit who may use the external app with Group Role Restrictions
- Align hosted pages with your brand: Hosted Pages
- Review navigation mapping: Introducing Trustdesk