TOTP (Verification)
This is a technical introduction how you can implement the Enrollment for TOTP by simply following the below steps.
What is TOTP
TOTPs are so-called time-based one-time passwords, a few-digit code that is generated on the authenticator app for a fixed duration of time. The UI will show the box to enter the TOTP. The user should get the TOTP from the authenticator app on their personalised device (mobile) and enter it. On successful verification, we can proceed with the authentication.
You can integrate it in any app, even your own apps, the user is already using and equip it to an Authenticator.

When is a user able to configure TOTP
| Criteria | Example | Configuration |
|---|---|---|
| User Verification Setup | As soon as user registers in cidaas authenticator app and enrolls TOTP as one of the authentication mechanism. | |
| Allowed Verification Methods | The verification method, the user want to setup, must be activated for your instance. It is a global setup. | ![]() |
Understanding the Flow and APIs
| API | Description | Link |
|---|---|---|
| Get available verification methods | To display and allow the user to configure the available verification methods. | Link to API |
| Enrollment Initiation | The Enrollment of a user via authenticator app, will provide the URL that is shown e.g as a QR Code in the default user profile. | Link to API |
| Enrollment Status | This will allow to verify the enrollment status in the User Profile, to determine when to continue the enrollment completion. | Link to API |
| Add friendly Device Name | In case of using device authentication methods like FIDO2, you can add a user-friendly name. | Link to API |
Step 1: Allow TOTP in your Instance
In your Verification Setup you need to allow that TOTP is enabled. Thereby you can change your existing setup, navigate to Multifactor Settings > Enable TOTP.

Step 2: Present Verification Methods
The first page for enrollment should present all verification methods available.

Thereby you can use the below query to retrieve the available methods.
curl 'https://domain/verification-srv/config/list' \
-H 'Authorization: Bearer eyJhbGciOiJxxx2Og' \
-H 'cache-control: no-cache' \
-H 'content-type: application/json' \
--compressed
The API returns all available methods as array:
[
{
"verificationType": "TOTP",
"active":true
},
{
"verificationType": "TOUCHID",
"active": true,
},
]
It returns a
verificationTypewhich can be used as input variable (path parameter) for the API in Step 3.
Step 3: Initiation of Enrollment
To start the enrollment, a QR Code will be displayed to the user. The QR code

The CURL command to initiate the enrollment will accept totp as path parameter. Thereby you are defining the method to configure. Based on the token the user will be identified.
curl 'https://domain/verification-actions-srv/setup/{method}/initiation' \
-H 'accept: application/json, text/plain, */*' \
-H 'accept-language: en-US,en;q=0.9' \
-H 'authorization: Bearer eyJhbGciOiJSUzI1NiIsImtpZCI6ImRiMDxxxH3CCQAZ246TjbEZvqQkNy_CM9YARxW7geGevv2Og' \
-H 'content-type: application/json' \
--data-raw '{"deviceInfo":{"deviceId":"","location":{"lat":"","lon":""}}}' \
--compressed
Using the response you can construct the QR-Code based on the below template.
`otpauth://totp/tenant_name:given_name family_name?t=type&d=given_name family_name&issuer=tenant_name&tk=tenant_key&l=logoURL&sub=sub&cid=client_id&burl=baseURL&eid=exchange_id`;
The response from the api contains exchange_id, sub and authenticator_client_id which is required as input.
{
"exchange_id": {
"exchange_id": "d5edcec1-d306-4cb8-8650-a3eb0330084d",
"expires_at": "2024-01-12T21:12:30.108Z",
},
"authenticator_client_id": "532542d2-c6b8-4921-86b6-bb1da13f941b",
"sub": "da65eb32-d460-4355-8b94-ee061896712f",
"status_id": "04dca6fd-2cd7-4a9d-9d94-851be71d6344"
}
The final QR Code Link based on the above input, looks like this:
`otpauth://totp/demo:Poca Hontas?t=totp&d=Poca Hontas&issuer=domain&tk=cidaas-demo-prod&sub=da65eb32-d460-4355-8b94-ee061896712f&cid=532542d2-c6b8-4921-86b6-bb1da13f941b&burl=https://domain&eid=d5edcec1-d306-4cb8-8650-a3eb0330084d`;
It returns
exchange_idthat indicates you have successfully enrolled TOTP.
Step 4: Complete Enrollment
Finally the user will be presented with the enrollment success popup

Developer Perspective
This Implementation Guide is based on the default demo pages which is using a angular framework based on Typescript. It can be implemented in any other programming language as well.
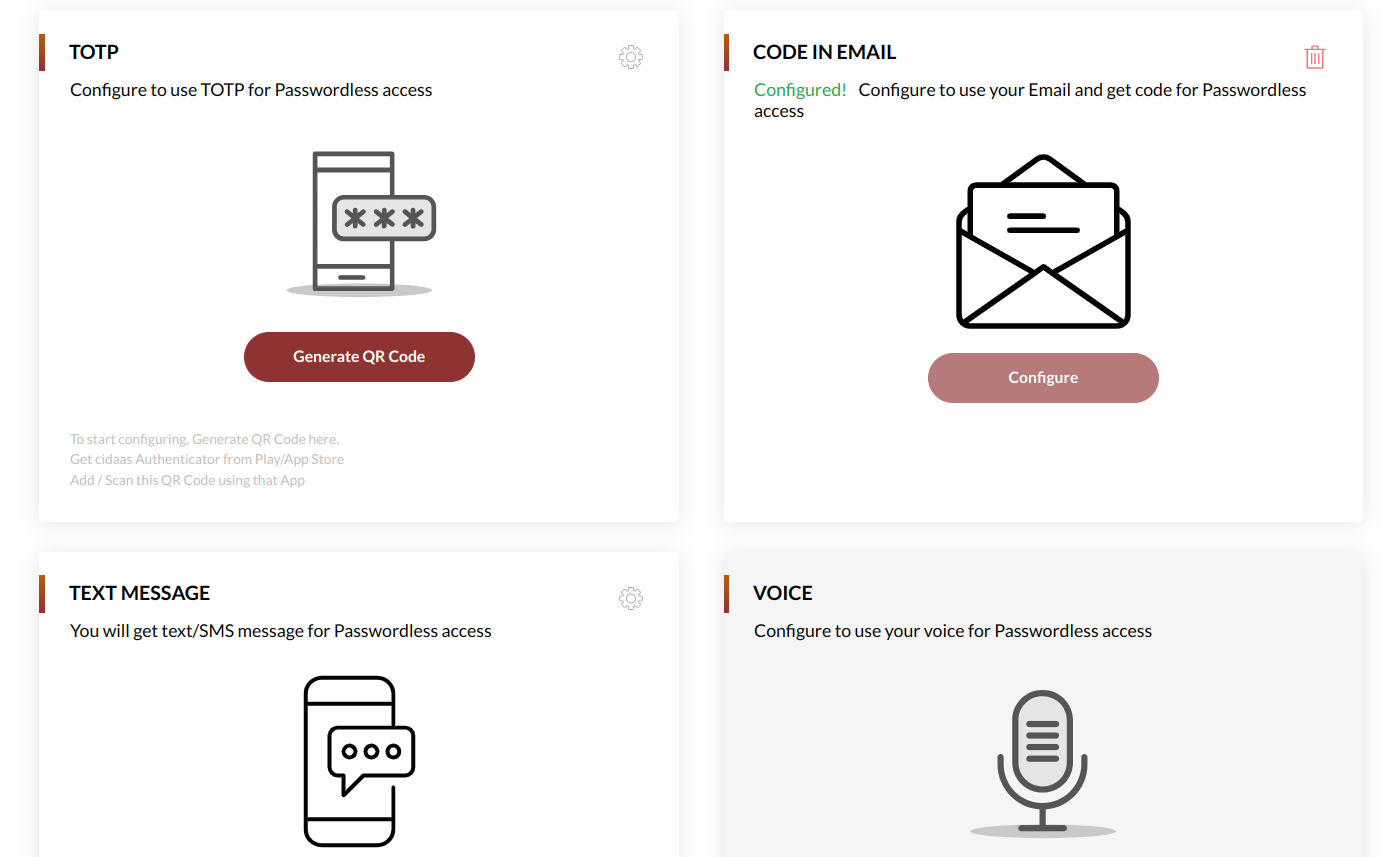
As a first step you will be redirected to the login&security page. This Section starts to show the verification methods:

Step 1: Present Verification Methods
The first page for enrollment should present all verification methods available.

Thereby you can use the below query to retrieve the available methods.
getMFAList(): Observable<IEnabledMFAResponse> {
return this.http.get<IEnabledMFAResponse>(this.baseUrl+ '/verification-srv/config/list', ({headers: URLHelper.getHeaders()}));
}
The API returns all available methods as array:
[
{
"verificationType": "TOTP",
"active":true
},
{
"verificationType": "TOUCHID",
"active": true,
},
]
It returns a
verificationTypewhich can be used as input variable (path parameter) for the API in Step 3.
Step 3: Initiation of Enrollment
To start the enrollment, a QR Code will be displayed to the user. The QR code

The CURL command to initiate the enrollment will accept totp as path parameter. Thereby you are defining the method to configure. Based on the token the user will be identified.
let mfaData:IMFAData = setupVerification(type: string, payload: ICommonPayload): Observable<ICommonMFAResponse> {
return this.http.post<ICommonMFAResponse>(this.baseUrl + '/verification-srv/v2/setup/initiate/totp', payload, ({headers: URLHelper.getHeaders()}));
}
Using the response you can construct the QR-Code based on the below template.
`otpauth://totp/tenant_name:given_name family_name?t=type&d=given_name family_name&issuer=tenant_name&tk=tenant_key&l=logoURL&sub=sub&cid=client_id&burl=baseURL&eid=exchange_id`;
The response from the api contains exchange_id, sub and authenticator_client_id which is required as input.
{
"exchange_id": {
"exchange_id": "d5edcec1-d306-4cb8-8650-a3eb0330084d",
"expires_at": "2024-01-12T21:12:30.108Z",
},
"authenticator_client_id": "532542d2-c6b8-4921-86b6-bb1da13f941b",
"sub": "da65eb32-d460-4355-8b94-ee061896712f",
"totp_secret": "OVKTIPC2EYVFOVCLMU5UI5Z4IA3VCR2G",
"status_id": "04dca6fd-2cd7-4a9d-9d94-851be71d6344"
}
The final QR Code Link can be created e.g. using this code snippet:
_constructQRData = (status: IMFAData, tenantInfo: ITenantInfo, type: string): string => {
let url = `otpauth://totp/${tenantInfo.tenant_name ? tenantInfo.tenant_name : '-'}:-?t=${type}&d=-&issuer=${
tenantInfo.tenant_name ? tenantInfo.tenant_name : '-'
}&tk=${tenantInfo.tenant_key ? tenantInfo.tenant_key : '-'}&l=${tenantInfo.logo_uri ? tenantInfo.logo_uri : '-'}&cid=${
status.authenticator_client_id ? status.authenticator_client_id : '-'
}&burl=${tenantInfo.base_url ? tenantInfo.base_url : '-'}&eid=${
status.exchange_id?.exchange_id ? status.exchange_id?.exchange_id : '-'
}`;
return url;
};
It returns a
exchange_idwhich can be used as input variable (path parameter) for the API in Step 4.
Step 4: Check of Enrollment Status
Now, we are waiting for the users action, and the user performing the TOTP on his phone. This waiting state requires a polling. The recommended time interval is 4 seconds.
checkSocketStatus(statusId: string): Observable<ISocketResponse> {
return this.http.get<ISocketResponse>(this.baseUrl + 'verification-srv/verificationstatus/' + statusId, {}, ({headers: URLHelper.getHeaders()}));
}
| API | Description | Link |
|---|---|---|
| Check the authentication status | Check the current status of the authentication request and it has to be polled continuously. | Link to API |
The API returns a status which can be
| State | Description |
|---|---|
INITIATED | The initiated status will show up as long as you are showing the QR Code. When the QR Code was scanned you should change the UI, so that it is clear there is no further action required |
SCANNED | After the user scanned the code, the state will change to SCANNED |
ENROLLED | The ENROLLED state will show as soon as the user successfully completed the enrollment on the authenticator app. |
{
"status": "INITIATED",
"id": "da552e03-cfc2-4461-92d3-f05b5e488a6c",
"sub": "da65eb32-d460-4355-8b94-ee061896712f",
"type": "TOTP",
}
{
"status": "SCANNED",
"id": "da552e03-cfc2-4461-92d3-f05b5e488a6c",
"sub": "da65eb32-d460-4355-8b94-ee061896712f",
"type": "TOTP"
}
```json
{
"status": "ENROLLED",
"id": "da552e03-cfc2-4461-92d3-f05b5e488a6c",
"sub": "da65eb32-d460-4355-8b94-ee061896712f",
"type": "TOTP",
"ph_id": "79e52278-80f4-488f-8adc-5ef3d4c4869d",
"device_id": "dd7e81392ff7bbd3"
}
It returns a
device_idandph_idwhen status is ENROLLED. This is required for the user-friendly name Step 5.
Step 5: Enrollment Completion Success
Finally the user will be presented with the enrollment success popup

Need Support?
Please contact us directly on our support page