FIDO2 (Verification)
This is a technical introduction on how you can implement the Enrollment for FIDO2 by simply following the below steps.
What is FIDO2
FIDO2 enables users to leverage common devices to easily authenticate to online services in both mobile and desktop environments.
A user can authenticate to any application on any device using FIDO2 on your Authenticator App.
You can integrate it in any app, even your own apps, the user is already using and quip it as an Authenticator.
When is a user able to configure FIDO2
| Criteria | Example | Configuration |
|---|---|---|
| Authentication | A user is able to configure any verification method, only if they are authenticated. So you need a valid token. | |
| Allowed Verification Methods | The verification method, the user wants to set up, must be activated for your instance. It is a global setup. |  |
Understanding the Flow and APIs
| API | Description | Link |
|---|---|---|
| Get available verification methods | To display and allow the user to configure the available verification methods. | Link to API |
| Enrollment Initiation | The Enrollment of a user via authenticator app, will provide the URL that is shown e.g as a QR Code in the default user profile. | Link to API |
| Add friendly Device Name | In case of using device authentication methods like FIDO2, you can add a user-friendly name. | Link to API |
Step 1: Allow FIDO2 in your Instance
In your Verification Setup you need to allow that FIDO2 is enabled. Thereby you can change your existing setup, navigate to Multifactor Settings > Enable FIDO2.
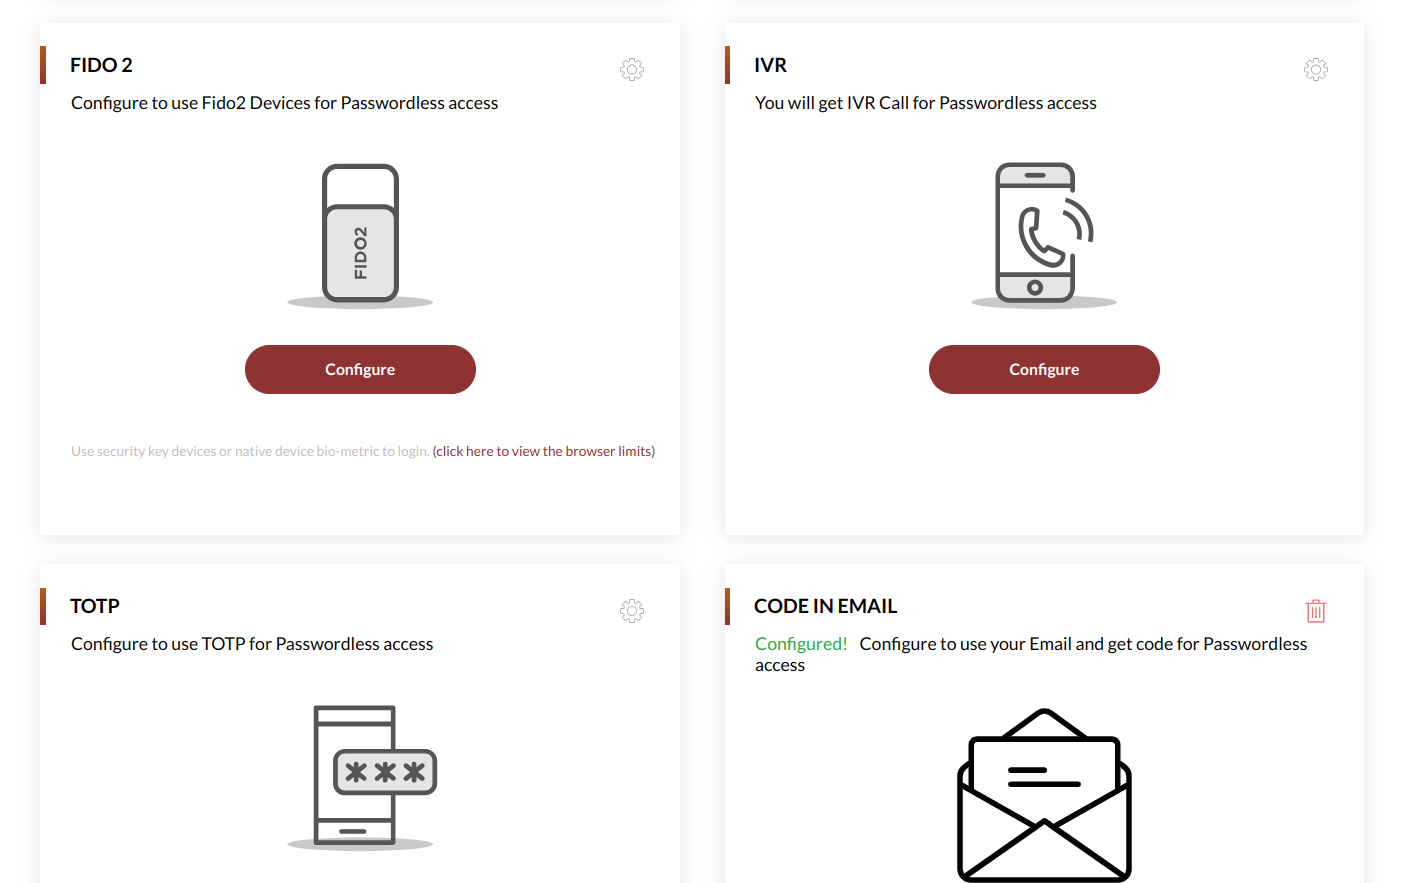
Step 2: Present Verification Methods
The first page for enrollment should present all verification methods available.
Thereby you can use the below query to retrieve the available methods.
curl 'https://domain/verification-srv/config/list' \
  -H 'Authorization: Bearer eyJhbGciOiJxxx2Og' \
  -H 'cache-control: no-cache' \
  -H 'content-type: application/json' \
  --compressed
The API returns all available methods as array:
[
  {
      "verificationType": "FIDO2",
      "active":true
  },
  {
      "verificationType": "TOUCHID",
      "active": true,
  },
]
It returns for a verificationType which can be used as input variable (path parameter) for the API in Step 3.
Step 3: Initiation of Enrollment
To start the enrolment of FIDO2, the initiate API needs to be called. To support cross-domain authentication, pass domainURL in the request body, but this domainURL should be specified in the cidaas tenant level allowed_domains settings
The CURL command to initiate the enrollment will accept fido2 as path parameter. This way, you are defining the method to configure. Based on the token the user will be identified.
curl 'https://domain/verification-actions-srv/setup/fido2/initiation' \
  -H 'accept: application/json, text/plain, */*' \
  -H 'accept-language: en-US,en;q=0.9' \
  -H 'authorization: Bearer eyJhbGciOiJSUzI1NiIsImtpZCI6ImRiMDxxxH3CCQAZ246TjbEZvqQkNy_CM9YARxW7geGevv2Og' \
  -H 'content-type: application/json' \
  --data-raw '{"domainURL",:"https://yourcidaasdomain.de","deviceInfo":{"deviceId":"","location":{"lat":"","lon":""}}}' \
  --compressed
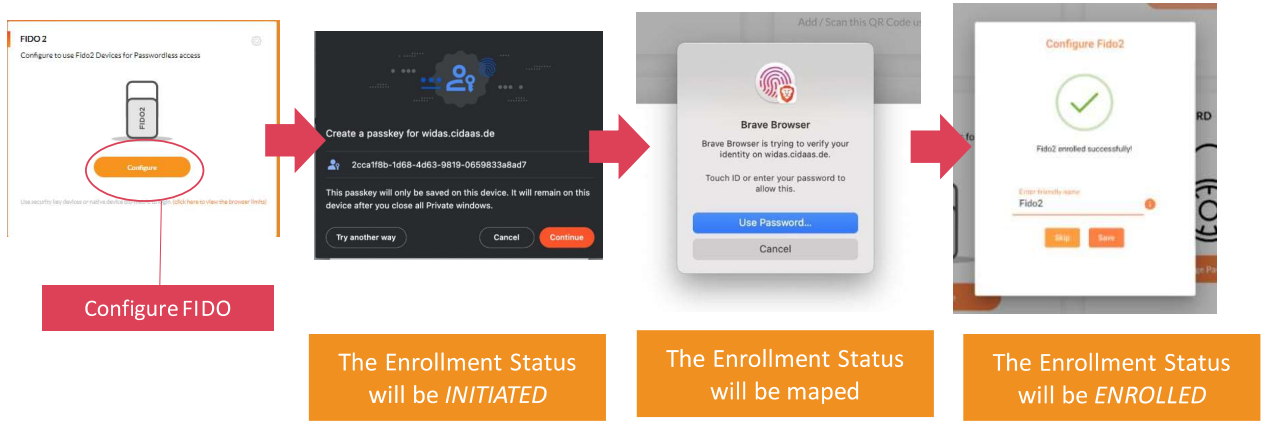
After initiating the FIDO2 registration process, a popup will appear on your screen to guide you through the configuration of your FIDO2 authenticator. This popup serves as a user-friendly interface to ensure a smooth setup experience.
The response from the api contains exchange_id, sub which is required as input.
{
"success": true,
"status": 200,
"data": {
"exchange_id": {
"exchange_id": "455fd20d-837d-43a6-a212-a02eeea1a46b",
"expires_at": "2024-01-10T20:45:51.781Z"
},
"sub": "6837c08e-d748-4091-8d8e-a3e24f30e0f8",
"status_id": "710792ba-32f9-4d2d-8584-fefa3a6d94b8",
"fido2_entity": {
"type": "LOGIN",
"fidoRequestId": "string",
"server_challenge": {
"challenge": "string",
"rp": {
"id": "string",
"name": "string"
},
"user": {
"id": "string",
"name": "string",
"displayName": "string"
},
"authenticatorSelection": {
"requireResidentKey": false,
"userVerification": "discouraged"
},
"attestation": "none",
"pubKeyCredParams": [
{
"type": "public-key",
"alg": -7
}
]
}
}
}
}
Step 4: Complete Enrollment
When calling the enrollment API from website. A popup appears on the user's mobile device, prompting them to allow the enrollment.
The cURL command for enrolling FIDO2
Request
curl --location 'https://domain/verification-actions-srv/setup/fido2/verification' \
--header 'authorization: Bearer eyJhbGciOiJSUzI1NiIsImtpZCI6ImRiMDZhMTQyLTdmYTYtNGYyMy1hMmNhLWNhYjk4ZGMwN' \
--header 'content-type: application/json' \
--data '{
    "sub": "15a12925c-40d9-4972-b2e2-bd7ef8fe5b05",
    "exchange_id": "07c3f156-219a-4a7c-9c9e-aaa9e6fdc460",
    "fido2_client_response": {
        "client_response": {
            "authenticatorAttachment": "cross-platform",
            "rawId": "AfwJQWEy_fS_GzOjUMl-bnDKBhBMFhvTZgRyK1MYA9EZELp9zrNuVgUwR7T3wlXNTykToR7DEmmuXFKqr3lPgKc",
            "response": {
                "attestationObject": "o2NmbXRkbm9uZWdhdHRTdG10oGhhdXRoRGF0YVjF8o9v9zxNbuQvD0LKzEZ"
            },
            "id": "AfwJQWEy_fS_GzOjUMl-bnDKBhBMFhvTZgRyK1MYA9EsZELp9zrNuVgUwR7T3wlXNTykToR7DEmmuXFKqr3lPgKca",
            "type": "public-key"
        },
        "fidoRequestId": "e29070dc-6448-41fd-9449-e445ca6a88831"
    }
}'
Response
{
    "success": true,
    "status": 200,
    "data": {
        "exchange_id": {
            "exchange_id": "13d684206-42c3-4bb1-bc37-0e3188f4d5d9",
            "expires_at": "2024-01-16T10:57:16.635Z",
            "_id": "00721c72-1f03-4d84-b96d-61589847e436",
            "id": "00721c72-1f03-4d84-b96d-61589847e436"
        },
        "sub": "15a12925c-40d9-4972-b2e2-bd7ef8fe5b05",
        "status_id": "16e24c6f7-f271-4e9f-9dbb-ef0872598beb",
        "ph_id": "215dc05f9-8615-4795-a7b5-72dd58917539",
        "device_id": "a4be5075824dfc9ebfcea962f3188097c",
        "friendly_name": ""
    }
}
It returns a device_id and ph_id when status is ENROLLED. This is required for the user-friendly name Step 5.
Step 5: Complete Enrollment
The final step is to allow the user to set a user-friendly name.
curl 'https://domain/verification-srv/v2/setup/users/configured/update/devicename' \
  -X 'PUT' \
  -H 'accept: application/json, text/plain, */*' \
  -H 'authorization: Bearer eyJhbGciOiJSUxxfdKh5Za4y-b2nU65v4egHW6RQ' \
  -H 'content-type: application/json' \
  --data-raw '{"device_id":"a4be5075824dfc9ebfcea962f3188097c","friendly_name":"My Loved Phone","id":"da552e03-cfc2-4461-92d3-f05b5e488a6c","ph_id":"215dc05f9-8615-4795-a7b5-72dd58917539","sub":"15a12925c-40d9-4972-b2e2-bd7ef8fe5b05"}' \
  --compressed
Need Support?
Please contact us directly on our support page
Step 1: Allow FIDO2 in your Instance
In you Verification Setup you need to allow that FIDO2 is enabled. To do this, you can your existing setup, navigate to Multifactor Settings > Enable FIDO2.
Step 2: Present Verification Methods
The first page for enrollment should present all verification methods available.
You can use the following query to retrieve the available methods.
curl 'https://domain/verification-srv/config/list' \
  -H 'Authorization: Bearer eyJhbGciOiJxxx2Og' \
  -H 'cache-control: no-cache' \
  -H 'content-type: application/json' \
  --compressed
The API returns all available methods as an array:
[
  {
      "verificationType": "FIDO2",
      "active":true
  },
  {
      "verificationType": "TOUCHID",
      "active": true,
  },
]
It returns a verificationType which can be used as input variable (path parameter) for the API in Step 3.
Step 3: Initiation of Enrollment
To start the enrollment of FIDO2, the initiate API needs to be called. To support cross domain authentication, pass domainURL in the request body, but this domainURL should be specified in the cidaas tenant level allowed_domains settings
The CURL command to initiate the enrollment will accept fido2 as path parameter. Thereby you are defining the method to configure. Based on the token the user will be identified.
curl 'https://domain/verification-actions-srv/setup/fido2/initiation' \
  -H 'accept: application/json, text/plain, */*' \
  -H 'accept-language: en-US,en;q=0.9' \
  -H 'authorization: Bearer eyJhbGciOiJSUzI1NiIsImtpZCI6ImRiMDxxxH3CCQAZ246TjbEZvqQkNy_CM9YARxW7geGevv2Og' \
  -H 'content-type: application/json' \
  --data-raw '{"domainURL",:"https://yourcidaasdomain.de","deviceInfo":{"deviceId":"","location":{"lat":"","lon":""}}}' \
  --compressed
After initiating the FIDO2 registration process, a popup will appear on your screen to guide you through the configuration of your FIDO2 authenticator. This popup serves as a user-friendly interface to ensure a smooth setup experience.
The response from the API contains exchange_id, sub which is required as input.
{
"success": true,
"status": 200,
"data": {
"exchange_id": {
"exchange_id": "455fd20d-837d-43a6-a212-a02eeea1a46b",
"expires_at": "2024-01-10T20:45:51.781Z"
},
"sub": "6837c08e-d748-4091-8d8e-a3e24f30e0f8",
"status_id": "710792ba-32f9-4d2d-8584-fefa3a6d94b8",
"fido2_entity": {
"type": "LOGIN",
"fidoRequestId": "string",
"server_challenge": {
"challenge": "string",
"rp": {
"id": "string",
"name": "string"
},
"user": {
"id": "string",
"name": "string",
"displayName": "string"
},
"authenticatorSelection": {
"requireResidentKey": false,
"userVerification": "discouraged"
},
"attestation": "none",
"pubKeyCredParams": [
{
"type": "public-key",
"alg": -7
}
]
}
}
}
}
Step 4: Complete Enrollment
When calling the enrollment API from the website. A popup appears on the user's mobile device, prompting them to allow the enrollment.
The CURL command for enrolling Fido2
Request
curl --location 'https://domain/verification-actions-srv/setup/fido2/verification' \
--header 'authorization: Bearer eyJhbGciOiJSUzI1NiIsImtpZCI6ImRiMDZhMTQyLTdmYTYtNGYyMy1hMmNhLWNhYjk4ZGMwN' \
--header 'content-type: application/json' \
--data '{
    "sub": "15a12925c-40d9-4972-b2e2-bd7ef8fe5b05",
    "exchange_id": "07c3f156-219a-4a7c-9c9e-aaa9e6fdc460",
    "fido2_client_response": {
        "client_response": {
            "authenticatorAttachment": "cross-platform",
            "rawId": "AfwJQWEy_fS_GzOjUMl-bnDKBhBMFhvTZgRyK1MYA9EZELp9zrNuVgUwR7T3wlXNTykToR7DEmmuXFKqr3lPgKc",
            "response": {
                "attestationObject": "o2NmbXRkbm9uZWdhdHRTdG10oGhhdXRoRGF0YVjF8o9v9zxNbuQvD0LKzEZ"
            },
            "id": "AfwJQWEy_fS_GzOjUMl-bnDKBhBMFhvTZgRyK1MYA9EsZELp9zrNuVgUwR7T3wlXNTykToR7DEmmuXFKqr3lPgKca",
            "type": "public-key"
        },
        "fidoRequestId": "e29070dc-6448-41fd-9449-e445ca6a88831"
    }
}'
Response
{
    "success": true,
    "status": 200,
    "data": {
        "exchange_id": {
            "exchange_id": "13d684206-42c3-4bb1-bc37-0e3188f4d5d9",
            "expires_at": "2024-01-16T10:57:16.635Z",
            "_id": "00721c72-1f03-4d84-b96d-61589847e436",
            "id": "00721c72-1f03-4d84-b96d-61589847e436"
        },
        "sub": "15a12925c-40d9-4972-b2e2-bd7ef8fe5b05",
        "status_id": "16e24c6f7-f271-4e9f-9dbb-ef0872598beb",
        "ph_id": "215dc05f9-8615-4795-a7b5-72dd58917539",
        "device_id": "a4be5075824dfc9ebfcea962f3188097c",
        "friendly_name": ""
    }
}
It returns for a device_id and ph_id when status is ENROLLED. This is required for the user-friendly name Step 5.
Step 5: Set Device Name
The final step is to allow the user to set a user-friendly name.
curl 'https://domain/verification-srv/v2/setup/users/configured/update/devicename' \
  -X 'PUT' \
  -H 'accept: application/json, text/plain, */*' \
  -H 'authorization: Bearer eyJhbGciOiJSUxxfdKh5Za4y-b2nU65v4egHW6RQ' \
  -H 'content-type: application/json' \
  --data-raw '{"device_id":"a4be5075824dfc9ebfcea962f3188097c","friendly_name":"My Loved Phone","id":"da552e03-cfc2-4461-92d3-f05b5e488a6c","ph_id":"215dc05f9-8615-4795-a7b5-72dd58917539","sub":"15a12925c-40d9-4972-b2e2-bd7ef8fe5b05"}' \
  --compressed

---